1. Introduction
This manual provides essential information for the proper installation, operation, and maintenance of your StrongArm 4806 Rear Hatch Lift Supports. These gas-charged lift supports are designed to replace original equipment on Nissan 200SX models from 1984 to 1988, ensuring reliable support for your vehicle's rear hatch.
2. Safety Information
- Always ensure the hatch is securely supported by a prop rod or another person before attempting to remove or install lift supports. Failure to do so can result in serious injury.
- Wear appropriate personal protective equipment, including safety glasses and gloves, during installation.
- Gas-charged lift supports are under high pressure. Do not puncture, heat, or attempt to disassemble them.
- Keep hands and fingers clear of pinch points when operating the hatch after installation.
3. Package Contents
Your StrongArm 4806 package includes:
- Two (2) StrongArm 4806 Rear Hatch Lift Supports

Image: The StrongArm 4806 product packaging and the two included gas-charged lift supports.
4. Compatibility
These lift supports are compatible with the following vehicle:
- Make: Nissan
- Model: 200SX
- Years: 1984, 1985, 1986, 1987, 1988
- Position: Rear Hatch
They are designed to replace OEM part numbers including, but not limited to: 95219, 10809, 4806, 72686, 8195396, 8518IM, 901008, B95219, SG125003.

Image: A diagram illustrating common locations for lift supports on a vehicle, including the hatch/liftgate, glass, and hood.
5. Installation Instructions (Setup)
Installation can typically be completed in minutes with simple hand tools. Refer to your vehicle's service manual for specific instructions if needed.
Tools Required:
- Small flat-head screwdriver (for removal)
- Hatch prop rod or assistance from another person
Procedure:
- Secure the Hatch: Open the rear hatch and securely support it using a prop rod or have another person hold it firmly in the fully open position. This is critical for safety.
- Remove Old Support: Using a small flat-head screwdriver, carefully pry off the retaining clips on both ends of the old lift support where it connects to the ball studs. Once the clips are disengaged, pull the old support off the ball studs.
- Install New Support: Align the new StrongArm lift support with the ball studs. Push the ends of the new support onto the ball studs until they snap into place. Ensure the retaining clips are fully engaged.
- Repeat for Second Support: Repeat the process for the second lift support. It is recommended to replace both supports simultaneously to ensure balanced operation and longevity.
- Test Operation: Carefully remove the prop rod or release the hatch. Slowly close and open the hatch to confirm proper function and smooth operation.
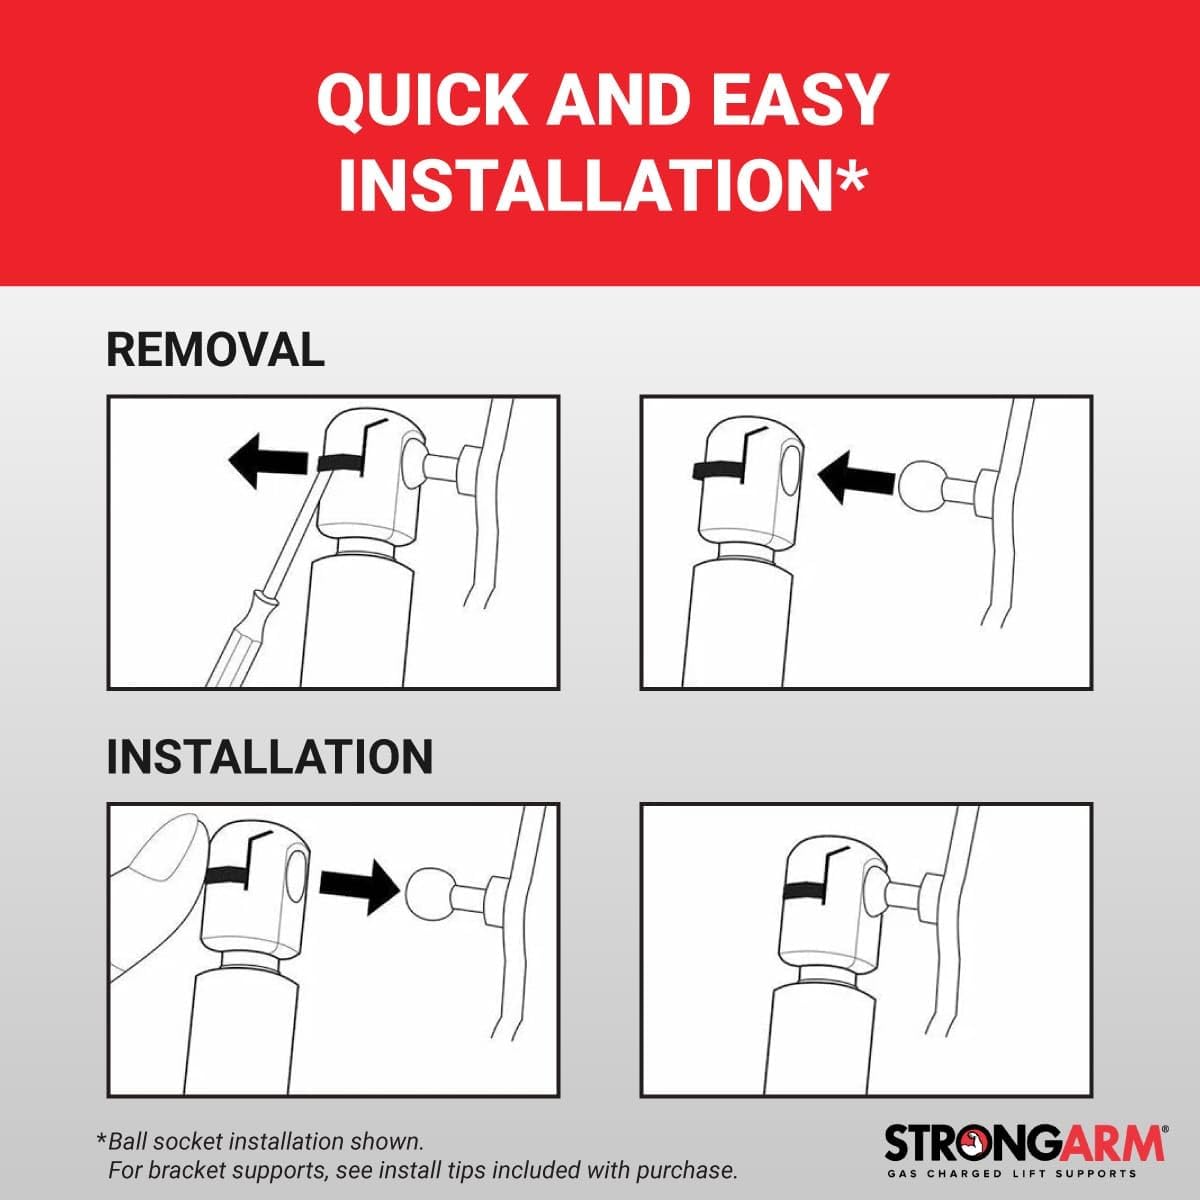
Image: A visual guide demonstrating the removal of an old ball socket lift support using a screwdriver and the installation of a new one by pushing it onto the ball stud.
6. Operation (Usage)
Once installed, your StrongArm 4806 lift supports will provide smooth and consistent assistance when opening and holding your vehicle's rear hatch. They are engineered for:
- Smooth, Quiet Motion: Designed to operate without excessive noise or jerky movements.
- Consistent Performance: Patented temperature compensation module valves ensure reliable operation across various weather conditions.
- Secure Holding: The gas charge maintains the hatch in its open position, preventing accidental closure.

Image: A graphic highlighting key features of StrongArm lift supports: smooth, quiet motion; built for long-lasting performance; and engineered to match OEM specifications.
7. Maintenance
StrongArm lift supports are designed for minimal maintenance. To ensure optimal performance and longevity:
- Keep Clean: Periodically wipe down the piston rod with a clean, damp cloth to remove dirt and debris. Avoid using abrasive cleaners.
- Inspect Connections: Regularly check the connection points (ball studs and sockets) for any signs of wear, corrosion, or looseness.
- Avoid Damage: Do not paint the piston rod or apply any lubricants to it, as this can interfere with the seal and operation. Avoid bending or scratching the rod.
8. Troubleshooting
If you experience issues with your lift supports, consider the following:
- Hatch Not Holding Open: This typically indicates worn-out lift supports. If only one was replaced, the other might be failing. It is recommended to replace both supports simultaneously.
- Hatch Difficult to Close: New lift supports can sometimes be stiff initially. Ensure they are fully seated on the ball studs. If the issue persists, verify that the correct part number was installed for your vehicle.
- Squeaking or Grinding Noise: Check the ball stud connections for proper seating and cleanliness. A small amount of silicone grease can be applied to the ball studs (not the piston rod) if noise persists, but ensure it does not interfere with the retaining clips.
9. Specifications
- Model Number: 4806
- Extended Length (Center Mount to Center Mount): 29.52 inches
- Item Weight (per support): Approximately 8 ounces
- Product Dimensions (per support): Approximately 29.52 x 2 x 2 inches
- Manufacturer Part Number: 4806
- Position: Rear Hatch

Image: The StrongArm brand logo emphasizing OEM replacement quality and genuine parts.
10. Warranty and Support
StrongArm products are manufactured to high-quality standards. For specific warranty information or technical support, please refer to the documentation included with your purchase or visit the official StrongArm website. Keep your proof of purchase for any warranty claims.


