
1. Introduction
Thank you for choosing the T-SUN Solar Spotlights. This manual provides detailed instructions for the proper installation, operation, and maintenance of your solar-powered outdoor spotlight. Please read this manual thoroughly before use to ensure optimal performance and longevity of your product.
2. Product Components
Before installation, please verify that all components are present:
- Solar light fixture (1 unit)
- Separate solar panel (1 unit)
- Ground stakes (for light and solar panel)
- Screws and anchors (for wall mounting)
- Built-in Lithium Ion battery (pre-installed)

Image: Overview of the T-SUN Solar Spotlight system, showing the spotlight, separate solar panel, connecting cable, and ground stakes.
3. Specifications
| Brand | T-SUN |
| Model Number | TS-S4201-30 |
| Color | Warm White |
| Material | Aluminum, Acrylonitrile Butadiene Styrene, Shell |
| Power Source | Solar Powered |
| Water Resistance Level | IP65 Waterproof |
| Brightness | 100-120 Lumen |
| Solar Panel Efficiency | Up to 17% |
| Product Dimensions | 6.9"L x 6.1"W x 3.7"H |
| Battery | 1 Lithium Ion battery (included) |

Image: Diagram illustrating the dimensions of the solar panel and the spotlight fixture.
4. Setup and Installation
The T-SUN Solar Spotlight offers two primary installation methods: ground stake or wall mount.
4.1 Choosing an Installation Location
- Select a location for the solar panel that receives at least 6-8 hours of direct sunlight daily to ensure full charging.
- Avoid placing the solar panel under trees, eaves, or other obstructions that may block sunlight.
- Ensure the spotlight is positioned to illuminate your desired area effectively.
4.2 Ground Installation
- Attach the ground stake to the bottom of both the solar panel unit and the spotlight fixture.
- Firmly insert the ground stakes into soft ground in your chosen locations. Ensure the solar panel is angled towards the sun.
- Connect the cable from the solar panel to the spotlight fixture. Ensure the connection is secure.
4.3 Wall-Mounted Installation
- Mark the desired mounting points on the wall for both the solar panel and the spotlight fixture.
- Drill pilot holes at the marked locations.
- Insert the provided anchors into the pilot holes.
- Secure the mounting brackets of the solar panel and spotlight to the wall using the provided screws.
- Adjust the angle of the solar panel to maximize sun exposure and the spotlight to direct light as needed.
- Connect the cable from the solar panel to the spotlight fixture.
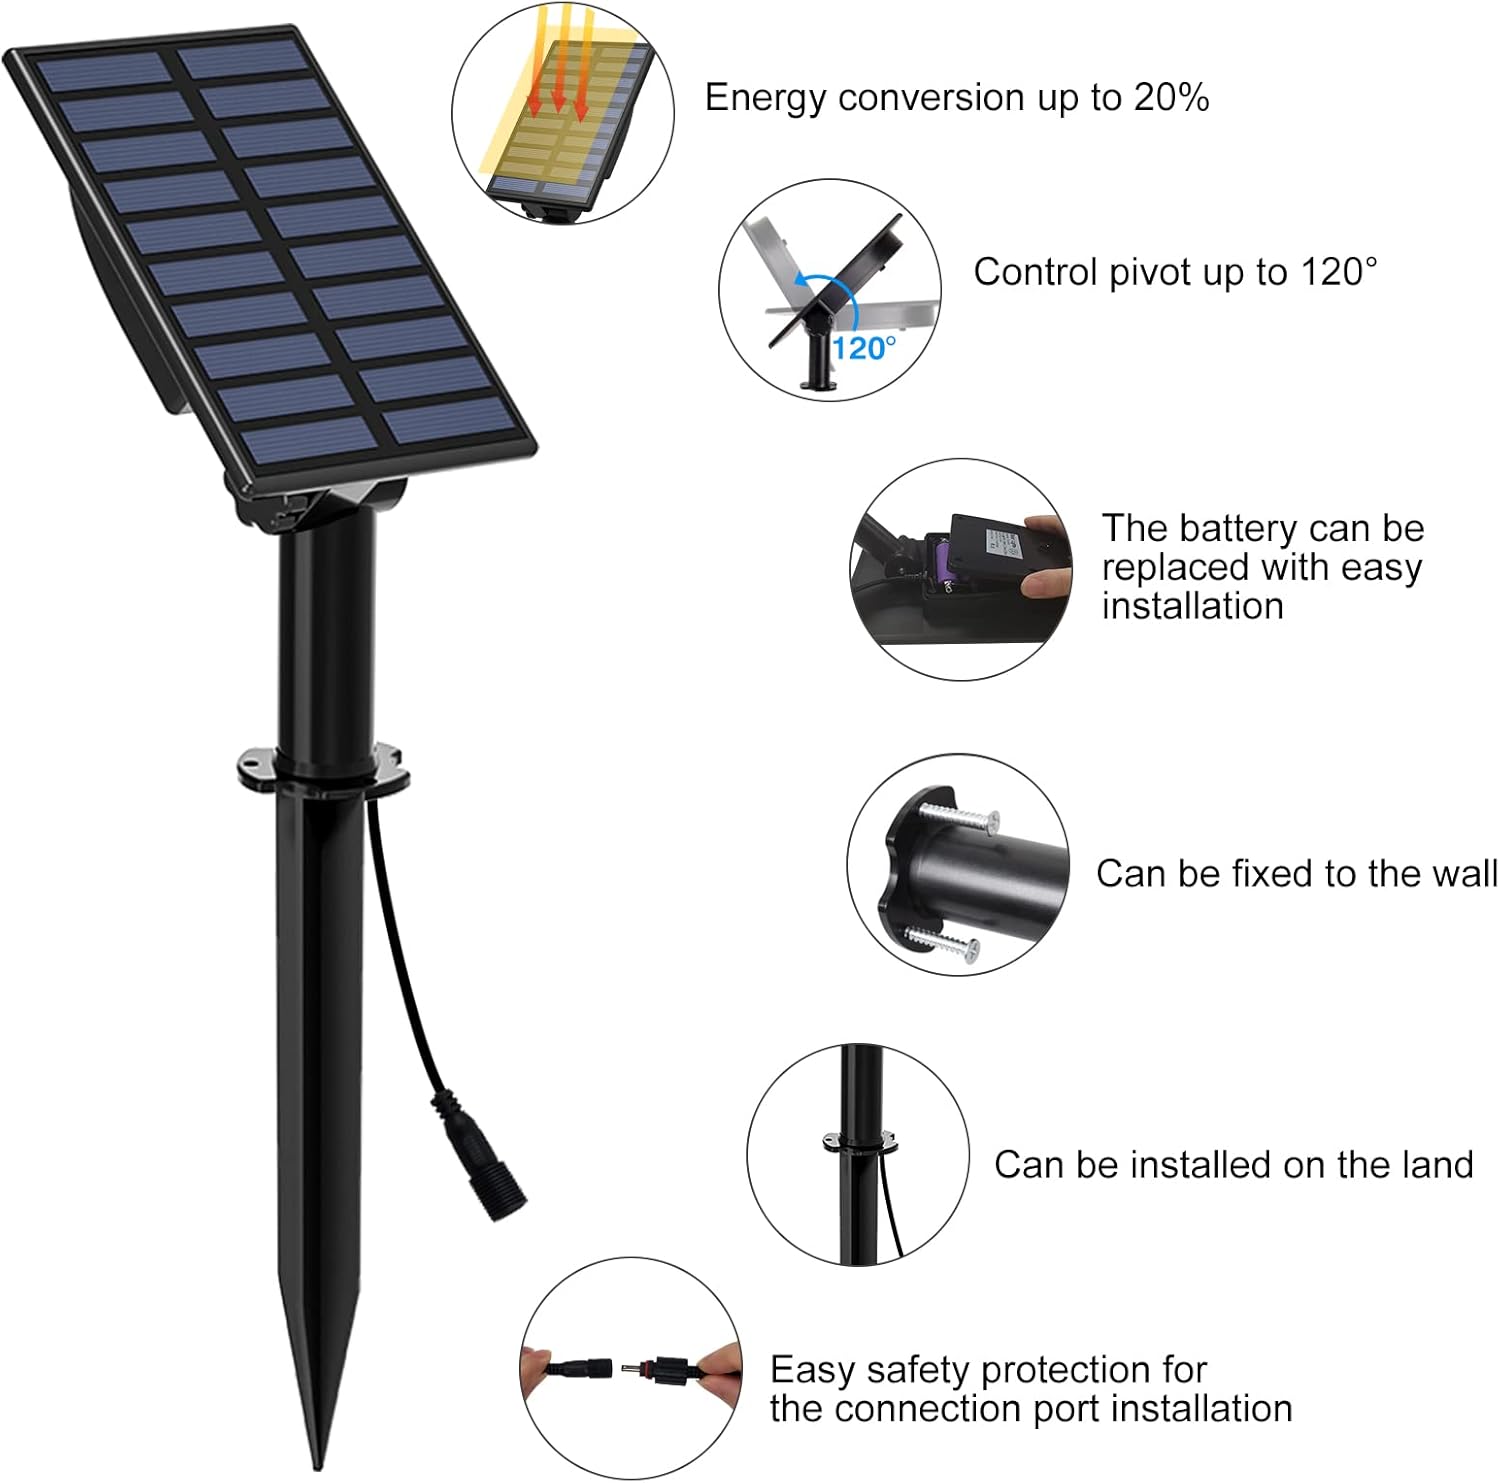
Image: Visual guide demonstrating both ground stake and wall-mounted installation options for the solar spotlight and panel.

Image: Illustrates the adjustable pivot points for the solar panel (up to 120°) and light head, along with various installation methods and the battery replacement feature.
5. Operating Instructions
Your T-SUN Solar Spotlight is designed for automatic and efficient operation.
5.1 Automatic Operation
- The solar panel will automatically charge the built-in battery during daylight hours when exposed to sunlight.
- At night, the spotlight will automatically turn on, utilizing the stored energy.

Image: Depicts the automatic charging process during the day and automatic illumination at night for the solar spotlight.
5.2 Lighting Modes
The spotlight features two lighting modes: High and Low.
- High Light Mode: Provides maximum brightness for approximately 8 hours after a full charge.
- Low Light Mode: Provides reduced brightness for approximately 12 hours after a full charge.
To switch between modes, locate the power button on the back of the spotlight head. Press the button once to cycle between High, Low, and Off. The light will remember the last selected mode.

Image: Illustration showing the difference between High and Low lighting modes and their approximate duration.
5.3 Adjusting Light and Panel Angles
- The solar panel can be adjusted up to 90 degrees vertically to optimize sun exposure.
- The spotlight head can be adjusted up to 180 degrees to direct light precisely where needed.
6. Maintenance
Regular maintenance ensures the optimal performance and lifespan of your solar spotlight.
- Cleaning the Solar Panel: Periodically wipe the solar panel with a soft, damp cloth to remove dust, dirt, leaves, or snow. A clean panel ensures maximum sunlight absorption.
- Battery Replacement: The built-in Lithium Ion battery is designed for long-term use. If the light duration significantly decreases over time, the battery may need replacement. Refer to the product specifications for battery type and consult a qualified technician or the manufacturer for replacement instructions.
- General Inspection: Regularly check all connections and mounting points to ensure they are secure.
7. Troubleshooting
If your T-SUN Solar Spotlight is not functioning as expected, please refer to the following common issues and solutions:
| Problem | Possible Cause | Solution |
|---|---|---|
| Light does not turn on at night. | Insufficient solar panel charging. | Ensure the solar panel is in a location receiving 6-8 hours of direct sunlight daily. Clean the solar panel surface. |
| Light duration is shorter than expected. | Incomplete charging or aging battery. | Verify solar panel placement for maximum sun exposure. Consider replacing the battery if it's old. |
| Light flickers or is dim. | Low battery charge or dirty solar panel. | Allow the solar panel to charge fully. Clean the solar panel. |
| Light turns off prematurely. | External light source interfering with sensor. | Ensure the solar panel is not exposed to other light sources (e.g., streetlights, porch lights) at night, as this can trick the sensor into thinking it's daytime. |

Image: Visual representation of common issues and solutions, such as avoiding shade, streetlights, and ensuring proper ground installation.
8. Safety Information
- This product is designed for outdoor use only. Do not use indoors.
- Keep out of reach of children.
- Do not attempt to disassemble or modify the product, as this may void the warranty and pose safety risks.
- Dispose of batteries according to local regulations.
- Avoid direct eye exposure to the LED light.
9. Warranty and Support
T-SUN products are manufactured to high-quality standards. For warranty information or technical support, please refer to the product packaging or contact the seller directly through your purchase platform. Please have your model number (TS-S4201-30) and purchase date available when contacting support.