1. Introduction
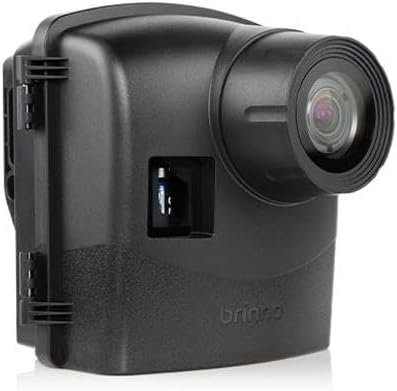
The Brinno ATH2000 is an IPX5-rated weatherproof housing designed to protect your Brinno time-lapse camera from environmental elements and extend its operational battery life. This housing is suitable for long-term outdoor projects, providing enhanced durability and power supply for continuous recording.
2. Package Contents
Verify that all items listed below are included in your package:
- ATH2000 Housing Unit
- Camera Mounting Adapter
- Battery Slot (for 16 AA batteries)
- Extension Lens Cover (for Brinno BCS lenses)
- Desiccant Pack
- Screwdriver
- USB-C Adapter
- Strap (x2)

3. Compatibility
The Brinno ATH2000 Weatherproof Housing is compatible with the following Brinno time-lapse camera models:
- TLC2020
- TLC2000
- TLC200
- TLC200 Pro
- TLC120
- TLC130

4. Key Features
- IPX5 Weather Resistance: Provides protection against water jets from any direction, making it suitable for outdoor use in various weather conditions including rain and snow.
- Extended Battery Life: Accommodates up to 16 additional AA batteries, significantly extending the camera's operational time up to one year, depending on camera settings and usage.
- Lens Compatibility: Includes an extension lens cover to allow the use of Brinno BCS lenses for specialized close-up or wide-angle shots.
- Adjustable Mounting: Features an adjustable camera mounting adapter to securely fit various compatible Brinno TLC cameras.
- External Device Access: Equipped with a cord hole for connecting external devices such as solar panels, further extending power options.
- Security Features: Includes eyelets for padlocks or other security devices to deter theft.
5. Assembly and Installation
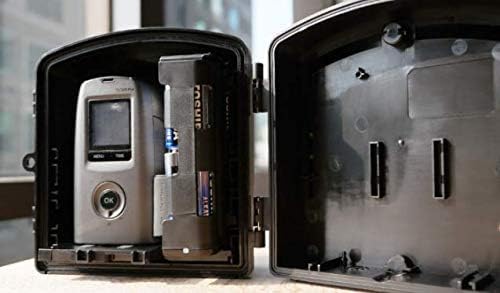
- Prepare the Camera: Ensure your Brinno time-lapse camera is configured with desired settings and has its internal batteries installed (if applicable).
- Install Additional Batteries: Open the battery slot module. Insert up to 16 AA batteries, ensuring correct polarity. Connect the power cable from the battery module to the camera's power input.
- Place Desiccant: Place the desiccant pack inside the housing to absorb moisture and prevent fogging.
- Mount the Camera: Attach your Brinno camera to the adjustable camera mounting adapter. Secure the adapter with the camera inside the ATH2000 housing. Ensure the camera lens aligns with the housing's lens opening.
- Attach Extension Lens Cover (Optional): If using a Brinno BCS lens, attach the extension lens cover to the housing's front opening.
- Close and Seal the Housing: Carefully close the housing, ensuring the rubber gasket is properly seated to maintain the IPX5 seal. Secure the latches firmly.
- Mount the Housing: Use the provided bungee cords or a compatible tripod/clamp (not included) with the housing's tripod socket to mount it in your desired location. Ensure the mounting is stable and secure.
6. Operation
Once the camera is securely installed within the ATH2000 housing and powered, its operation is governed by the camera's own settings and controls. The housing primarily provides protection and extended power.
- Battery Monitoring: Periodically check the camera's battery indicator (if available) or estimate remaining life based on your camera's power consumption and the 16 AA batteries.
- External Power: If using an external power source like a solar panel, ensure it is properly connected to the housing's cord hole and the camera's power input.
- Accessing Camera: To access the camera's controls, memory card, or internal batteries, you must unmount and open the ATH2000 housing.
7. Maintenance
- Cleaning: Clean the exterior of the housing and the lens cover with a soft, damp cloth. Avoid abrasive cleaners that could scratch the surface or damage the seal.
- Desiccant Replacement: The desiccant pack absorbs moisture over time. Replace it periodically, especially in humid environments, to prevent internal fogging. The frequency depends on environmental conditions.
- Seal Inspection: Regularly inspect the rubber gasket around the housing's opening for any signs of wear, cracks, or damage. A compromised gasket can lead to water ingress.
- Battery Check: When replacing batteries, ensure no corrosion is present in the battery compartment. Clean any corrosion with a cotton swab and rubbing alcohol.
8. Troubleshooting
| Problem | Possible Cause | Solution |
|---|---|---|
| Blurred or Smudged Images | Lens cover misalignment; internal fogging; dirty lens cover. | Ensure the camera lens is perfectly aligned with the housing's lens opening. Replace desiccant. Clean the exterior and interior of the lens cover. |
| Camera Not Powering On | Dead batteries; incorrect battery installation; loose power connection. | Replace all AA batteries. Verify correct battery polarity. Check the power cable connection between the battery module and the camera. |
| Water Inside Housing | Improperly sealed housing; damaged gasket. | Ensure latches are fully secured and the housing is closed correctly. Inspect the rubber gasket for damage and replace if necessary. |
| Short Battery Life | Low quality batteries; extreme temperatures; camera settings. | Use high-quality alkaline or lithium AA batteries. Battery performance can decrease in cold weather. Review camera settings for optimal power consumption. |
9. Technical Specifications
| Specification | Detail |
|---|---|
| Model Name | Brinno ATH2000 Outdoor Camera Housing Unit |
| Water Resistance Level | IPX5 (Waterproof) |
| Material | Plastic |
| Color | Black |
| Item Dimensions (D x W x H) | 7.09" x 6.3" x 5.12" (18cm x 16cm x 13cm) |
| Item Weight | 454 Grams |
| Battery Support | 16 x AA batteries (for extended power) |
| Mounting Type | Strap mount, Tripod socket |
| Compatible Devices | TLC2020, TLC2000, TLC200, TLC200 Pro, TLC120, TLC130 |
10. Warranty and Support
The Brinno ATH2000 Weatherproof Housing comes with a 1-year Limited Manufacturer's Warranty. This warranty covers defects in materials and workmanship under normal use.
For warranty claims, technical support, or further assistance, please contact Brinno customer service or visit the official Brinno website. Keep your purchase receipt as proof of purchase.
Manufacturer: Brinno Incorporated c/o Phase 3 Systems Corporation


