
Introduction
This manual provides detailed instructions for the installation, operation, and maintenance of your LogiLink E20270 Adjustable Under-Desk and Wall PC Mount. Please read this manual thoroughly before installation and use to ensure proper function and safety.

Image: LogiLink E20270 PC mount installed under a wooden desk, holding a black desktop computer tower. This mount helps elevate your PC, protecting it from dust and accidental damage.
Safety Information
- Ensure the mounting surface (desk or wall) can safely support the weight of the mount and the PC (up to 10 kg).
- Use appropriate tools and follow all installation steps carefully to prevent injury or damage.
- Do not exceed the maximum weight capacity of 10 kg (22 lbs).
- Keep children and pets away from the installation area.
- Regularly check all screws and connections to ensure they remain secure.
Package Contents
Please verify that all components are present before beginning installation:
- LogiLink E20270 PC Mount Assembly
- Mounting Hardware (screws, anchors, washers, drill attachment if applicable)
- User Manual (this document)
Note: Specific mounting hardware may vary. Ensure you have the correct tools for your chosen installation surface.
Specifications
| Feature | Specification |
|---|---|
| Brand | LogiLink |
| Model Name | E20270 |
| Material | Metal |
| Color | Black |
| Installation Type | Under-desk, Wall Mount |
| Maximum Weight Capacity | 10 kg (22 lbs) |
| Adjustable Height Range | 300 - 533 mm |
| Adjustable Width Range | 88 - 203 mm |
| Rotation | 360 degrees |
| Sliding Mechanism | Up to 325 mm for accessibility |
| Product Dimensions (approx.) | 17.5 x 10.5 x 59.2 cm (L x W x H) |
Note: The product weight listed in some specifications (9.07g) appears to be a typographical error. The mount is constructed from metal and designed to hold up to 10 kg, indicating a substantial build.
Setup and Installation
The LogiLink E20270 PC mount offers versatile installation options: under a desk or on a wall. Choose the method that best suits your workspace.
1. Prepare the Mount
- Unpack all components and verify against the package contents list.
- Adjust the mount's width to fit your PC tower. Loosen the adjustment screws, slide the sides to the desired width (88-203 mm), and tighten securely.
- Adjust the mount's height to fit your PC tower. Loosen the adjustment screws, slide the bottom support to the desired height (300-533 mm), and tighten securely.

Image: Close-up of the mount's adjustable components. Ensure all adjustments are securely fastened before mounting.
2. Choose Installation Method
Refer to the diagram below for visual guidance on under-desk and wall mounting options, including key dimensions.
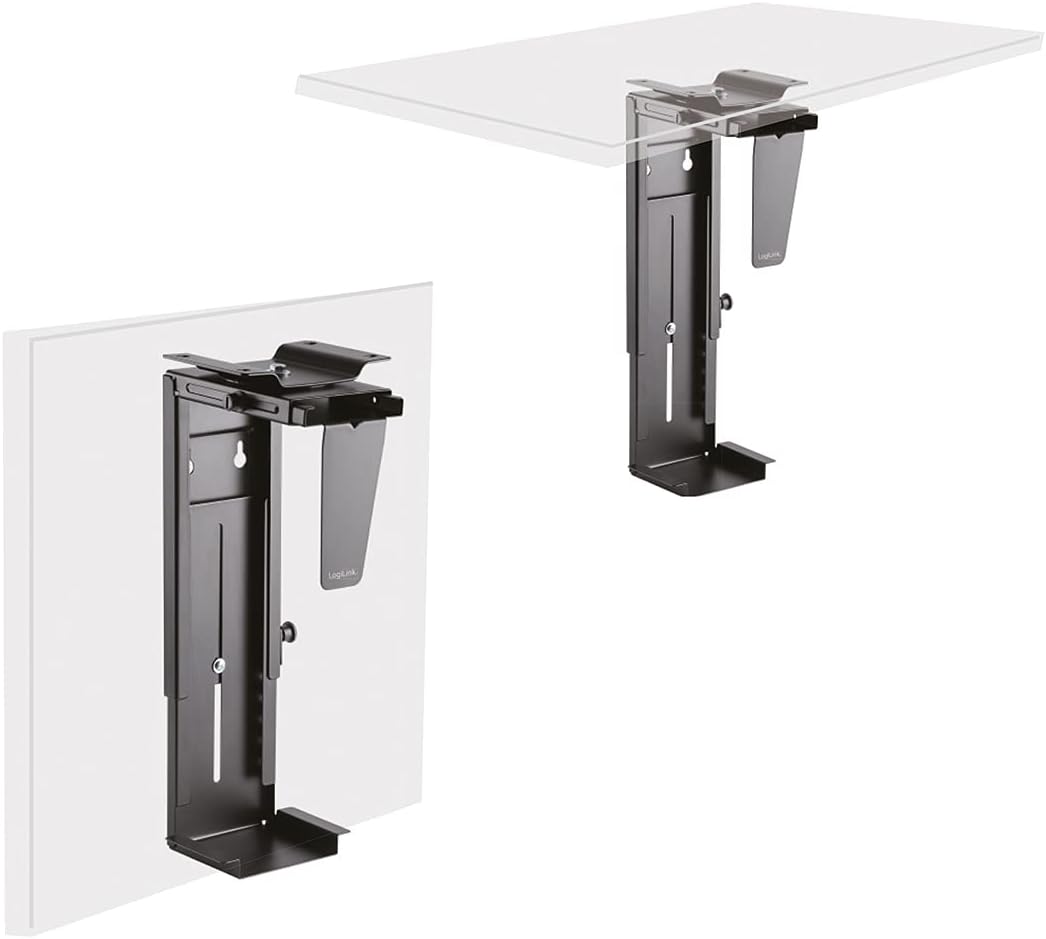
Image: Illustration of the LogiLink E20270 mount configured for under-desk and wall installation.
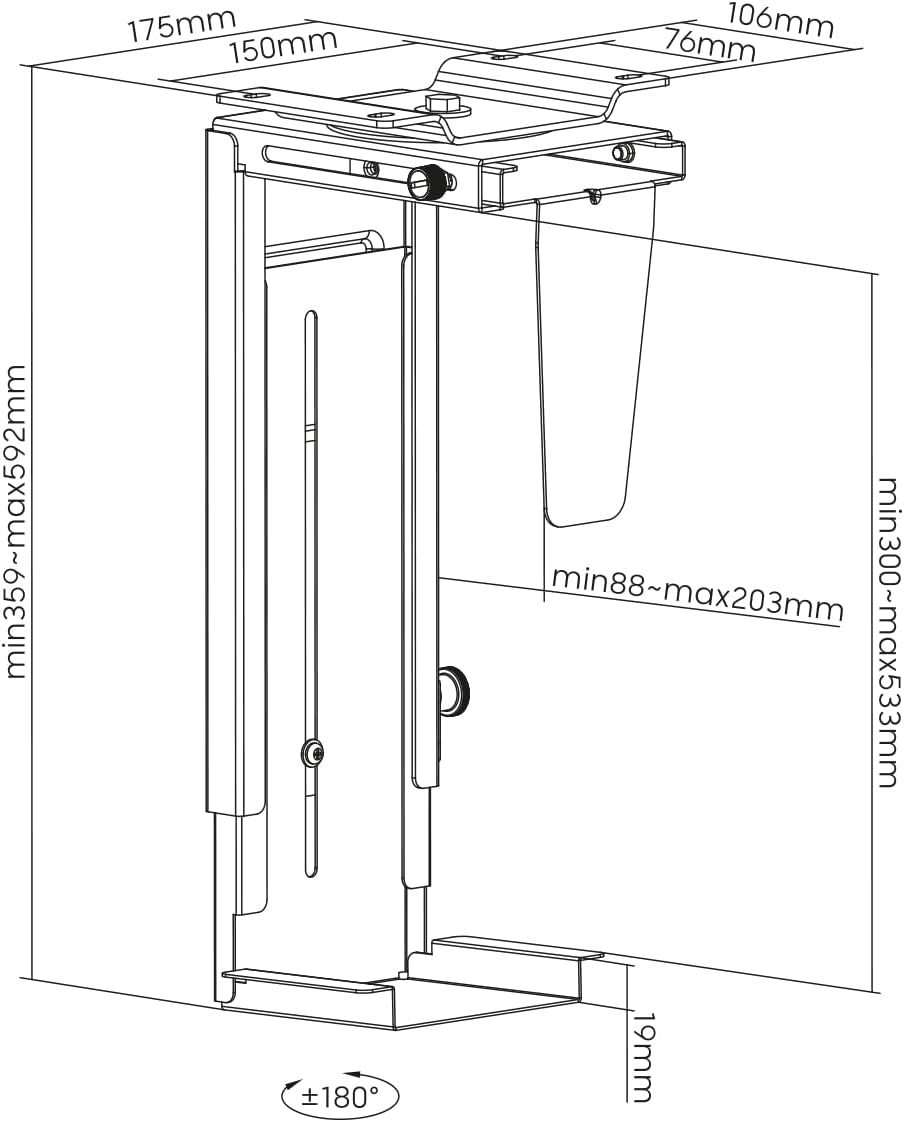
Image: Dimensional diagram of the LogiLink E20270 PC mount, showing adjustable ranges and mounting points.
Under-Desk Installation:
- Position the mount under your desk in the desired location. Ensure there is enough clearance for PC ventilation and rotation.
- Mark the drilling points through the mounting holes on the top plate of the mount.
- Drill pilot holes into the underside of the desk using an appropriate drill bit (refer to the drill attachment if provided, or use a bit suitable for your screws and desk material).
- Secure the mount to the desk using the provided screws. Ensure all screws are tightened firmly.
Wall Mount Installation:
- Select a sturdy wall location that can support the weight of the mount and your PC. Avoid areas with electrical wires or plumbing.
- Hold the mount against the wall in the desired position and mark the drilling points. Use a level to ensure it is straight.
- Drill holes at the marked points. Insert wall anchors if necessary (for drywall or masonry).
- Secure the mount to the wall using the provided screws. Ensure all screws are tightened firmly.
3. Install Your PC
- Carefully slide your PC tower into the adjusted mount.
- Ensure the PC is seated firmly and evenly within the mount.
- Connect all necessary cables (power, display, USB, etc.) to your PC. The sliding mechanism allows for easier access to ports.
Operation
The LogiLink E20270 PC mount is designed for ease of use and accessibility.
- 360-Degree Rotation: The mount allows your PC to rotate 360 degrees, providing easy access to the front and rear ports without needing to remove the PC from the mount. Gently rotate the PC to the desired position.
- Sliding Mechanism: For enhanced accessibility, the mount features a sliding mechanism that allows the PC to extend up to 325 mm from its mounted position. This is particularly useful for connecting cables or performing maintenance.
Maintenance
To ensure the longevity and proper function of your PC mount, follow these simple maintenance guidelines:
- Cleaning: Wipe the mount with a soft, damp cloth to remove dust and dirt. Avoid abrasive cleaners or solvents that could damage the finish.
- Fastener Check: Periodically check all mounting screws and adjustment screws to ensure they are tight and secure. Re-tighten if necessary.
- Weight Limit: Do not overload the mount beyond its 10 kg (22 lbs) capacity.
Troubleshooting
If you encounter any issues with your LogiLink E20270 PC mount, refer to the following common solutions:
- Mount feels unstable:
- Ensure all mounting screws are securely tightened to the desk or wall.
- Verify that the adjustment screws for height and width are firmly tightened around your PC.
- Check that the mounting surface is sturdy enough to support the weight.
- PC does not fit:
- Re-check the adjustable height (300-533 mm) and width (88-203 mm) ranges against your PC's dimensions.
- Ensure the adjustment screws are fully loosened before attempting to adjust.
- Difficulty rotating or sliding:
- Ensure no cables are snagged or obstructing the movement.
- Check for any debris in the sliding mechanism.
If problems persist, please contact LogiLink customer support for further assistance.
Warranty and Support
For information regarding warranty coverage, technical support, or replacement parts, please refer to the official LogiLink website or contact their customer service directly. Keep your purchase receipt as proof of purchase.
Official LogiLink Website: www.logilink.eu


