
1. Introduction
This manual provides essential information for the proper setup, operation, and maintenance of your Flysky FS-iA6 2.4G 6-channel receiver. The FS-iA6 is designed for use with various Flysky transmitters, offering reliable signal reception for fixed-wing aircraft, gliders, and helicopters. Please read this manual thoroughly before using the product to ensure safe and efficient operation.
2. Product Overview
The Flysky FS-iA6 is a compact and lightweight 6-channel receiver featuring a dual antenna system for enhanced signal reliability. It operates on the 2.4GHz AFHDS 2A system, providing stable communication between your transmitter and model.

Figure 2.1: Flysky FS-iA6 Receiver with included bind plug.
Key Features:
- 6-channel receiver for versatile control.
- 2.4GHz AFHDS 2A system for reliable and interference-free operation.
- Dual antenna design for improved signal reception and range.
- Compact and lightweight design, suitable for various RC models.
- Compatible with a range of Flysky transmitters.
3. Technical Specifications
| Specification | Value |
|---|---|
| Channels | 6 |
| Model Type | Fixed-Wing/Glider/Helicopter |
| RF Range | 2.4055-2.475GHz |
| RF Channel | 140 |
| RF Receiver Sensitivity | -105dBm |
| Bandwidth | 500KHz |
| 2.4GHz System | AFHDS 2A |
| Modulation Type | GFSK |
| Power Input | 4.0-6.5V DC |
| Antenna Length | 26mm (Dual Antenna) |
| Weight | 7g (0.634 ounces) |
| Dimensions (L*W*H) | 40.4 x 21.1 x 7.35mm |
| i-BUS Port | No |
| Data Acquisition Port | No |
| Color | Black |
| Certifications | CE0678, FCC |
| Package Dimensions | 2.92 x 1.93 x 0.75 inches |
| Item Model Number | C312 |
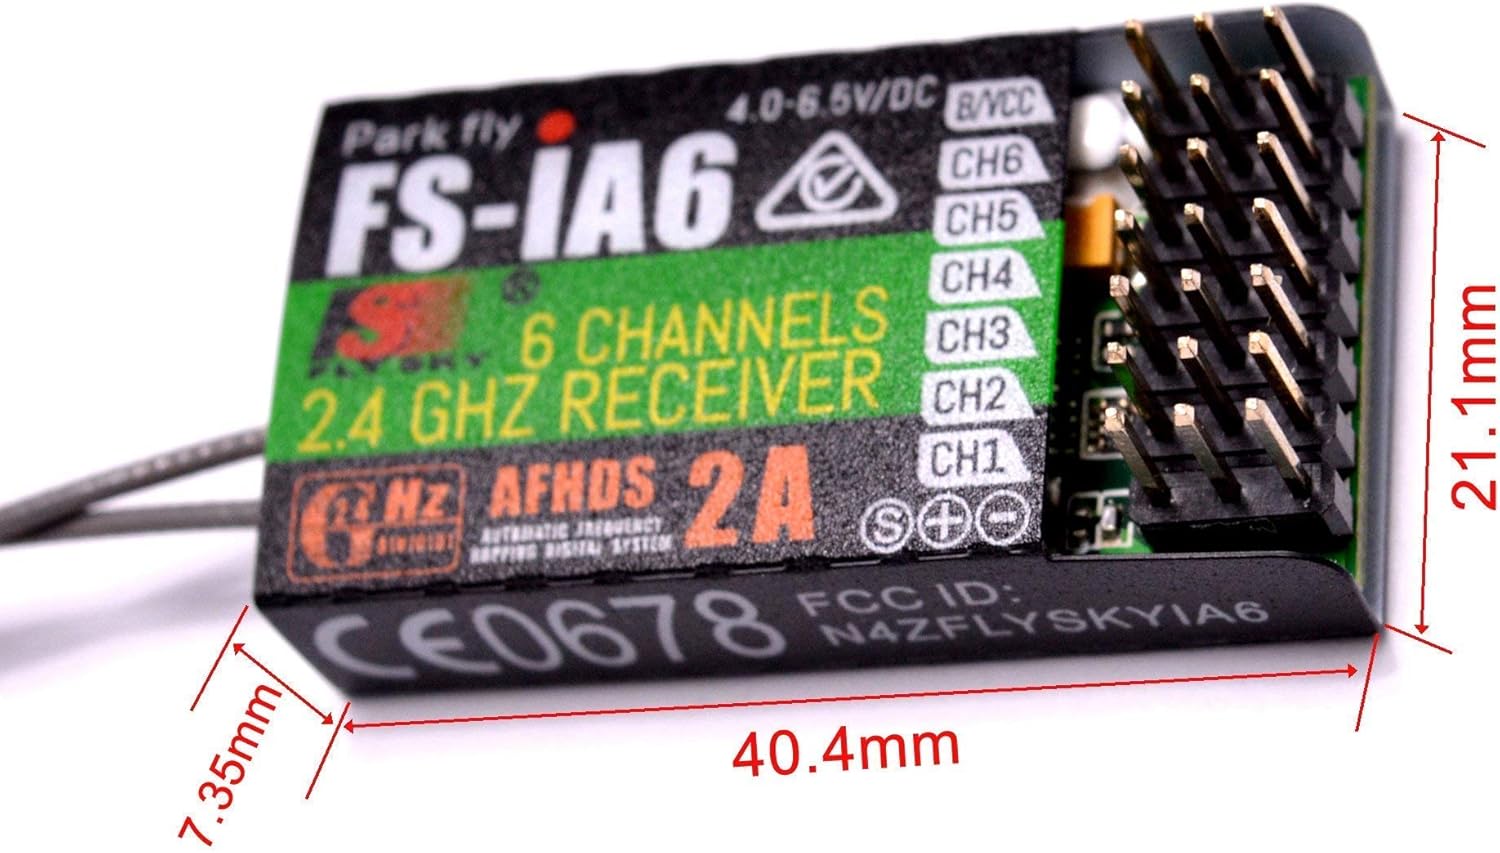
Figure 3.1: Physical dimensions of the FS-iA6 Receiver.
4. Package Contents
Upon opening the package, verify that all items listed below are present and in good condition:
- 1x Flysky FS-iA6 Receiver
- 1x Bind Plug
Figure 4.1: The FS-iA6 Receiver and bind plug as typically packaged.
5. Setup and Binding
5.1 Power Requirements
The FS-iA6 receiver operates on a DC voltage range of 4.0V to 6.5V. Ensure your power source (e.g., ESC's BEC, dedicated receiver battery) provides voltage within this range to prevent damage to the receiver.
5.2 Binding the Receiver to a Transmitter
Binding is the process of linking the receiver to your specific Flysky transmitter. This procedure needs to be performed only once per receiver unless the binding is lost or you wish to bind to a different transmitter.
- Ensure your transmitter is turned OFF.
- Insert the bind plug into the B/VCC port on the FS-iA6 receiver. This port is typically labeled for binding or battery/voltage input.
- Apply power to the receiver (within the 4.0-6.5V DC range). The receiver's LED should start flashing rapidly, indicating it is in binding mode.
- Turn on your Flysky transmitter while holding down the bind button (if applicable) or activating the bind function through the transmitter's menu. Refer to your transmitter's manual for specific binding instructions.
- Once the binding is successful, the receiver's LED will become solid, indicating a stable connection.
- Turn off the receiver's power, then remove the bind plug from the B/VCC port.
- Turn off your transmitter.
- Reconnect power to the receiver (without the bind plug) and then turn on your transmitter. The receiver's LED should illuminate solid, confirming a successful bind. Test all channels to ensure proper operation.

Figure 5.1: Illustration of connecting the bind cable to the receiver's B/VCC port.

Figure 5.2: Visual representation of the binding process, highlighting the dual antennas and 6-channel configuration.
6. Compatible Transmitters
The Flysky FS-iA6 receiver is compatible with a range of Flysky transmitters utilizing the AFHDS 2A protocol. These include, but are not limited to, the following models:
- FS-i4, FS-i6, FS-i6X, FS-i10, FS-i6S
- GT2E, GT2F, GT2G
- TH9X, FS-CT6B, GT3C, CT3C
- FS-IT4S, FS-GT5, FS-TM10

Figure 6.1: Examples of compatible Flysky transmitters.

Figure 6.2: Detailed compatibility chart for Flysky receivers, highlighting the FS-iA6.
7. Operation
Once the receiver is successfully bound to your transmitter and installed in your model, ensure all control surfaces and functions respond correctly to transmitter inputs. Always perform a range check before flying to confirm signal integrity.
7.1 Channel Assignment
The FS-iA6 provides 6 channels. Connect your servos and other components (e.g., ESC, flight controller) to the corresponding channels (CH1-CH6) on the receiver. Standard assignments often include:
- CH1: Aileron
- CH2: Elevator
- CH3: Throttle
- CH4: Rudder
- CH5-CH6: Auxiliary functions (e.g., flaps, landing gear, lights)
Refer to your model's specific requirements and your transmitter's setup for precise channel mapping.
8. Maintenance
Proper maintenance ensures the longevity and reliable performance of your FS-iA6 receiver.
- Keep Clean: Regularly inspect the receiver for dirt, dust, or debris. Use a soft, dry brush or compressed air to clean it. Avoid using liquids.
- Protect from Moisture: The receiver is not waterproof. Protect it from water, humidity, and extreme temperatures. If operating in damp conditions, consider using a waterproof enclosure.
- Antenna Placement: Ensure the dual antennas are positioned at a 90-degree angle to each other and are not obstructed by carbon fiber or metal parts of your model. This optimizes signal reception.
- Secure Mounting: Mount the receiver securely within your model using double-sided foam tape or hook-and-loop fasteners to absorb vibrations.
- Cable Management: Ensure all servo and power cables are securely connected and routed away from moving parts or sources of electrical interference.
- Storage: Store the receiver in a cool, dry place when not in use, away from direct sunlight and extreme temperatures.
9. Troubleshooting
If you encounter issues with your FS-iA6 receiver, refer to the following common problems and solutions:
- Receiver LED not lighting up:
- Check power connection and ensure voltage is within 4.0-6.5V DC.
- Verify power source (battery, ESC BEC) is functioning correctly.
- Receiver LED flashing rapidly (not binding):
- Ensure the bind plug is correctly inserted into the B/VCC port.
- Confirm your transmitter is in binding mode and is compatible with the AFHDS 2A protocol.
- Try moving the transmitter closer to the receiver during the binding process.
- Receiver LED solid, but no control:
- Verify the receiver is bound to the correct transmitter.
- Check all servo and ESC connections to the receiver.
- Ensure the transmitter is turned on and fully charged.
- Perform a power cycle on both the transmitter and receiver.
- Intermittent signal loss or reduced range:
- Check antenna placement; ensure they are not obstructed or damaged.
- Avoid placing the receiver near high-current wires, motors, or ESCs that can generate electrical noise.
- Ensure no other 2.4GHz devices are causing interference in the immediate vicinity.
- Verify the transmitter's battery level.
If problems persist after attempting these solutions, contact customer support.
10. Warranty Information
Specific warranty details for the Flysky FS-iA6 receiver are typically provided at the point of purchase or on the manufacturer's official website. Please retain your proof of purchase for any warranty claims. Generally, warranties cover manufacturing defects but do not cover damage caused by misuse, accidents, unauthorized modifications, or improper installation.
11. Customer Support
For further assistance, technical support, or inquiries regarding your Flysky FS-iA6 receiver, please contact the manufacturer or your authorized dealer. Have your product model number (FS-iA6) and any relevant purchase information ready when contacting support.
Manufacturer: Flysky