
TRONIC SMV9809
TRONIC 3-in-1 Detector SMV9809 User Manual
Model: SMV9809
1. Introduction
Thank you for choosing the TRONIC 3-in-1 Detector, Model SMV9809. This device is designed to detect wood, metal, and live electrical voltage behind walls, ceilings, and floors. Please read this manual thoroughly before using the device to ensure safe and effective operation. Keep this manual for future reference.
2. Safety Instructions
WARNING: Failure to follow these safety instructions may result in electric shock, fire, or serious injury.
- Always assume that live electrical wires are present behind walls. Exercise extreme caution.
- Do not rely solely on the detector to locate live wires. Always turn off power to the area before drilling or cutting.
- The device is designed for indoor use only. Avoid exposure to moisture or extreme temperatures.
- Do not open or modify the device. Repairs should only be performed by qualified personnel.
- Keep the device out of reach of children.
- Clean the device with a dry, soft cloth. Do not use abrasive cleaners or solvents.
3. Product Overview
The TRONIC SMV9809 detector features an LCD display and intuitive controls for easy operation.
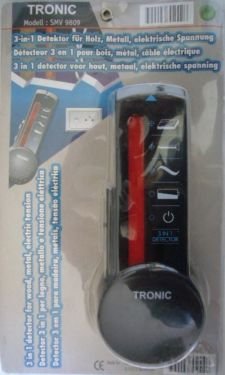
Figure 1: Front view of the TRONIC 3-in-1 Detector SMV9809, showing the LCD screen and control buttons.
3.1 Components
- LCD Display: Shows detection mode, signal strength, and battery status.
- Mode Button: Switches between Wood, Metal, and AC Voltage detection modes.
- Scan Button: Initiates the scanning process.
- Sensor Area: Located on the back of the device, this area must be placed flat against the surface for accurate detection.
- Battery Compartment: Located on the back, for battery installation.
4. Setup
4.1 Battery Installation
The TRONIC SMV9809 requires a 9V battery (not included).
- Open the battery compartment cover on the back of the device.
- Insert a new 9V battery, ensuring correct polarity (+/-).
- Close the battery compartment cover securely.
Note: Replace the battery when the low battery indicator appears on the LCD display.
5. Operating Instructions
5.1 General Operation Tips
- Ensure the surface is dry and free of dust.
- Hold the device flat against the surface. Do not tilt or lift it during scanning.
- Move the device slowly and steadily across the surface.
- Mark the detected areas with a pencil.
5.2 Wood Detection Mode
This mode is used to locate wood studs behind drywall or other common wall materials.
- Press the Mode Button until the "WOOD" indicator appears on the LCD.
- Place the device flat against the wall where you want to start scanning.
- Press and hold the Scan Button. Wait for calibration (a beep may sound).
- Slowly slide the device horizontally across the surface.
- The signal strength indicator on the LCD will increase as you approach a wood stud. A distinct sound and full bar indication will signal the center of the stud.
5.3 Metal Detection Mode
This mode detects ferrous and non-ferrous metals, such as pipes, rebar, or conduit.
- Press the Mode Button until the "METAL" indicator appears on the LCD.
- Place the device flat against the wall.
- Press and hold the Scan Button.
- Slowly slide the device horizontally.
- The signal strength will increase as you approach metal. A continuous tone and full bar indication will signal the presence of metal.
5.4 AC Voltage Detection Mode
CAUTION: This mode detects live, unshielded AC wires. Always confirm power is off before working.
- Press the Mode Button until the "AC" indicator appears on the LCD.
- Place the device flat against the wall.
- Press and hold the Scan Button.
- Slowly slide the device horizontally.
- The signal strength will increase, and an audible alarm will sound when live AC voltage is detected. The "AC" symbol will flash on the display.
6. Maintenance
- Cleaning: Wipe the device with a dry, soft cloth. Do not use liquids or chemical cleaners.
- Storage: Store the device in a dry, dust-free environment at room temperature. Remove the battery if the device will not be used for an extended period.
- Battery Replacement: Replace the 9V battery when the low battery indicator is displayed.
7. Troubleshooting
| Problem | Possible Cause | Solution |
|---|---|---|
| Device does not turn on. | Dead or incorrectly installed battery. | Check battery polarity; replace battery. |
| Inaccurate readings. | Device not calibrated correctly; surface too wet/uneven; interference. | Ensure proper calibration (press and hold scan button on clear area); ensure dry, flat surface; avoid scanning near strong electromagnetic fields. |
| No detection in AC mode. | Wires are shielded or too deep; power is off. | Ensure power is on for the circuit; AC detection depth is limited. |
8. Specifications
- Model: SMV9809
- Detection Modes: Wood, Metal, AC Voltage
- Power Source: 9V Battery (not included)
- Display: LCD
- Material: Plastic
- International Protection Rating: IP66 (Dust tight and protected against powerful jets of water)
- Adjustable Length: Yes
9. Warranty and Support
TRONIC products are manufactured to high-quality standards. For warranty information or technical support, please refer to the documentation provided with your purchase or contact your retailer. Keep your proof of purchase for any warranty claims.
Ask a question about this manual
Ask about setup, troubleshooting, compatibility, parts, safety, or missing instructions. Manuals+ will review the question and use this page’s manual context to help answer it.