
Acctim 71863_SML
Acctim 71863 Sirius Radio Controlled Mantle Clock and Weather Forecast Station User Manual
Model: 71863_SML | Brand: Acctim
Introduction
The Acctim 71863 Sirius is a versatile radio-controlled mantle clock and weather forecast station designed to provide accurate time, indoor and outdoor temperature readings, and weather forecasts. It features a multi-colour display with adjustable brightness, time and temperature projection, a dual alarm with snooze function, a calendar, and a convenient USB charging port. This manual provides detailed instructions for setting up, operating, and maintaining your device.
Safety Information
- Ensure the device is placed on a stable, flat surface to prevent accidental falls.
- Do not expose the unit to extreme temperatures, direct sunlight, or high humidity.
- Keep the device away from strong magnetic fields.
- Use only the provided mains adapter for power.
- Do not attempt to disassemble or repair the unit yourself. Refer all servicing to qualified personnel.
- Keep out of reach of children.
Package Contents
Please check the package contents carefully. If any items are missing or damaged, contact your retailer.
- Acctim 71863 Sirius Main Unit
- Outdoor Temperature Sensor
- Mains Power Adapter
- User Manual (this document)
Product Overview
Familiarize yourself with the main components and controls of your Acctim Sirius clock.
Front View

This image displays the front of the Acctim 71863 Sirius clock, highlighting its large digital display for time, indoor/outdoor temperature, and weather forecast icons. Below the display are the control buttons: MODE, MEM, and the +/- buttons with the radio signal icon.
- Digital Display: Shows time, date, indoor/outdoor temperature, and weather forecast.
- MODE Button: Used to switch between display modes and enter settings.
- MEM Button: Used to recall memory data or confirm settings.
- +/- Buttons: Used to adjust values, change settings, or manually initiate radio control signal search.
Side View (Right)

This image shows the right side of the Acctim 71863 Sirius clock, featuring two ON/OFF switches for Alarm 1 and Alarm 2, and a USB charging port labeled "USB Charger 5V === 1A".
- Alarm 1 ON/OFF Switch: Activates or deactivates the first alarm.
- Alarm 2 ON/OFF Switch: Activates or deactivates the second alarm.
- USB Charge Port (5V === 1A): For charging external devices.
Rear View
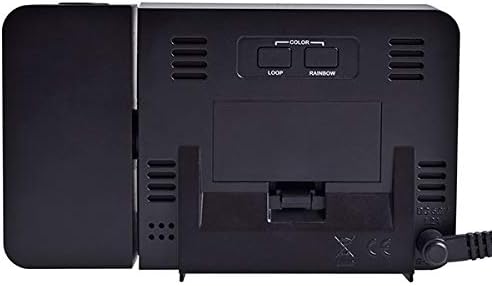
This image displays the rear of the Acctim 71863 Sirius clock, showing the battery compartment cover, ventilation grilles, and the DC 5V power input port.
- Battery Compartment: Houses backup batteries (not included, typically for memory retention during power outages).
- DC 5V Power Input: Connects to the provided mains power adapter.
- Ventilation Grilles: For proper airflow.
Setup
1. Powering the Unit
- Insert backup batteries (e.g., 2 x AAA, not supplied) into the battery compartment on the rear of the unit. This is for memory retention during power interruptions.
- Connect the provided mains power adapter to the "DC 5V" input port on the rear of the unit.
- Plug the mains power adapter into a suitable wall outlet. The display will illuminate.
2. Outdoor Sensor Setup
- Insert batteries (e.g., 2 x AA, not supplied) into the outdoor temperature sensor.
- Place the outdoor sensor in a sheltered location outside, away from direct sunlight and rain, to ensure accurate temperature readings. Ensure it is within range of the main unit.
- The main unit should automatically connect to the outdoor sensor. The outdoor temperature will appear on the display. If it does not connect, press and hold the "+" button on the main unit to initiate a manual search for the sensor.
3. Radio Controlled Time Synchronization
Upon initial power-up, the clock will automatically attempt to synchronize with the radio time signal (e.g., MSF signal in the UK). This process may take several minutes to an hour. Ensure the unit is placed in an area with good signal reception, away from electronic interference.
- A radio signal icon will flash on the display during synchronization.
- Once synchronized, the icon will become solid, indicating successful time reception.
- If synchronization fails, try repositioning the clock or manually initiate a search by pressing and holding the "+" button.
Operating Instructions
Setting Time and Date Manually (if radio control is unavailable)
- Press and hold the MODE button until the time display starts flashing.
- Use the + or - buttons to adjust the hour. Press MODE to confirm.
- Repeat for minutes, year, month, and day.
- Press MODE again to exit settings.
Setting Alarms
- Press the MODE button repeatedly until "AL1" or "AL2" appears on the display.
- Press and hold the MODE button until the alarm time flashes.
- Use the + or - buttons to set the desired alarm hour and then minutes.
- Press MODE to confirm.
- Slide the corresponding Alarm ON/OFF switch (on the right side) to the "ON" position to activate the alarm. An alarm icon will appear on the display.
- When the alarm sounds, press the SNOOZE area (top of the unit) to activate snooze. The alarm will sound again after approximately 5 minutes.
- To stop the alarm completely, slide the corresponding Alarm ON/OFF switch to "OFF".
Display Brightness and Colour
- The display features multiple colours and adjustable brightness. Refer to the specific buttons on the rear of the unit (if present, or front controls) for colour loop and brightness adjustment.
- Typically, a dedicated button or a combination of MODE and +/- buttons controls brightness levels.
Time and Temperature Projection
The unit can project the time and temperature onto a wall or ceiling.
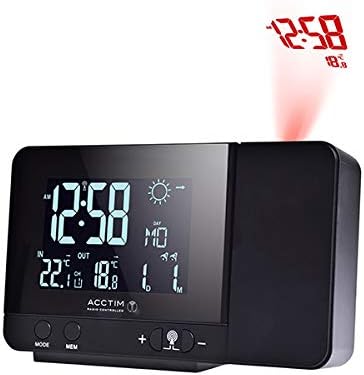
This image illustrates the Acctim 71863 Sirius clock projecting the time and temperature (e.g., "12:58" and "18°") in red onto a surface above the unit.

This image shows the Acctim 71863 Sirius clock with its projection module extended, clearly displaying the projection lens and the projected time and temperature in red.
- Locate the projector lens on the side of the unit.
- Adjust the angle of the projector to direct the image onto your desired surface.
- Use the focus wheel (if present, usually near the lens) to sharpen the projected image.
- The projection feature can typically be turned ON/OFF via a dedicated button or by pressing a specific combination of main unit buttons.
Using the USB Charge Port
The USB charge port (5V === 1A) on the side of the unit allows you to charge compatible electronic devices, such as smartphones or tablets. Simply connect your device's USB charging cable to this port.
Maintenance
- Clean the unit with a soft, dry cloth. Do not use abrasive cleaners or solvents.
- Ensure the ventilation grilles on the rear are not obstructed.
- Replace backup batteries annually or when the display shows a low battery indicator (if applicable).
- For the outdoor sensor, check and replace batteries as needed, especially before winter months.
Troubleshooting
| Problem | Possible Cause | Solution |
|---|---|---|
| Display is blank or dim. | No power or low brightness setting. | Ensure mains adapter is securely plugged in. Adjust display brightness. Check backup batteries. |
| Time is incorrect or not synchronizing. | Poor radio signal reception or interference. | Reposition the clock away from electronic devices. Manually initiate radio signal search (press and hold "+"). Set time manually if signal is consistently poor. |
| Outdoor temperature not displayed. | Outdoor sensor not connected or low battery. | Ensure outdoor sensor batteries are fresh and correctly inserted. Place sensor within range. Press and hold "+" on main unit to re-establish connection. |
| Projection is blurry or not visible. | Out of focus or projector off. | Adjust the focus wheel near the projector lens. Ensure the projection feature is activated. Check ambient light conditions. |
| Alarm does not sound. | Alarm not activated or set incorrectly. | Ensure the alarm ON/OFF switch is in the "ON" position. Verify alarm time is set correctly. |
Specifications
| Feature | Detail |
|---|---|
| Brand | Acctim |
| Model Number | 71863_SML |
| Product Dimensions (Main Unit) | 3.5 x 13.5 x 8.5 cm (Depth x Width x Height) |
| Item Weight | 350 g |
| Material | Plastic |
| Display Type | Digital, Multi-colour |
| Special Features | Snooze, Temperature Display (Indoor/Outdoor), Charging Port, Time Projection, Weather Forecast |
| Power Source | Mains Powered (DC 5V adapter included), Battery Backup (for memory) |
| USB Charge Port Output | 5V === 1A |
Warranty and Support
For warranty information, please refer to the documentation provided at the time of purchase. For technical support or further assistance, please visit the official Acctim website or contact their customer service department. Contact details are typically available on the manufacturer's website or product packaging.
Ask a question about this manual
Ask about setup, troubleshooting, compatibility, parts, safety, or missing instructions. Manuals+ will review the question and use this page’s manual context to help answer it.