
1. Introduction
Thank you for choosing the HiKiNS 125GPD 5-Stage Reverse Osmosis Water Filtration System. This system is designed to provide high-quality, purified drinking water by effectively removing up to 99% of contaminants. This manual provides essential information for the safe installation, operation, and maintenance of your new water filtration system.
2. Safety Information
- Read all instructions carefully before installation and operation.
- Ensure all connections are secure to prevent leaks.
- Do not use with water that is microbiologically unsafe or of unknown quality without adequate disinfection before or after the system.
- The system is designed for cold water use only (38°F - 100°F / 3°C - 38°C).
- Maintain proper water pressure as specified in the product specifications.
- Keep the system away from direct sunlight and heat sources.
3. Product Overview
The HiKiNS RO-125G system utilizes a 5-stage filtration process to deliver clean, great-tasting water directly to your tap. It features a high-flow 125 GPD membrane and a water-saving design.
Key Features:
- FDA/CE certified components and food-grade materials for safety and durability.
- Advanced 5-stage reverse osmosis technology removes up to 99% of pollutants including germs, bacteria, arsenic, chlorine, lead, fluoride, and heavy metals.
- 125 GPD high-flow design for faster water purification.
- Water-saving efficiency with a pure water to wastewater ratio of approximately 1:1.
- Equipped with a 100% lead-free faucet.
- High-quality, no-leakage quick-connect fittings for easy installation.
System Components:
The complete system includes the main filtration unit, a storage tank, a gooseneck faucet, and various installation accessories.

Figure 3.1: Complete HiKiNS RO-125G System Kit Contents. This image displays all components included in the package, such as the main filter unit, pressure tank, faucet, various filters, tubing, and installation tools.
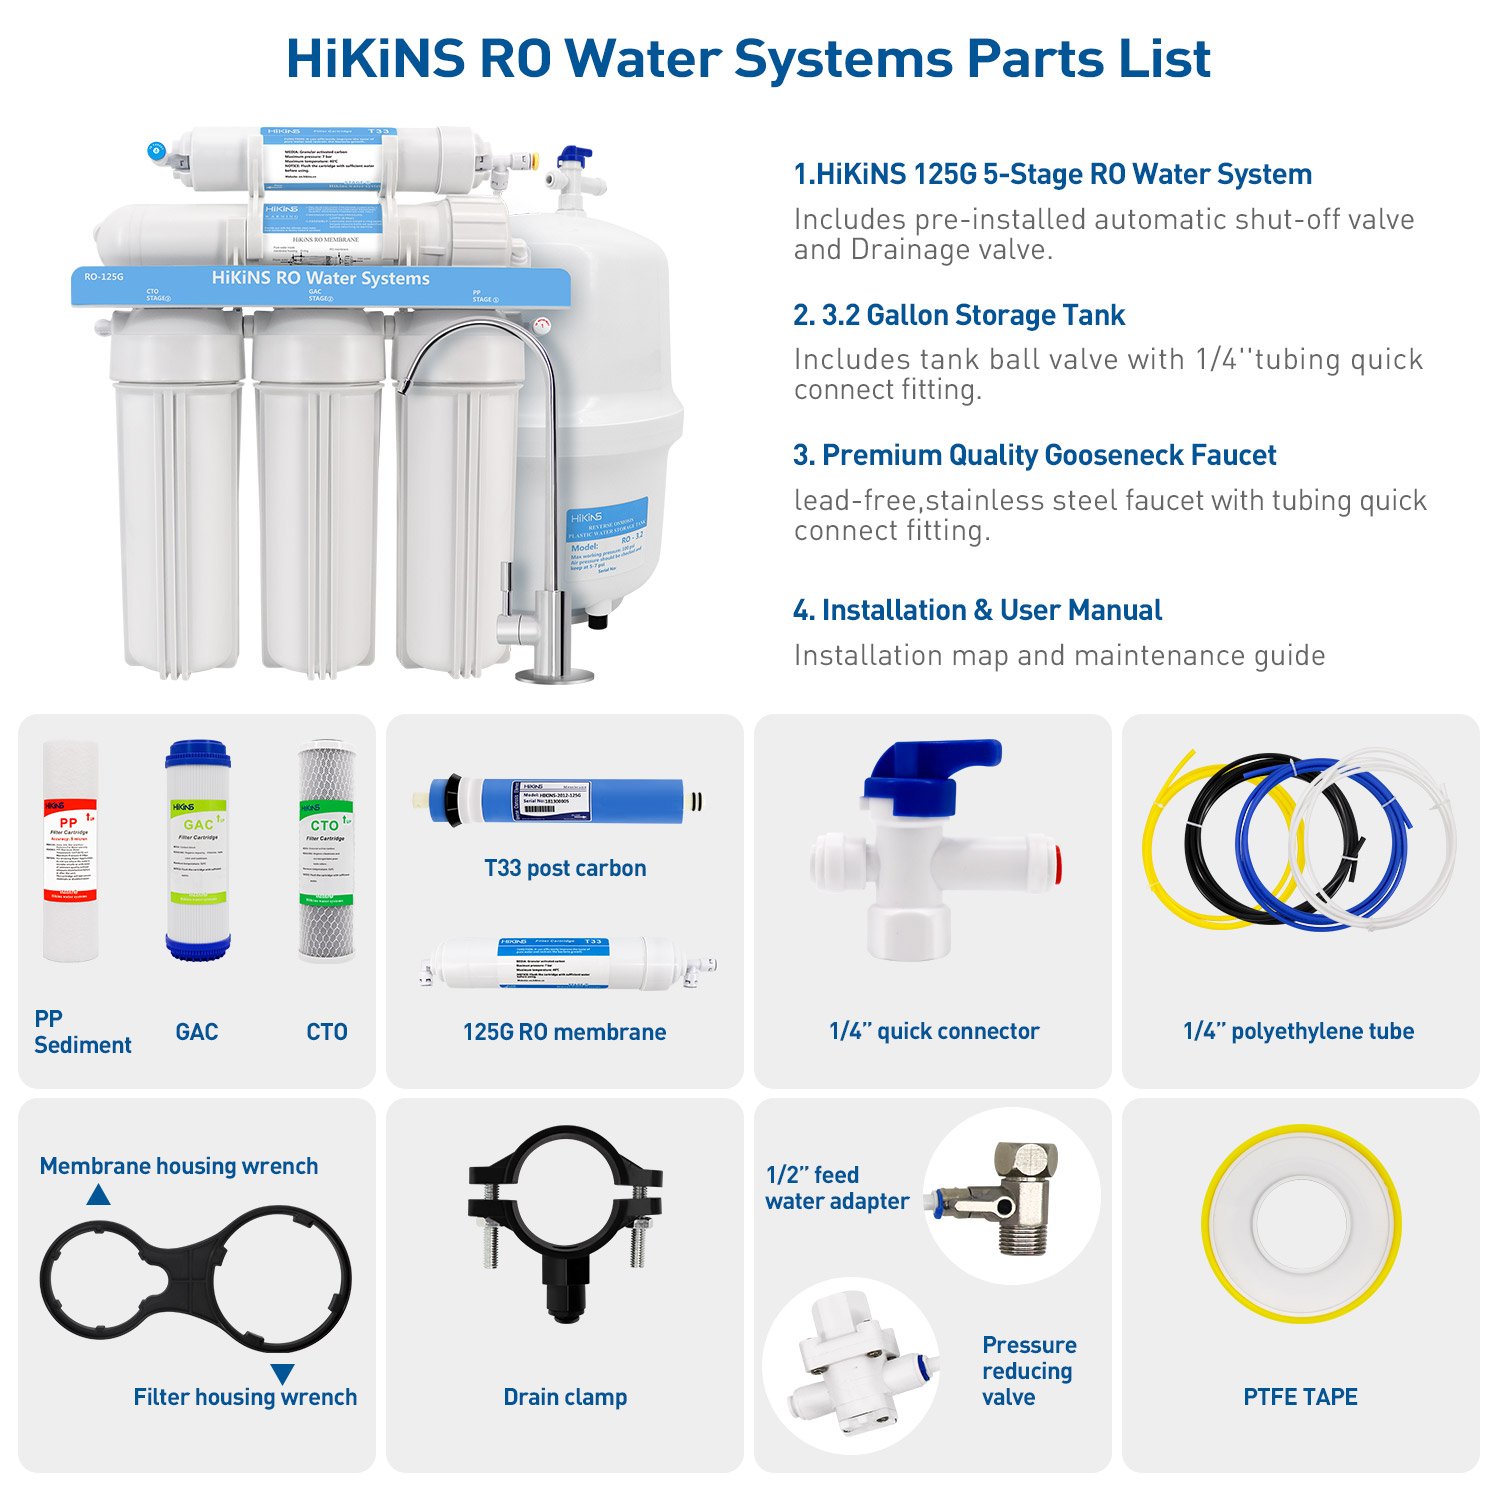
Figure 3.2: Detailed Parts List. This image labels individual components like the 5-stage RO system, 3.2-gallon storage tank, premium gooseneck faucet, various filter cartridges (PP Sediment, GAC, CTO, 125G RO membrane, T33 post carbon), quick connectors, polyethylene tubing, wrenches, drain clamp, pressure reducing valve, and PTFE tape.
5-Stage Filtration Process:
The system employs a multi-stage filtration process to ensure comprehensive water purification:
- 1st Stage: PP Sediment Filter (High Density, 1 micron) - Removes sediment, dirt, rust, and other large particles.
- 2nd Stage: GAC Filter (Granular Activated Carbon) - Removes chlorine, organic chemicals, odors, and tastes.
- 3rd Stage: CTO Filter (Carbon Block Filter) - Further reduces chlorine, organic compounds, and fine sediments.
- 4th Stage: RO Membrane (125 GPD) - The core of the system, removes up to 99% of dissolved solids, heavy metals, bacteria, and viruses.
- 5th Stage: T33 Post Carbon Filter (Coconut Shell Activated Carbon) - Polishes the water for improved taste and odor before consumption.

Figure 3.3: Diagram illustrating the 5-stage deep filtration process, showing how each filter stage removes different types of contaminants from tap water to produce purified water.
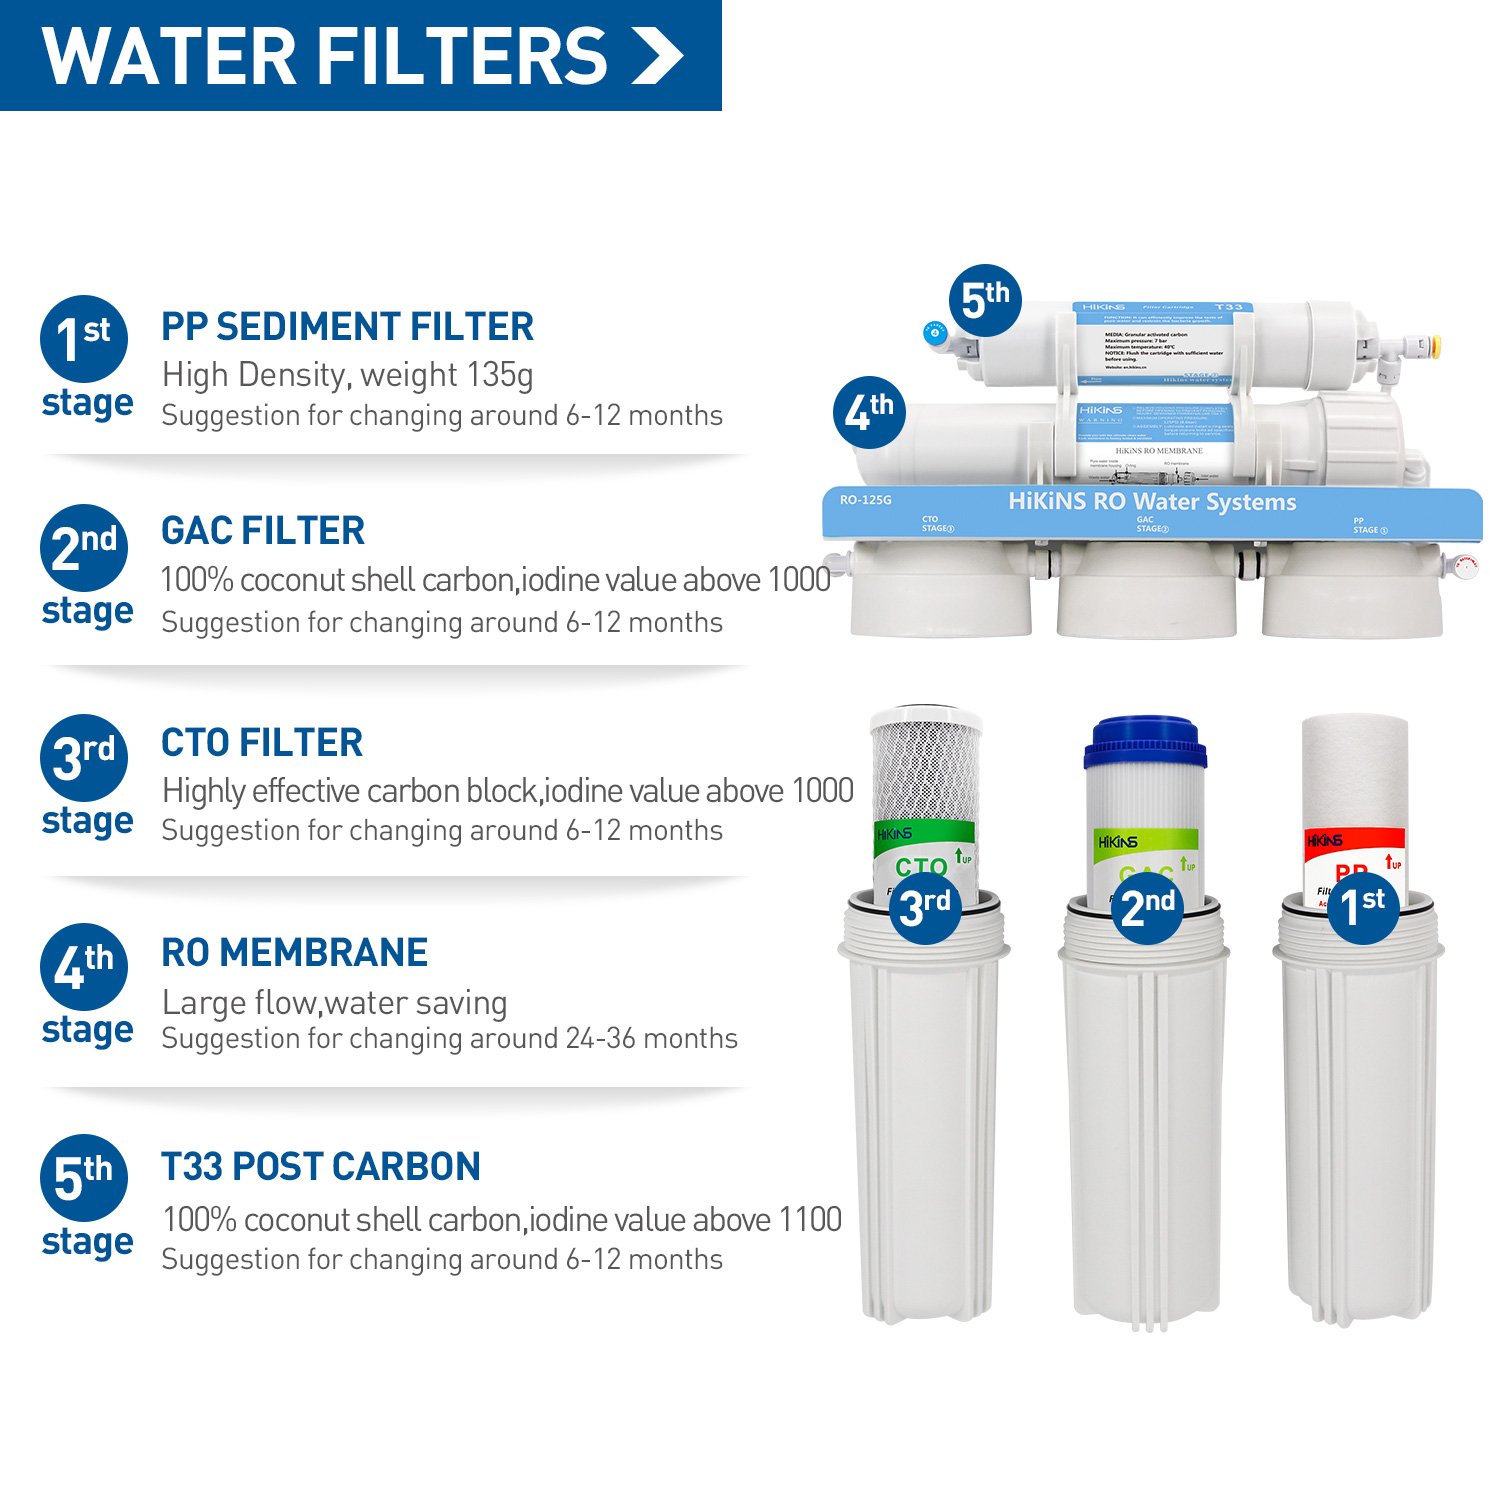
Figure 3.4: Visual representation of the five filter stages, indicating the type of filter at each stage and suggested replacement intervals.
4. Installation Guide
This section provides step-by-step instructions for installing your HiKiNS RO water filtration system. It is recommended to review all steps before beginning the installation.
Pre-Installation Checklist:
- Verify all parts are present as per the parts list (Figure 3.2).
- Ensure you have necessary tools: drill, adjustable wrench, utility knife, Teflon tape (included).
- Confirm adequate space under the sink for the filtration unit and storage tank.
- Locate the cold water supply line and a suitable drain point.
Installation Steps:
- Install the Faucet: Drill a 1/2-inch hole in your countertop or sink for the faucet. Secure the faucet with the provided hardware.
- Connect to Cold Water Supply: Turn off the cold water supply. Disconnect the cold water line from the angle stop valve. Install the feed water adapter (T-valve) and reconnect the cold water line.
- Install the Drain Clamp: Attach the drain clamp to the drainpipe under the sink, above the P-trap. Drill a 1/4-inch hole through the drainpipe at the clamp location.
- Mount the RO Unit: Secure the main RO unit to the cabinet wall under the sink using mounting screws.
- Connect Tubing: Refer to the installation diagrams (Figures 4.1 and 4.2) for proper tubing connections.
- Connect the feed water adapter to the RO unit's inlet (Source water).
- Connect the RO unit's drain line to the drain clamp.
- Connect the RO unit's pure water outlet to the storage tank valve.
- Connect the storage tank valve to the faucet.
- Install Filters and Membrane: Ensure all filter cartridges and the RO membrane are correctly seated in their housings. Use the provided wrenches to tighten housings.
- Check for Leaks: Slowly turn on the cold water supply. Check all connections for leaks. Tighten any leaking connections.

Figure 4.1: Simplified installation diagram showing the basic connections between the faucet, feed water, drain, RO unit, and storage tank.

Figure 4.2: Detailed installation diagram providing a comprehensive view of all tubing connections and component placements for the HiKiNS RO system.
5. Operating Instructions
Initial System Flush:
After installation, it is crucial to flush the system to remove any carbon fines and air from the filters and membrane. This ensures optimal performance and taste.
- Open the RO faucet and allow the water to run until the storage tank is completely empty (water flow will slow to a trickle). This may take 10-15 minutes.
- Close the RO faucet and allow the storage tank to refill completely. This can take 2-4 hours depending on water pressure.
- Repeat steps 1 and 2 at least two more times. This ensures the system is thoroughly flushed and ready for use.
Daily Use:
Once flushed, your system is ready for daily use. Simply open the RO faucet to dispense purified water. The system will automatically refill the storage tank as water is drawn.
6. Maintenance and Filter Replacement
Regular maintenance, particularly timely filter replacement, is essential for the continued performance and longevity of your RO system. Neglecting filter changes can lead to reduced water quality and system damage.
Filter Replacement Schedule:
| Stage | Filter Type | Suggested Replacement Interval |
|---|---|---|
| 1st Stage | PP Sediment Filter | 6-12 months |
| 2nd Stage | GAC Filter | 6-12 months |
| 3rd Stage | CTO Filter | 6-12 months |
| 4th Stage | RO Membrane | 24-36 months |
| 5th Stage | T33 Post Carbon Filter | 6-12 months |
Note: Filter life may vary based on local water quality and usage.
7. Troubleshooting
This section provides solutions to common issues you might encounter with your RO system.
| Problem | Possible Cause | Solution |
|---|---|---|
| No water or very slow flow from faucet | Low water pressure; Clogged filters; Air in system; Tank valve closed; RO membrane clogged. | Check water supply pressure; Replace pre-filters; Perform system flush; Open tank valve; Replace RO membrane. |
| Water has bad taste or odor | Expired carbon filters; New system not flushed properly; Contaminated tank. | Replace carbon filters (GAC, CTO, T33); Perform initial system flush multiple times; Sanitize or replace storage tank. |
| Constant drain water flow | Automatic Shut-Off Valve (ASO) malfunction; Low tank pressure; Clogged flow restrictor. | Check ASO valve; Check and repressurize tank; Replace flow restrictor. |
| Leaking connections | Loose fittings; Damaged O-rings; Incorrect tubing insertion. | Tighten fittings; Replace O-rings; Re-cut and re-insert tubing securely. |
8. Product Specifications

Figure 8.1: Dimensions of the HiKiNS RO-125G filtration unit and the storage tank, providing measurements in inches.
| Specification | Detail |
|---|---|
| Model Name | RO-125G |
| Brand | HiKiNS |
| Purification Method | Reverse Osmosis |
| Capacity | 125 gallons per day (GPD) |
| Installation Type | Under Sink |
| Material | Acrylonitrile Butadiene Styrene |
| Product Dimensions (L x W x H) | 53.34 x 12.7 x 53.34 cm (21 x 5 x 21 inches); 249.48 grams |
| Lower Temperature Rating | 38 Degrees Fahrenheit (3.3°C) |
| Power Source | Tap water pressure |
| Manufacturer | Hikins |
9. Warranty and Customer Support
The HiKiNS 125GPD 5-Stage Reverse Osmosis Water Filtration System comes with a two-year warranty. This warranty covers defects in materials and workmanship under normal use and service.
For technical assistance, troubleshooting, or warranty claims, please contact HiKiNS customer support through your original point of purchase or visit the official HiKiNS website for contact information.
Please retain your proof of purchase for warranty service.


