1. Introduction
This manual provides essential information for the proper installation, operation, and maintenance of the Lennox 43W85 Inducer Motor Assembly. This component is designed for use in compatible HVAC systems to facilitate the safe and efficient venting of combustion byproducts. Adherence to these instructions is crucial for optimal performance and safety. It is recommended that installation and servicing be performed by a qualified HVAC technician.
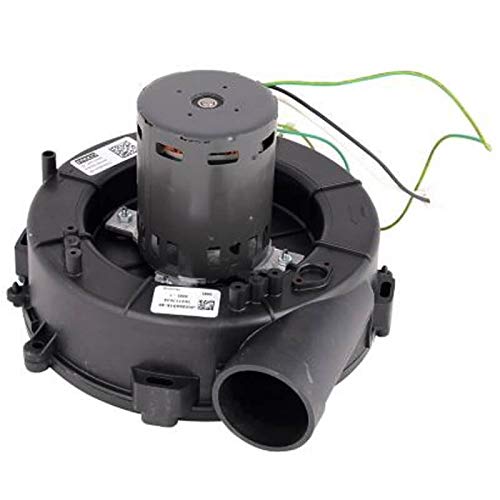
Figure 1: Lennox 43W85 Inducer Motor Assembly. This image displays the complete inducer motor assembly, including the motor housing, fan, and electrical connections, ready for installation into an HVAC unit.
2. Safety Information
WARNING: Improper installation, adjustment, alteration, service, or maintenance can cause property damage, personal injury, or loss of life. Consult a qualified installer, service agency, or the gas supplier for information or assistance.
- Always disconnect electrical power to the HVAC unit before installing or servicing the inducer motor assembly.
- Wear appropriate personal protective equipment (PPE), including gloves and eye protection.
- Ensure all wiring connections comply with local and national electrical codes.
- Do not operate the HVAC system if the inducer motor assembly is damaged or not functioning correctly.
- Keep children and pets away from the work area during installation and maintenance.
3. Installation
Installation of the Lennox 43W85 Inducer Motor Assembly should only be performed by a certified HVAC technician. The following steps are a general guide and may vary based on the specific HVAC unit model.
- Power Disconnection: Turn off all electrical power to the furnace or HVAC unit at the main service panel. Verify power is off using a voltage meter.
- Access Panel Removal: Remove the furnace access panels to expose the inducer motor assembly.
- Disconnect Wiring: Carefully disconnect the electrical wiring from the existing inducer motor. Note the position and color of each wire for correct re-connection.
- Remove Old Assembly: Disconnect the exhaust vent pipe and any mounting hardware securing the old inducer motor assembly. Remove the old unit.
- Install New Assembly: Position the new Lennox 43W85 Inducer Motor Assembly in place. Secure it with the appropriate mounting hardware.
- Connect Wiring: Reconnect the electrical wiring to the new inducer motor assembly, ensuring all connections are secure and match the original configuration.
- Reconnect Vent Pipe: Reattach the exhaust vent pipe to the new inducer motor assembly, ensuring a tight, leak-free seal.
- Replace Panels: Reinstall the furnace access panels.
- Restore Power: Restore electrical power to the HVAC unit.
- Test Operation: Initiate a heating cycle to verify the proper operation of the new inducer motor assembly and check for any unusual noises or issues.
4. Operation
The Lennox 43W85 Inducer Motor Assembly operates as an integral part of your HVAC system's combustion process. When a call for heat is initiated, the inducer motor activates to draw combustion air into the burner and push exhaust gases out through the vent system. This creates a negative pressure within the combustion chamber, which is necessary for safe and efficient ignition and burning. The motor will continue to operate throughout the heating cycle and typically run for a short period after the main burner shuts off to purge any remaining combustion gases.
5. Maintenance
Regular maintenance helps ensure the longevity and efficient operation of your inducer motor assembly. It is recommended that these checks be performed annually by a qualified technician.
- Visual Inspection: Periodically inspect the inducer motor assembly for any signs of wear, corrosion, or damage. Check for loose wires or connections.
- Cleanliness: Ensure the fan blades and housing are free from debris, dust, or lint buildup, which can impede airflow and cause imbalance. Use a soft brush or vacuum cleaner for cleaning.
- Noise Check: Listen for any unusual noises (e.g., grinding, squealing, rattling) during operation, which could indicate a failing bearing or other mechanical issue.
- Vent Pipe Inspection: Verify that the exhaust vent pipe connected to the inducer motor is clear of obstructions and properly sealed.
- Professional Service: For any suspected issues or complex maintenance, contact a qualified HVAC technician. Do not attempt to disassemble the motor assembly yourself.
6. Troubleshooting
If you experience issues with your Lennox 43W85 Inducer Motor Assembly, consult the following troubleshooting guide. For safety and proper diagnosis, always contact a qualified HVAC technician for repairs.
| Symptom | Possible Cause | Recommended Action |
|---|---|---|
| Inducer motor does not start | No power, faulty wiring, control board issue, seized motor. | Check circuit breaker. Verify electrical connections. Contact a qualified technician. |
| Unusual noise (grinding, squealing) | Worn bearings, debris in blower wheel, loose mounting. | Turn off power immediately. Contact a qualified technician for inspection and repair. |
| Motor runs but no exhaust flow | Blocked vent pipe, damaged blower wheel. | Inspect vent pipe for obstructions. Contact a qualified technician. |
| Motor cycles on and off rapidly | Pressure switch issue, blocked vent, control board fault. | Contact a qualified technician for diagnosis. |
7. Specifications
Key technical specifications for the Lennox 43W85 Inducer Motor Assembly:
- Brand: Lennox
- Model: 43W85
- Voltage: 115 Volts
- Speed: 3000 RPM
- Item Weight: 8 Pounds
- Product Dimensions: 12 x 12 x 12 inches (approximate)
- Manufacturer: Lennox
8. Warranty Information
Warranty coverage for the Lennox 43W85 Inducer Motor Assembly is provided by the manufacturer, Lennox. Specific warranty terms, conditions, and duration may vary. Please refer to the warranty documentation included with your purchase or contact your authorized Lennox dealer or the seller for detailed information regarding warranty claims and service.
9. Customer Support
For technical assistance, service, or inquiries regarding the Lennox 43W85 Inducer Motor Assembly, please contact:
- Your authorized Lennox dealer or installer.
- Lennox Customer Service (refer to the official Lennox website for contact details).
- A qualified and certified HVAC technician.
When contacting support, please have your product model number (43W85) and any relevant purchase information readily available.


