
Product Overview
The Detroit Radiant TP-55A Fan Blower Assembly is a critical component designed for various Detroit Radiant infrared radiant tube heaters. This assembly ensures proper air circulation and combustion efficiency within compatible heating units.
It is compatible with many Detroit Radiant models including DTHS, HL, DX, XTS, DET, DES, LS, and LD series infrared radiant tube heaters. For precise compatibility, it is recommended to verify with your heater's model and serial number.
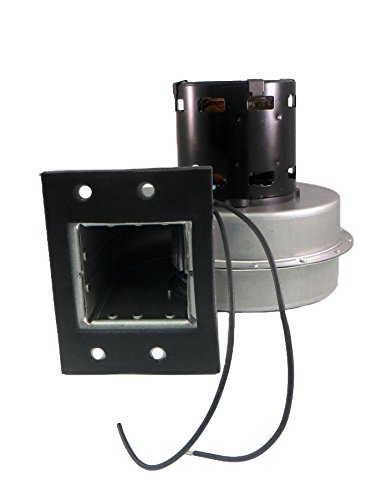
Image: The TP-55A Fan Blower Assembly, showing the motor, fan housing, and the rectangular air intake/output port with mounting holes.
Safety Information
Important: Read all instructions carefully before installation or maintenance. Failure to follow these instructions could result in property damage, personal injury, or death.
- Always disconnect power to the heater before attempting any installation, maintenance, or repair.
- Installation and service must be performed by a qualified installer, service agency, or gas supplier.
- Ensure proper ventilation during operation.
- Do not operate the heater with damaged or missing components.
- Wear appropriate personal protective equipment (PPE) such as gloves and eye protection.
Setup and Installation
This section outlines the general steps for installing the TP-55A Fan Blower Assembly. Specific heater models may have variations.
- Preparation:
- Ensure the heater is completely cool and disconnected from all power sources.
- Gather necessary tools: screwdriver set, wrench set, wire strippers, electrical tape, multimeter (optional).
- Access the Existing Blower:
- Locate the existing fan blower assembly on your Detroit Radiant heater.
- Carefully remove any access panels or covers to expose the blower.
- Disconnect Wiring:
- Note the wiring connections to the old blower. It typically uses a 3-pin power connector. Take photos for reference if needed.
- Disconnect the electrical wiring from the old blower assembly.
- Remove Old Blower:
- Unscrew or unbolt the old blower assembly from its mounting bracket or heater housing.
- Carefully remove the old blower, noting its orientation.
- Install New Blower:
- Position the new TP-55A Fan Blower Assembly in the same orientation as the old one.
- Secure the new blower using the appropriate screws or bolts. Ensure it is firmly mounted.
- Connect Wiring:
- Connect the electrical wiring to the new blower, matching the connections noted earlier. The TP-55A uses a 3-Pin power connector.
- Ensure all connections are secure and properly insulated.
- Reassemble:
- Replace any access panels or covers removed during the process.
- Ensure all components are properly reassembled before restoring power.
Operating Instructions
The TP-55A Fan Blower Assembly operates automatically as part of the heater's control system. There are no direct user controls for the blower itself.
- Once installed, the blower will activate when the heater calls for heat, providing forced air for combustion.
- Ensure the heater's power supply is stable and within specified voltage ranges.
- Listen for unusual noises during operation, which may indicate an issue with the blower or other heater components.
Maintenance
Regular maintenance helps ensure the longevity and efficient operation of the TP-55A Fan Blower Assembly and the heater.
- Annual Inspection: It is recommended to have the blower assembly inspected annually by a qualified service technician.
- Cleaning: Periodically inspect the blower fan blades and housing for dust, debris, or obstructions. Carefully clean with a soft brush or vacuum cleaner if necessary. Ensure power is disconnected before cleaning.
- Bearing Check: Listen for any grinding or squealing noises from the motor bearings. Worn bearings may require replacement of the assembly.
- Wiring Inspection: Check all electrical connections for signs of wear, corrosion, or looseness.
Troubleshooting
This section provides basic troubleshooting steps for common issues related to the fan blower assembly. For complex problems, consult a qualified technician.
| Problem | Possible Cause | Solution |
|---|---|---|
| Blower does not turn on. | No power to heater; faulty wiring; defective motor; control board issue. | Check heater power supply; inspect wiring connections; test motor for continuity (qualified technician); consult heater manual for control board diagnostics. |
| Blower makes unusual noises (grinding, squealing). | Worn bearings; debris in fan housing; loose mounting. | Inspect for debris and clean; check mounting bolts; replacement of assembly may be required if bearings are worn. |
| Reduced airflow from blower. | Obstructed intake/output; dirty fan blades; motor running slow. | Clear any obstructions; clean fan blades; check motor voltage (qualified technician). |
Specifications
- Model: TP-55A
- Brand: Detroit Radiant
- Compatible Devices: Detroit Radiant DTHS, HL, DX, XTS, DET, DES, LS, LD infrared radiant tube heaters.
- Cooling Method: Forced air
- Power Connector Type: 3-Pin
- UPC: 725084930684
Warranty and Support
For warranty information and technical support, please contact Detroit Radiant directly or the authorized dealer from whom the product was purchased. Please have your product model (TP-55A) and any relevant heater model and serial numbers available when contacting support.
Contact Information: Refer to the official Detroit Radiant website or your product packaging for the most current contact details.