1. Introduction
This instruction manual provides detailed guidance for the safe and effective use of the AMZ Clips And Fasteners Size 4 Stainless Steel Grommet Setting Die. Please read this manual thoroughly before operating the tool to ensure proper installation of stainless steel grommets and to prevent injury or damage to the tool or materials.
2. Product Overview
The AMZ Clips And Fasteners Size 4 Setting Die is a precision tool designed for installing stainless steel grommets. It consists of two primary components: an upper die (punch) and a lower die (base). These components are engineered from high carbon steel to ensure durability and precise mating for consistent grommet and washer installation.
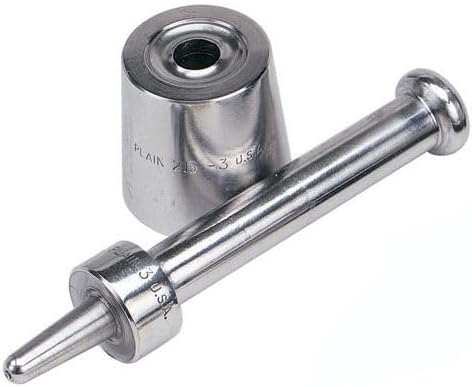
Figure 1: The AMZ Clips And Fasteners Size 4 Stainless Steel Grommet Setting Die, illustrating its two main parts: the cylindrical lower die (base) and the elongated upper die (punch).
3. Safety Information
Always observe the following safety precautions when using this tool:
- Wear appropriate personal protective equipment, such as safety glasses, to protect against flying debris.
- Ensure your work surface is stable and clear of obstructions.
- Keep hands and fingers clear of the striking area during operation.
- Use a mallet or hammer of appropriate weight and material to strike the upper die. Avoid using excessive force.
- Store the tool in a dry, safe place, out of reach of children.
- Do not modify the tool. Use it only for its intended purpose.
4. Setup
Before beginning the grommet installation process, ensure you have the following:
- AMZ Clips And Fasteners Size 4 Setting Die (upper and lower components).
- Size 4 stainless steel grommets and washers.
- Material to be grommeted (e.g., fabric, canvas, tarp), pre-punched with a hole of appropriate size for a Size 4 grommet.
- A sturdy, flat work surface, preferably a workbench or anvil.
- A mallet or hammer.
Preparation:
- Place the lower die (base) on your sturdy work surface.
- Ensure the material is clean and free of debris.
- Pre-punch a hole in your material where the grommet is to be installed. The hole should be slightly smaller than the barrel of the grommet to ensure a snug fit.
5. Operating Instructions
Follow these steps to properly install a Size 4 stainless steel grommet:
- Position the Grommet: Place the grommet (the part with the barrel) through the pre-punched hole in your material from the front side. The barrel of the grommet should protrude through the back of the material.
- Place the Washer: Place the washer (the flat ring) over the barrel of the grommet on the back side of the material.
- Seat on Lower Die: Carefully place the grommet and material assembly onto the lower die. The barrel of the grommet, with the washer on it, should fit into the recessed area of the lower die. Ensure the material lies flat.
- Position Upper Die: Place the upper die (punch) directly over the grommet and washer assembly, aligning its tip with the barrel of the grommet.
- Strike to Set: Hold the upper die firmly and vertically. Strike the top of the upper die with a mallet or hammer. Apply firm, even strikes until the grommet barrel is fully rolled over and secured against the washer, creating a tight, permanent bond. Inspect the grommet to ensure it is fully set and the material is securely held.
- Remove: Carefully lift the upper die and remove the newly grommeted material from the lower die.
Repeat the process for additional grommets.
6. Maintenance
Proper maintenance will extend the life of your setting die:
- Cleaning: After each use, wipe the die components with a clean, dry cloth to remove any material residue or dust.
- Lubrication: Periodically apply a light coat of machine oil to the metal surfaces to prevent rust, especially if storing for extended periods or in humid environments.
- Storage: Store the setting die in a dry, protected area to prevent corrosion and damage.
- Inspection: Regularly inspect the die for any signs of wear, damage, or deformation. Discontinue use if significant damage is observed.
7. Troubleshooting
If you encounter issues during grommet installation, consider the following:
- Grommet not setting properly (loose or uneven):
- Ensure the material hole is correctly sized. Too large a hole can lead to a loose fit.
- Verify that the grommet and washer are correctly seated on the lower die.
- Apply more firm and even strikes with the mallet.
- Check if the die components are aligned correctly.
- Material tearing around the grommet:
- The pre-punched hole might be too small, causing stress on the material.
- Excessive force during striking can damage delicate materials.
- Ensure the material is properly supported on the lower die.
- Die components sticking together:
- Clean and lightly lubricate the die components.
- Ensure no debris is lodged between the parts.
8. Specifications
| Attribute | Detail |
|---|---|
| Brand | AMZ Clips And Fasteners |
| Model Number | CSO215-4 |
| Grommet Size Compatibility | Size 4 |
| Material | High Carbon Steel |
| Item Weight | 816 g (approximately 1.8 lbs) |
| Manufacturer Reference | CSO215-4 |
| ASIN | B07C1CKFSH |
| Date First Available | April 27, 2018 |
9. Warranty and Support
Specific warranty information for the AMZ Clips And Fasteners Size 4 Stainless Steel Grommet Setting Die is not provided within this manual. For details regarding warranty coverage, returns, or technical support, please refer to the product packaging, the original point of purchase, or contact AMZ Clips And Fasteners directly through their official website or customer service channels.


