
1. Introduction
The CiT Blaze is an ATX PC gaming case designed for enthusiasts seeking a blend of aesthetics and performance. It features a classic design with tempered glass front and side panels, showcasing your internal components. Pre-installed blue LED fans provide efficient cooling and a vibrant visual experience. This manual provides essential information for the proper setup, operation, maintenance, and troubleshooting of your CiT Blaze PC case.

Figure 1.1: CiT Blaze ATX PC Gaming Case (Blue Variant)
Key features include:
- Tempered Glass Panels: Front and left side panels for component visibility.
- Pre-installed LED Fans: Six 120mm blue LED halo fans (3 front, 2 top, 1 rear) for optimal airflow.
- Water Cooling Support: Front panel supports a 240mm radiator.
- Convenient I/O Ports: 2x USB 2.0, 1x USB 3.0, and HD Audio ports located on the top panel.
- Durable Construction: Made with 0.5mm SPCC metal.
2. Setup and Installation
Follow these steps to install your components into the CiT Blaze PC case.
2.1. Preparing the Case
- Carefully unpack the case from its packaging.
- Remove the tempered glass side panel by unscrewing the four thumb screws.
- Remove the front tempered glass panel if necessary for radiator installation or fan access.
2.2. Motherboard Installation
The CiT Blaze supports Micro ATX motherboards. Ensure standoffs are correctly aligned for your motherboard form factor.
- Install the I/O shield into the rear opening of the case.
- Carefully place your motherboard onto the standoffs.
- Secure the motherboard with screws.

Figure 2.1: Internal layout with motherboard mounting area
2.3. Power Supply Unit (PSU) Installation
The PSU mounts at the bottom rear of the case.
- Slide the PSU into its designated compartment from the rear.
- Secure the PSU with screws from the exterior rear of the case.
2.4. Drive Installation
The case supports 3.5-inch HDDs and 2.5-inch SSDs.
- 3.5" HDDs: Install into the drive cage located under the PSU shroud.
- 2.5" SSDs: Mount onto the dedicated SSD trays on the motherboard tray.
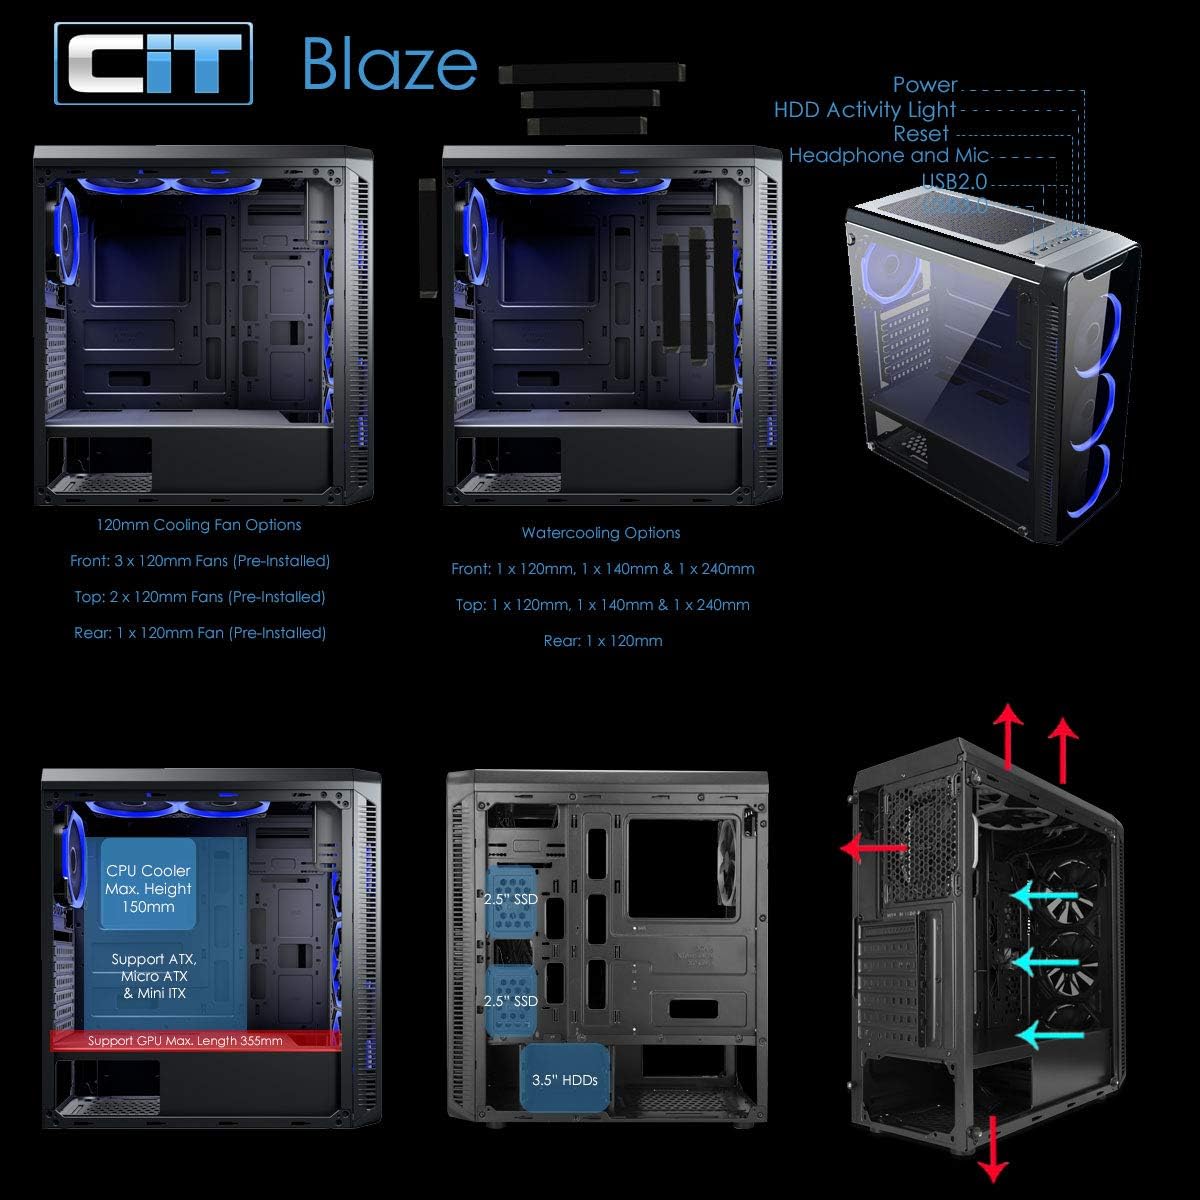
Figure 2.2: Drive bay locations for 2.5" SSDs and 3.5" HDDs
2.5. Connecting Front Panel Cables
Connect the front panel cables (USB, HD Audio, Power, Reset, HDD LED) to the corresponding headers on your motherboard. Refer to your motherboard manual for exact pin layouts.
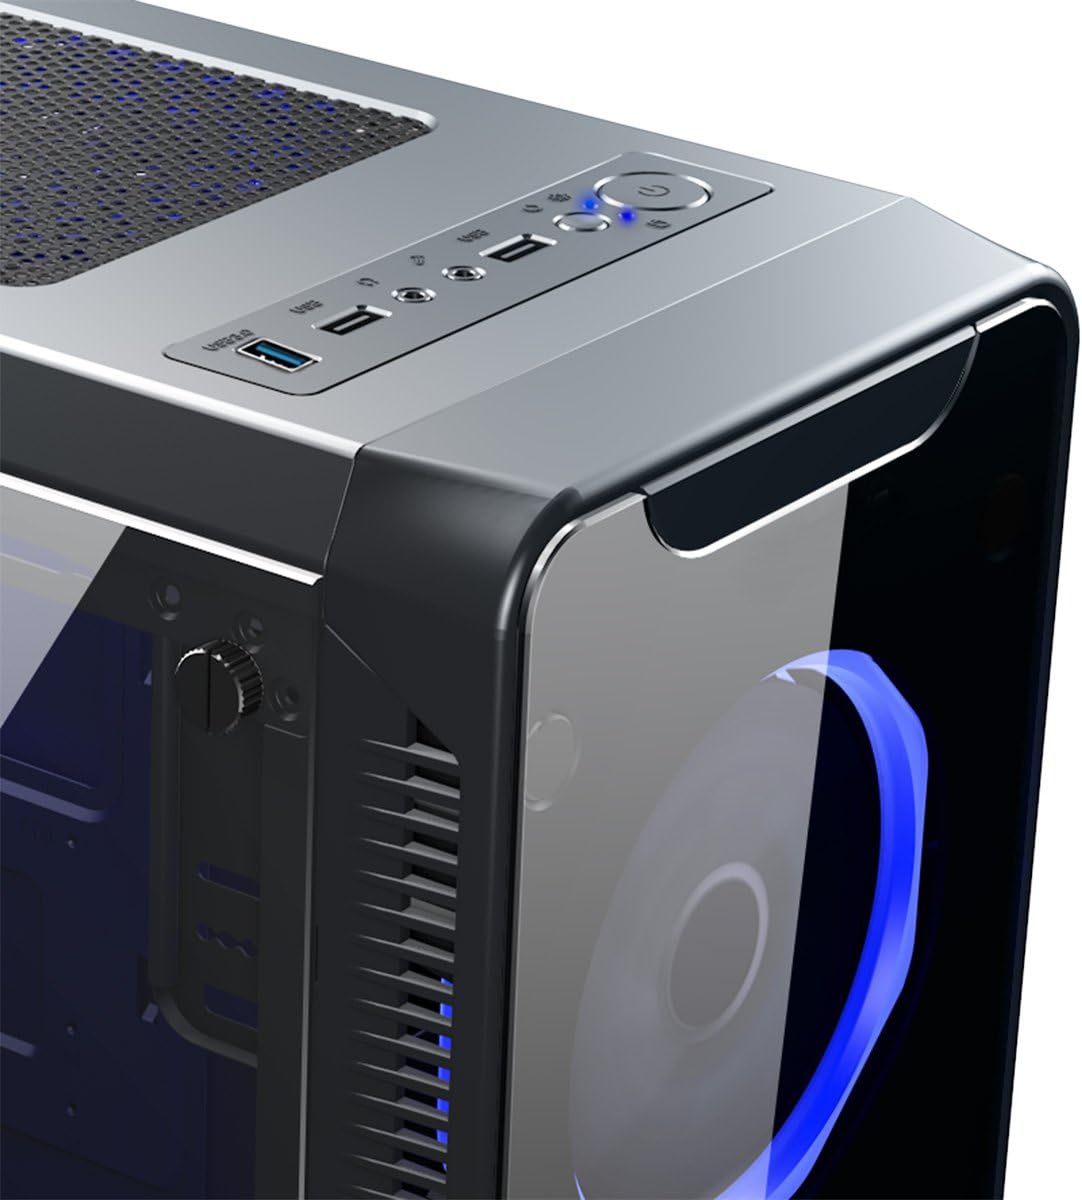
Figure 2.3: Top I/O Panel with USB and Audio Ports
3. Operating Instructions
Operating the CiT Blaze case primarily involves using the front panel controls and ensuring proper airflow.
3.1. Powering On/Off
Press the power button located on the top I/O panel to turn your computer on or off. A short press typically initiates power-on or sleep mode, while a long press (usually 4-5 seconds) forces a shutdown.
3.2. Using Front Panel Ports
The top I/O panel provides convenient access to:
- USB 3.0 Port (x1): For high-speed data transfer with compatible devices.
- USB 2.0 Ports (x2): For connecting peripherals such as keyboards, mice, or USB drives.
- HD Audio Jacks: For connecting headphones and microphones.
3.3. Fan Operation
The pre-installed blue LED fans operate automatically once the system is powered on, providing consistent airflow to cool your components. The fan speed is typically controlled by your motherboard's BIOS/UEFI settings or operating system software, depending on how they are connected.
4. Maintenance
Regular maintenance helps ensure optimal performance and longevity of your CiT Blaze PC case and its components.
4.1. Dust Filter Cleaning
The case is equipped with dust filters to prevent dust buildup inside. Regularly clean these filters to maintain good airflow and cooling efficiency.
- Locate and carefully remove the dust filters (e.g., top, bottom).
- Clean the filters using compressed air or by gently washing them with water. Ensure they are completely dry before re-installing.

Figure 4.1: Example of a dust filter
4.2. Tempered Glass Care
Clean the tempered glass panels with a soft, lint-free cloth and a glass cleaner. Avoid abrasive materials or harsh chemicals that could scratch or damage the glass.
4.3. Fan Cleaning
Over time, dust can accumulate on fan blades, reducing their effectiveness. Use compressed air to gently clean the fan blades and grilles. Ensure the system is powered off before cleaning.
5. Troubleshooting
This section addresses common issues you might encounter with your PC case.
5.1. System Not Powering On
- Check Power Connections: Ensure the PSU is properly connected to the wall outlet and the motherboard (24-pin ATX, 8-pin CPU).
- Front Panel Connections: Verify that the power button cable from the case is correctly connected to the motherboard's front panel header.
- PSU Switch: Confirm the power switch on the back of the PSU is in the 'On' position.
5.2. Fans Not Spinning / LEDs Not Lighting Up
- Fan Connections: Ensure all fan power cables are securely connected to the motherboard fan headers or a fan controller.
- Power Source: Verify that the fans are receiving power, especially if they use Molex connectors directly from the PSU.
5.3. USB Ports or Audio Jacks Not Working
- Internal Connections: Check that the USB 2.0, USB 3.0, and HD Audio cables from the front panel are correctly plugged into their respective headers on the motherboard.
- Driver Issues: Ensure your motherboard's chipset and audio drivers are up to date.
5.4. Component Fitment Issues
Some users have noted potential limitations regarding component size:
- CPU Cooler Height: Ensure your CPU cooler's height does not exceed the case's maximum clearance (refer to specifications).
- Power Supply Length: Verify your PSU's length is compatible with the available space, especially if using the HDD cage.
- GPU Length: Check that your graphics card length fits within the case's maximum GPU clearance.
6. Specifications
Detailed technical specifications for the CiT Blaze ATX PC Gaming Case.
| Feature | Specification |
|---|---|
| Model Name | Blaze |
| Model Number | CIT-BLAZE |
| Case Type | Mid Tower |
| Motherboard Compatibility | Micro ATX |
| Material | Tempered Glass, 0.5mm SPCC Metal |
| Color | Blue (LEDs) / Black (Chassis) |
| Pre-installed Fans | 6 x 120mm Blue LED Halo Fans (3 Front, 2 Top, 1 Rear) |
| Water Cooling Support | Front: 240mm Radiator |
| I/O Ports | 2 x USB 2.0, 1 x USB 3.0, HD Audio |
| Expansion Slots | 7 x Full Height |
| Drive Bays | 2 x 3.5" HDD, 2 x 2.5" SSD (inferred from images) |
| PSU Mounting | Bottom Mount |
| Dimensions (D x W x H) | 42cm x 20cm x 44.2cm (approx. 7.9" x 16.5" x 17.4") |
| Weight | 5.5 Kilograms |

Figure 6.1: Case Dimensions
7. Warranty and Support
For warranty claims, technical assistance, or further inquiries regarding your CiT Blaze PC Gaming Case, please contact CiT customer support or your retailer. Keep your proof of purchase for warranty validation.
Manufacturer: A One Distribution (UK) Ltd