
1. Introduction
This manual provides detailed instructions for the safe and effective use of your VWR 62379-531 Digital Caliper. Please read this manual thoroughly before operating the device to ensure proper function and to prevent damage or injury. Keep this manual for future reference.
Safety Precautions
- Always handle the caliper with care to avoid dropping or impacting the measuring surfaces.
- Keep the caliper clean and free from dust, dirt, and moisture.
- Do not attempt to disassemble or modify the caliper, as this may void the warranty and cause damage.
- Store the caliper in its protective case when not in use.
2. Product Overview
The VWR 62379-531 Digital Caliper is a precision measuring instrument designed for accurate measurements of length, depth, and step. Constructed from durable stainless steel, it features an ergonomic design for comfortable handling and reliable performance.
Key Features:
- Ergonomic design: Provides comfortable grip and ease of use.
- Stainless steel construction: Ensures durability and resistance to corrosion.
- Digital display: Offers clear and precise readings.
Components:
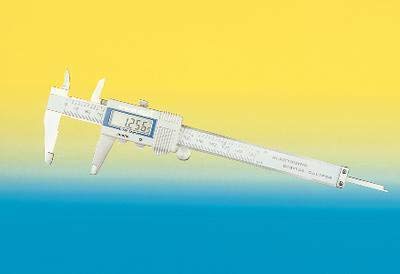
Figure 2.1: VWR 62379-531 Digital Caliper. This image shows the overall design of the digital caliper, highlighting its stainless steel body and digital display. The main jaws for external measurement are visible, along with the smaller jaws for internal measurement and the depth rod.
- External Measuring Jaws: Used for measuring outside dimensions.
- Internal Measuring Jaws: Used for measuring inside dimensions.
- Depth Rod: Used for measuring depth.
- Step Measuring Faces: Used for measuring step dimensions.
- Main Scale: The fixed scale on the caliper body.
- Slider: The movable part of the caliper.
- Digital Display: Shows the measurement reading.
- ZERO Button: Sets the display to zero at any point.
- ON/OFF Button: Powers the caliper on or off.
- mm/inch Button: Switches between metric and imperial units.
- Thumb Roller: For fine adjustment of the slider.
- Locking Screw: Secures the slider in position.
3. Setup
3.1 Unpacking
- Carefully remove the digital caliper from its packaging.
- Inspect the caliper for any signs of damage during transit. If damage is found, contact your supplier immediately.
- Ensure all components listed in the packaging are present.
3.2 Battery Installation
The VWR 62379-531 Digital Caliper typically uses a single button cell battery (e.g., CR2032 or LR44, check battery compartment for specific type).
- Locate the battery compartment cover on the digital display unit.
- Slide the cover open or unscrew it, depending on the design.
- Insert the new battery with the positive (+) side facing up.
- Close the battery compartment cover securely.
3.3 Initial Zero Setting
- Press the ON/OFF button to power on the caliper.
- Gently close the external measuring jaws completely.
- Press the ZERO button. The display should now read "0.00" (or "0.000" depending on resolution). Your caliper is now ready for use.
4. Operating Instructions
4.1 Power On/Off and Unit Selection
- Press the ON/OFF button to turn the caliper on.
- Press the ON/OFF button again to turn the caliper off. The caliper may also have an auto-off feature after a period of inactivity.
- Press the mm/inch button to switch between millimeters and inches.
4.2 Measuring Techniques
Always ensure the measuring surfaces are clean before taking a measurement.
- External Measurement:
- Open the external jaws wider than the object.
- Place the object between the jaws and gently close them until they make firm contact.
- Read the measurement on the digital display.
- Internal Measurement:
- Close the internal jaws and insert them into the opening to be measured.
- Open the jaws until they make firm contact with the inner surfaces.
- Read the measurement on the digital display.
- Depth Measurement:
- Place the end of the main beam firmly on the top surface of the object.
- Extend the depth rod into the hole or recess until it touches the bottom.
- Read the measurement on the digital display.
- Step Measurement:
- Place the step measuring face of the main beam on the higher surface.
- Extend the slider until its step measuring face rests on the lower surface.
- Read the measurement on the digital display.
4.3 Zero Setting at Any Point
The ZERO button allows you to set a temporary zero point at any position. This is useful for differential measurements or setting a reference point.
- Position the jaws at the desired reference point.
- Press the ZERO button. The display will show "0.00".
- Subsequent measurements will be relative to this new zero point.
4.4 Locking Screw
Use the locking screw to fix the slider in position after taking a measurement, allowing for easier reading or transfer of the measurement.
5. Maintenance
5.1 Cleaning
- Wipe the caliper surfaces with a clean, dry, lint-free cloth after each use.
- For stubborn dirt, a cloth lightly dampened with isopropyl alcohol can be used, but avoid excessive moisture.
- Never use abrasive cleaners or solvents that could damage the finish or electronic components.
- Ensure the measuring surfaces are free of debris to maintain accuracy.
5.2 Storage
- Store the caliper in its original protective case when not in use.
- Keep the caliper in a dry environment, away from direct sunlight, extreme temperatures, and high humidity.
- Slightly open the jaws before storage to relieve pressure on the measuring surfaces.
5.3 Battery Replacement
When the display becomes dim or shows an error message related to power, it's time to replace the battery. Follow the instructions in Section 3.2 for battery installation.
5.4 Calibration
While the caliper is factory-calibrated, periodic checks against known standards (gauge blocks) are recommended for critical applications to ensure continued accuracy. If significant deviation is observed, professional calibration may be required.
6. Troubleshooting
| Problem | Possible Cause | Solution |
|---|---|---|
| Display is blank or dim. | Low or dead battery. | Replace the battery (refer to Section 3.2). |
| Inaccurate readings. |
|
|
| Display shows "E" or other error code. | Internal electronic error or sensor issue. | Remove and reinsert the battery. If the error persists, contact customer support. |
| Slider movement is stiff. | Dirt or debris in the slider mechanism. | Clean the main beam and slider thoroughly. Apply a very small amount of light machine oil if necessary, avoiding the digital scale. |
7. Specifications
| Feature | Detail |
|---|---|
| Model Number | 62379-531 |
| Brand | VWR |
| Material | Stainless Steel |
| Product Dimensions (L x W) | 22.9L x 7.6W centimetres |
| Item Weight | 2 Pounds |
| Measurement System | Digital (mm/inch switchable) |
| Power Source | Button Cell Battery (e.g., CR2032, type may vary) |
8. Warranty and Support
8.1 Warranty Information
VWR products are manufactured to high-quality standards. For specific warranty terms and conditions applicable to your VWR 62379-531 Digital Caliper, please refer to the warranty card included with your purchase or visit the official VWR website. Keep your proof of purchase for warranty claims.
8.2 Customer Support
If you encounter any issues not covered in the troubleshooting section or require further assistance, please contact VWR customer support. You can typically find contact information on the VWR website or on your product packaging.
For online resources and frequently asked questions, please visit: www.vwr.com