
1. Product Overview
The Lorex DV900 Series DV9163 is a 16-channel 4K MPX Digital Video Recorder (DVR) equipped with a 3TB hard drive and 16 BNC ports. This DVR is designed for comprehensive security surveillance, supporting 4K Ultra HD recording on compatible cameras. It offers remote viewing capabilities through the FLIR Cloud app, allowing users to monitor their property from smartphones or tablets without complex network configurations.
Key Features:
- True 4K Ultra HD recording on all compatible cameras.
- Lorex Cloud app with 3-step setup for remote access from iOS or Android devices.
- Backward compatible with standard analog cameras.
- 16 BNC ports for extensive camera connectivity.
- 3TB pre-installed hard drive for ample storage.

Figure 1: Lorex DV9163 DVR unit with power adapter, HDMI cable, Ethernet cable, USB mouse, and quick start guide.
2. Setup Instructions
Follow these steps to set up your Lorex DV9163 DVR system.
2.1 Unboxing and Initial Inspection
Carefully unpack all components and ensure all items are present. The package should include the DVR unit, power adapter, HDMI cable, Ethernet cable, USB mouse, and a quick start guide.

Figure 2: Front panel of the Lorex DV9163 DVR, showing control buttons and USB port.
2.2 Connecting the DVR
- Connect Cameras: Connect your security cameras to the BNC video input ports on the back of the DVR using standard Siamese BNC cabling. This cabling provides both video and power transmission.
- Connect to Display: Connect the DVR to a monitor or TV using the provided HDMI cable or a VGA cable (not included).
- Connect to Network: Connect the DVR to your router using the Ethernet cable for network access and remote viewing capabilities.
- Connect USB Mouse: Plug the USB mouse into one of the USB ports on the DVR for navigation.
- Power On: Connect the power adapter to the DVR and then to a power outlet. Ensure all connections are secure before powering on.
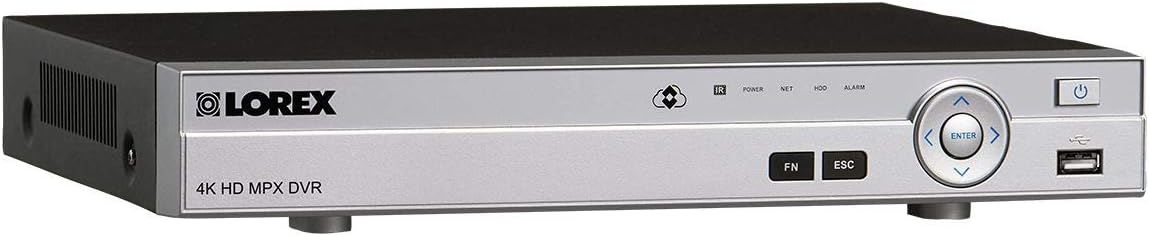
Figure 3: Rear panel of the Lorex DV9163 DVR, showing BNC ports, HDMI, VGA, Ethernet, and USB connections.
3. Operating Instructions
Once your DVR is set up, you can begin monitoring and managing your security system.
3.1 Local Monitoring
View live feeds from all connected cameras directly on your connected monitor or TV. Use the USB mouse to navigate the on-screen menu, switch between camera views, and access recording playback.
3.2 Remote Viewing with FLIR Cloud App
- Download App: Download the free FLIR Cloud app from your smartphone or tablet's app store (iOS or Android).
- Account Setup: Create an account and log in.
- Add Device: Scan the QR code located on your DVR unit using the app. This will quickly add your security system to your mobile device.
- Live View & Playback: Once added, you can view live camera feeds, play back recorded footage, and receive motion-activated push notifications and email alerts with screenshot attachments directly on your phone.
The FLIR Cloud app simplifies remote access by eliminating the need for complex port forwarding or network configurations.
4. Maintenance
Regular maintenance ensures optimal performance and longevity of your Lorex DVR system.
- Keep Clean: Periodically clean the DVR unit and cameras to prevent dust buildup, which can affect performance and cooling. Use a soft, dry cloth.
- Check Connections: Regularly inspect all cable connections (BNC, HDMI, Ethernet, power) to ensure they are secure and free from damage.
- Software Updates: Check the Lorex website or FLIR Cloud app for available firmware updates for your DVR to ensure you have the latest features and security patches.
- Hard Drive Health: The 3TB hard drive is crucial for recording. Monitor its health through the DVR's system settings. Back up important footage periodically.
5. Troubleshooting
If you encounter issues with your Lorex DV9163 DVR, refer to the following common solutions.
- No Video Signal:
- Ensure all camera BNC cables are securely connected to both the cameras and the DVR.
- Verify the display monitor/TV is set to the correct input source (HDMI/VGA).
- Check if cameras are receiving power.
- No Remote Access:
- Confirm the DVR is connected to the internet via the Ethernet cable.
- Ensure your mobile device has an active internet connection.
- Verify the DVR is properly added to your FLIR Cloud app account.
- Excessive Noise from DVR:
- Some fan noise is normal, especially under heavy load. Ensure the DVR is placed in a well-ventilated area.
- If the noise is unusually loud or new, contact Lorex support.
- Interference with TV Remote Control:
- This can occur due to infrared signal overlap. Try repositioning the DVR or the TV, or using an IR extender for your TV remote if available.
- Power Surge Protection:
To protect your DVR from power surges, it is highly recommended to connect it to a surge protector. This can prevent damage to the unit and ensure continuous operation.
6. Specifications
| Feature | Detail |
|---|---|
| Model Number | DV9163 |
| Channels | 16 Channel |
| Recording Resolution | 4K MPX (Ultra HD) |
| Hard Drive Capacity | 3TB (3000 GB) |
| Connectivity Technology | Wired (BNC, Ethernet) |
| Compatible Devices | Cameras, Smartphone, Tablet |
| Item Weight | 6 pounds |
| Package Dimensions | 18 x 13.6 x 5.6 inches |
| Manufacturer | LOREX |
7. Warranty and Support
For warranty information, technical support, or further assistance, please contact Lorex customer service. They can provide guidance on installation, troubleshooting, and product compatibility.
Refer to the official Lorex website or the documentation included with your product for the most up-to-date contact information and warranty details.