
1. Introduction
The KanexPro EXT-AVIP120M is an HDMI Over IP Extender designed to transmit HDMI signals over a standard Cat5e/6 network cable. This system allows for the extension of high-definition video and audio signals over long distances, utilizing existing network infrastructure. It supports point-to-point, point-to-multipoint, and multipoint-to-multipoint configurations, making it suitable for various professional AV installations.
2. Safety Information
- Read all instructions carefully before operating the device.
- Do not expose this unit to rain, moisture, or excessive humidity.
- Ensure proper ventilation to prevent overheating.
- Use only the provided power adapters.
- Do not attempt to disassemble or modify the unit. Refer all servicing to qualified personnel.
- Keep the device away from sources of heat, direct sunlight, and strong magnetic fields.
3. Package Contents
Please check the package contents carefully. If any items are missing or damaged, contact your dealer immediately.
- 1x KanexPro EXT-AVIP120M Transmitter (TX)
- 1x KanexPro EXT-AVIP120M Receiver (RX)
- 2x DC 5V Power Adapters
- 1x IR Transmitter Cable
- 1x IR Receiver Cable
- Mounting Brackets (pre-attached or included)
- Instruction Manual (this document)
4. Product Overview
The KanexPro EXT-AVIP120M system consists of a Transmitter (TX) and a Receiver (RX) unit. Both units feature an Ethernet port for network connection, a DC 5V power input, and IR ports for remote control extension. The Transmitter has an HDMI Input, while the Receiver has an HDMI Output.

Figure 1: KanexPro EXT-AVIP120M Transmitter (left) and Receiver (right) Units. Both units feature an Ethernet port, DC 5V power input, IR ports, and status indicators. The Transmitter has an HDMI Input, and the Receiver has an HDMI Output.
5. Setup and Installation
Follow these steps to set up your KanexPro EXT-AVIP120M system. Refer to the system diagram for visual guidance.
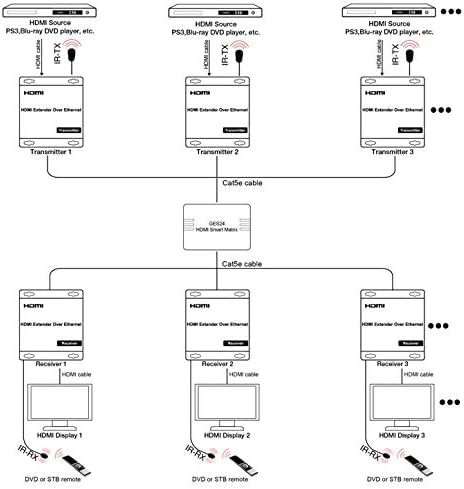
Figure 2: Typical System Diagram for KanexPro EXT-AVIP120M. This diagram illustrates how multiple transmitters and receivers can be connected via a network switch (HDMI Smart Matrix) using Cat5e cables to extend HDMI signals and IR control.
- Connect HDMI Source to Transmitter: Connect an HDMI cable from your HDMI source (e.g., PS3, Blu-ray DVD player, PC) to the HDMI Input port on the EXT-AVIP120M Transmitter unit.
- Connect IR TX Cable (Optional): If you wish to control the source device from the display location, connect the IR Transmitter (TX) cable to the IR TX port on the Transmitter unit. Position the IR emitter head near the IR sensor of your source device.
- Connect Transmitter to Network: Connect a Cat5e/6 Ethernet cable from the Ethernet port on the Transmitter unit to a network switch or directly to the Receiver unit for point-to-point. For multiple units, connect to a dedicated Gigabit Ethernet switch (e.g., HDMI Smart Matrix).
- Connect Receiver to Network: Connect a Cat5e/6 Ethernet cable from the Ethernet port on the Receiver unit to the same network switch or directly to the Transmitter unit.
- Connect HDMI Display to Receiver: Connect an HDMI cable from your HDMI display (e.g., TV, monitor) to the HDMI Output port on the EXT-AVIP120M Receiver unit.
- Connect IR RX Cable (Optional): If you are using IR extension, connect the IR Receiver (RX) cable to the IR RX port on the Receiver unit. Position the IR receiver head in a location where it can receive signals from your remote control.
- Power On Units: Connect the provided DC 5V power adapters to both the Transmitter and Receiver units and plug them into power outlets. The Power LED on each unit should illuminate.
- Verify Connection: Once both units are powered on and connected, the Status LED should indicate a successful connection and signal transmission.
6. Operating Instructions
The KanexPro EXT-AVIP120M operates automatically once properly connected and powered. No additional software or configuration is typically required for basic operation.
- Power On/Off: Simply connect or disconnect the power adapter to power the units on or off.
- Signal Transmission: The HDMI signal from the source connected to the Transmitter will be automatically extended to the display connected to the Receiver.
- IR Control: If IR cables are connected, you can use your source device's remote control at the display location to control the source device. Point the remote at the IR Receiver on the RX unit.
- Reset Button: A small reset button is available on both units. In case of signal issues, a brief press of the reset button may help re-establish the connection. Use a thin, non-metallic object to press it.
7. Maintenance
To ensure the longevity and optimal performance of your EXT-AVIP120M units, follow these simple maintenance guidelines:
- Cleaning: Use a soft, dry cloth to clean the exterior of the units. Do not use liquid or aerosol cleaners.
- Ventilation: Ensure that the units have adequate airflow and that ventilation openings are not blocked.
- Cable Connections: Periodically check all cable connections to ensure they are secure.
- Storage: If storing the units for an extended period, disconnect them from power and store them in a cool, dry place.
8. Troubleshooting
| Problem | Possible Cause | Solution |
|---|---|---|
| No picture on display. |
|
|
| Picture flickering or intermittent. |
|
|
| IR control not working. |
|
|
9. Specifications
| Feature | Detail |
|---|---|
| Model Number | EXT-AVIP120M |
| Product Dimensions | 8.2 x 6.3 x 4.5 inches (approximate, per unit) |
| Item Weight | 1 pound (per unit) |
| Color | Black |
| Compatible Devices | Computers, Smart TVs, Gaming Consoles, and other devices with HDMI input |
| Frequency Bands Supported | IR |
| Manufacturer | KANEXPRO |
| Date First Available | February 23, 2018 |
10. Warranty Information
KanexPro products are designed for reliability and performance. This product comes with a standard manufacturer's warranty. For specific warranty terms, duration, and claim procedures, please refer to the warranty card included with your product or visit the official KanexPro website. Keep your proof of purchase for warranty service.
11. Technical Support
If you encounter any issues that cannot be resolved using the troubleshooting guide, or if you require further assistance, please contact KanexPro technical support. You can find contact information on the official KanexPro website or through your local dealer.
When contacting support, please have the following information ready:
- Product Model Number (EXT-AVIP120M)
- Serial Number (if applicable)
- Date of Purchase
- A detailed description of the problem


