
Aexit modle
P20-2 2Pin Aviation Connector User Manual
Model: modle
Introduction
This manual provides comprehensive instructions for the installation, operation, and maintenance of the Aexit P20-2 2Pin Audio & Video Accessories Square Head Screw Fixing Flange Circular Aviation Connector. This robust connector is designed for reliable performance in various industrial and commercial applications, including data acquisition systems, inclinometers, computer automation measurement and control systems, mechanical equipment, audio/video setups, communications, and automotive systems. Its waterproof and airproof design ensures durability and consistent functionality in demanding environments.
Product Overview
The P20-2 aviation connector is a high-quality electrical component featuring a square head screw fixing flange for secure mounting. It is engineered to handle significant electrical loads, with a rated current of 25A and an operation limit voltage of AC 500V. The connector's design emphasizes ease of installation and reliable signal transmission.
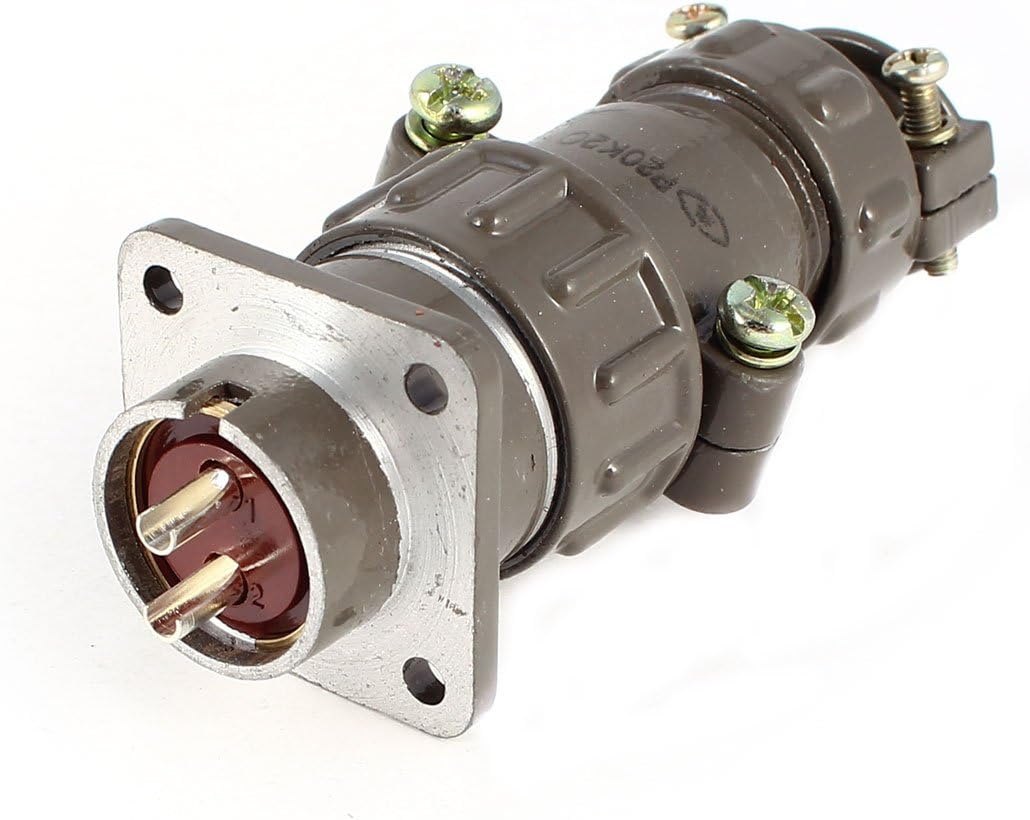
Figure 1: Front view of the P20-2 2Pin Aviation Connector, highlighting the square flange and the two electrical pins.
Key Features
- Product Name: Aviation Connector
- Model: P20-2
- Rated Current: 25A
- Operation Limit Voltage: AC 500V
- Withstand Voltage: AC 1500V
- Insulation Resistance: >500 mOhm
- Contact Resistance: < 1 mOhm
- Contact Diameter: 20mm / 0.79"
- Pin Quantity: 2 Pin
- Flange Size: 30 x 30mm / 1.2" x 1.2" (L*L)
- Flange Mounting Hole Diameter: 4mm / 0.16"
- Total Length: 85mm / 3.3"
- Material: Metal, Plastic
- Color: Silver Tone, Gray
- Weight: 46g
Technical Specifications
| Specification | Value |
|---|---|
| Brand Name | Aexit |
| Item Model Number | modle |
| ASIN | B079WGHH79 |
| Date First Available | February 18, 2018 |
Setup and Installation
The P20-2 connector is designed for easy flange fixing, allowing for secure mounting to panels or enclosures. Proper installation ensures optimal performance and safety.

Figure 2: Rear view of the P20-2 connector, illustrating the cable entry point and the mounting flange with screw holes.
Installation Steps:
- Prepare Mounting Surface: Ensure the mounting surface is clean, flat, and has pre-drilled holes matching the connector's 4mm flange mounting hole diameter and 30x30mm flange size.
- Disassemble Connector: Carefully unscrew and separate the connector housing components to access the wiring terminals.
- Wire Connections: Strip the insulation from your wires to the appropriate length. Connect the wires to the designated pins within the connector. Ensure all connections are secure and properly insulated to prevent short circuits.
- Assemble Housing: Reassemble the connector housing, ensuring all parts are correctly aligned and tightened.
- Mount Connector: Position the connector's flange over the pre-drilled holes on your mounting surface. Secure it firmly using appropriate screws (not included) through the 4mm mounting holes.
- Verify Connections: Before applying power, double-check all wiring and mounting to ensure stability and correct polarity.
Operating Instructions
Once installed, the P20-2 aviation connector facilitates quick and reliable electrical connections. Its design allows for straightforward mating and un-mating of the male and female components.
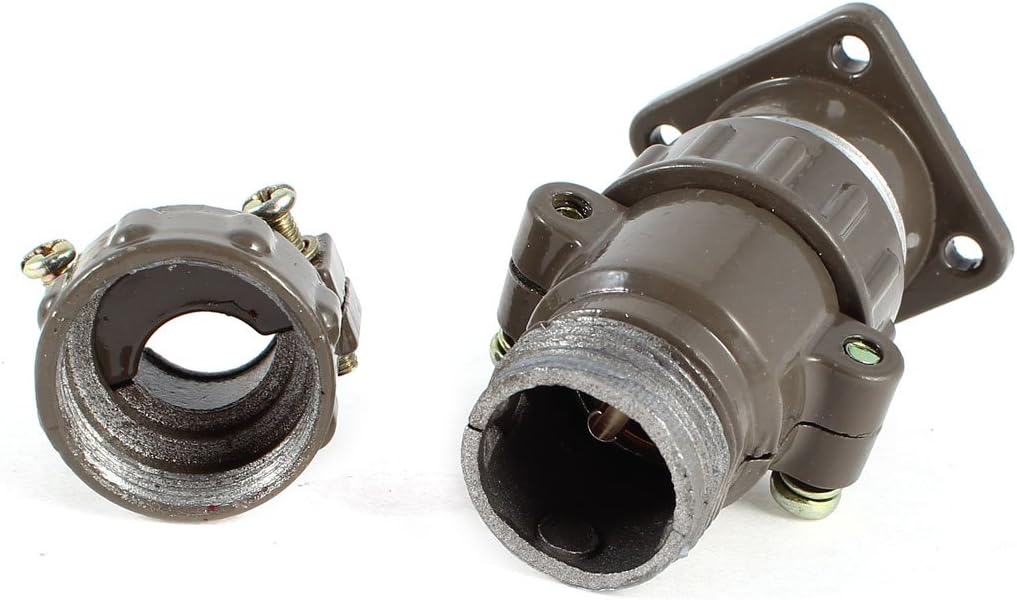
Figure 3: Disassembled view of the P20-2 connector, showing the main body and the screw-on back shell, illustrating how it can be taken apart for wiring.
Connecting:
- Align the male and female parts of the connector, ensuring the keyways or alignment marks are correctly matched.
- Gently push the two halves together until they are fully seated. A secure connection will be felt.
- For models with a locking mechanism (e.g., threaded collar), rotate the collar until it is fully tightened to secure the connection and prevent accidental disconnection.
Disconnecting:
- If present, unscrew the locking collar until it is loose.
- Pull the two halves of the connector apart firmly but gently. Avoid twisting or yanking, which could damage the pins.
Maintenance
Regular maintenance helps ensure the longevity and reliable performance of your P20-2 aviation connector.
- Cleaning: Periodically inspect the connector for dust, dirt, or corrosion. Use a clean, dry, lint-free cloth to wipe down the exterior. For internal contacts, if accessible, use a specialized electrical contact cleaner and a soft brush, ensuring the connector is disconnected from power.
- Inspection: Check for any signs of physical damage, such as cracks in the housing, bent pins, or loose connections. Ensure the mounting screws are tight.
- Storage: When not in use, store connectors in a clean, dry environment away from extreme temperatures and direct sunlight. Consider using protective caps if available.
Troubleshooting
If you encounter issues with your P20-2 aviation connector, consider the following common troubleshooting steps:
- No Connection/Intermittent Connection:
- Ensure the male and female parts are fully seated and the locking mechanism (if any) is engaged.
- Check for bent or damaged pins on either side of the connector.
- Verify that the internal wire connections are secure and not loose or corroded.
- Inspect the cable for damage or breaks.
- Difficulty Mating/Un-mating:
- Check for debris or foreign objects obstructing the connection.
- Ensure proper alignment of the keyways before attempting to connect.
- Avoid forcing the connection; if it doesn't mate easily, re-align and try again.
- Overheating:
- Overheating can indicate an overloaded circuit or a poor connection. Immediately disconnect power.
- Verify that the current draw does not exceed the connector's 25A rated current.
- Check for loose or corroded internal wire connections, which can increase resistance and generate heat.
If problems persist after troubleshooting, consult a qualified electrician or contact the manufacturer for assistance.
Safety Information
Working with electrical components carries inherent risks. Adhere to the following safety guidelines to prevent injury or damage:
- Disconnect Power: Always ensure that all power sources are disconnected and locked out before installing, wiring, or performing any maintenance on the connector.
- Qualified Personnel: Installation and wiring should only be performed by qualified personnel familiar with electrical safety practices and local electrical codes.
- Voltage and Current Ratings: Do not exceed the specified voltage (AC 500V) and current (25A) ratings of the connector. Overloading can lead to overheating, fire, or electrical shock.
- Proper Tools: Use appropriate insulated tools for all electrical work.
- Environmental Conditions: While the connector is waterproof and airproof, ensure it is used within its specified environmental limits. Avoid exposing it to corrosive substances or extreme conditions beyond its design.
- Secure Connections: Ensure all wire connections are tight and secure to prevent arcing or short circuits.
Warranty and Support
Warranty information for the Aexit P20-2 2Pin Aviation Connector is typically provided by the manufacturer or the point of purchase. Please refer to your purchase documentation or the manufacturer's official website for specific warranty terms and conditions.
For technical support, product inquiries, or assistance with troubleshooting beyond the scope of this manual, please contact Aexit customer service or your authorized distributor. Provide your product model number (modle) and a detailed description of the issue when seeking support.
Related documentsmodle


Ask a question about this manual
Ask about setup, troubleshooting, compatibility, parts, safety, or missing instructions. Manuals+ will review the question and use this page’s manual context to help answer it.