
1. Product Overview
The Yato YT-36140 is a manual hand riveter designed for setting rivet nuts in sizes M3, M4, M5, and M6. This tool is used to create a threaded insert in materials, allowing for the attachment of additional components using screws or bolts. It features a durable construction made from CrMo chrome-molybdenum tool steel and handles with a non-slip rubber lining for secure grip.

Image 1.1: The Yato YT-36140 Hand Riveter, showcasing its red body, black handles, and adjustable head.
2. Package Contents
Verify that all components are present in the package:
- 1 x Yato YT-36140 Hand Riveter Nut M3-M6
- Interchangeable heads for M3, M4, M5, M6 rivet nuts (pre-installed or included separately)

Image 2.1: The Yato YT-36140 Hand Riveter shown in its retail packaging, indicating the model number and brand.
3. Specifications
| Feature | Specification |
|---|---|
| Model Number | YT-36140 |
| Rivet Nut Sizes | M3, M4, M5, M6 |
| Material | CrMo Chrome-Molybdenum Tool Steel |
| Handle Material | Non-slip rubber lining |
| Item Weight | 300 g |
| Product Dimensions (LxWxH) | 5 x 5 x 4 cm (approximate) |
4. Setup
- Select the Correct Mandrel and Nosepiece: Identify the appropriate mandrel and nosepiece for the rivet nut size (M3, M4, M5, or M6) you intend to use. The tool comes with interchangeable heads for these sizes.
- Install the Mandrel: Unscrew the existing mandrel (if any) from the riveter. Thread the chosen mandrel into the riveter's head until it is securely fastened.
- Install the Nosepiece: Place the corresponding nosepiece over the mandrel and secure it. Ensure both components are tightened properly to prevent loosening during operation.
- Prepare the Rivet Nut: Thread the rivet nut onto the installed mandrel until it sits flush against the nosepiece.
5. Operating Instructions
Follow these steps to properly set a rivet nut:
- Drill Hole: Drill a hole in the material where the rivet nut is to be installed. The hole size must match the diameter of the rivet nut body.
- Insert Rivet Nut: Insert the rivet nut, which is threaded onto the riveter's mandrel, into the drilled hole. Ensure the flange of the rivet nut is flush against the material surface.
- Operate Riveter: Firmly squeeze the handles of the riveter together. This action pulls the mandrel, deforming the rivet nut and creating a secure, threaded anchor on the blind side of the material. Continue squeezing until resistance is felt and the rivet nut is fully set.
- Release and Remove: Once the rivet nut is set, release the handles. Unscrew the riveter from the newly installed rivet nut by rotating the tool counter-clockwise.
- Inspect: Verify that the rivet nut is securely fastened and properly formed.
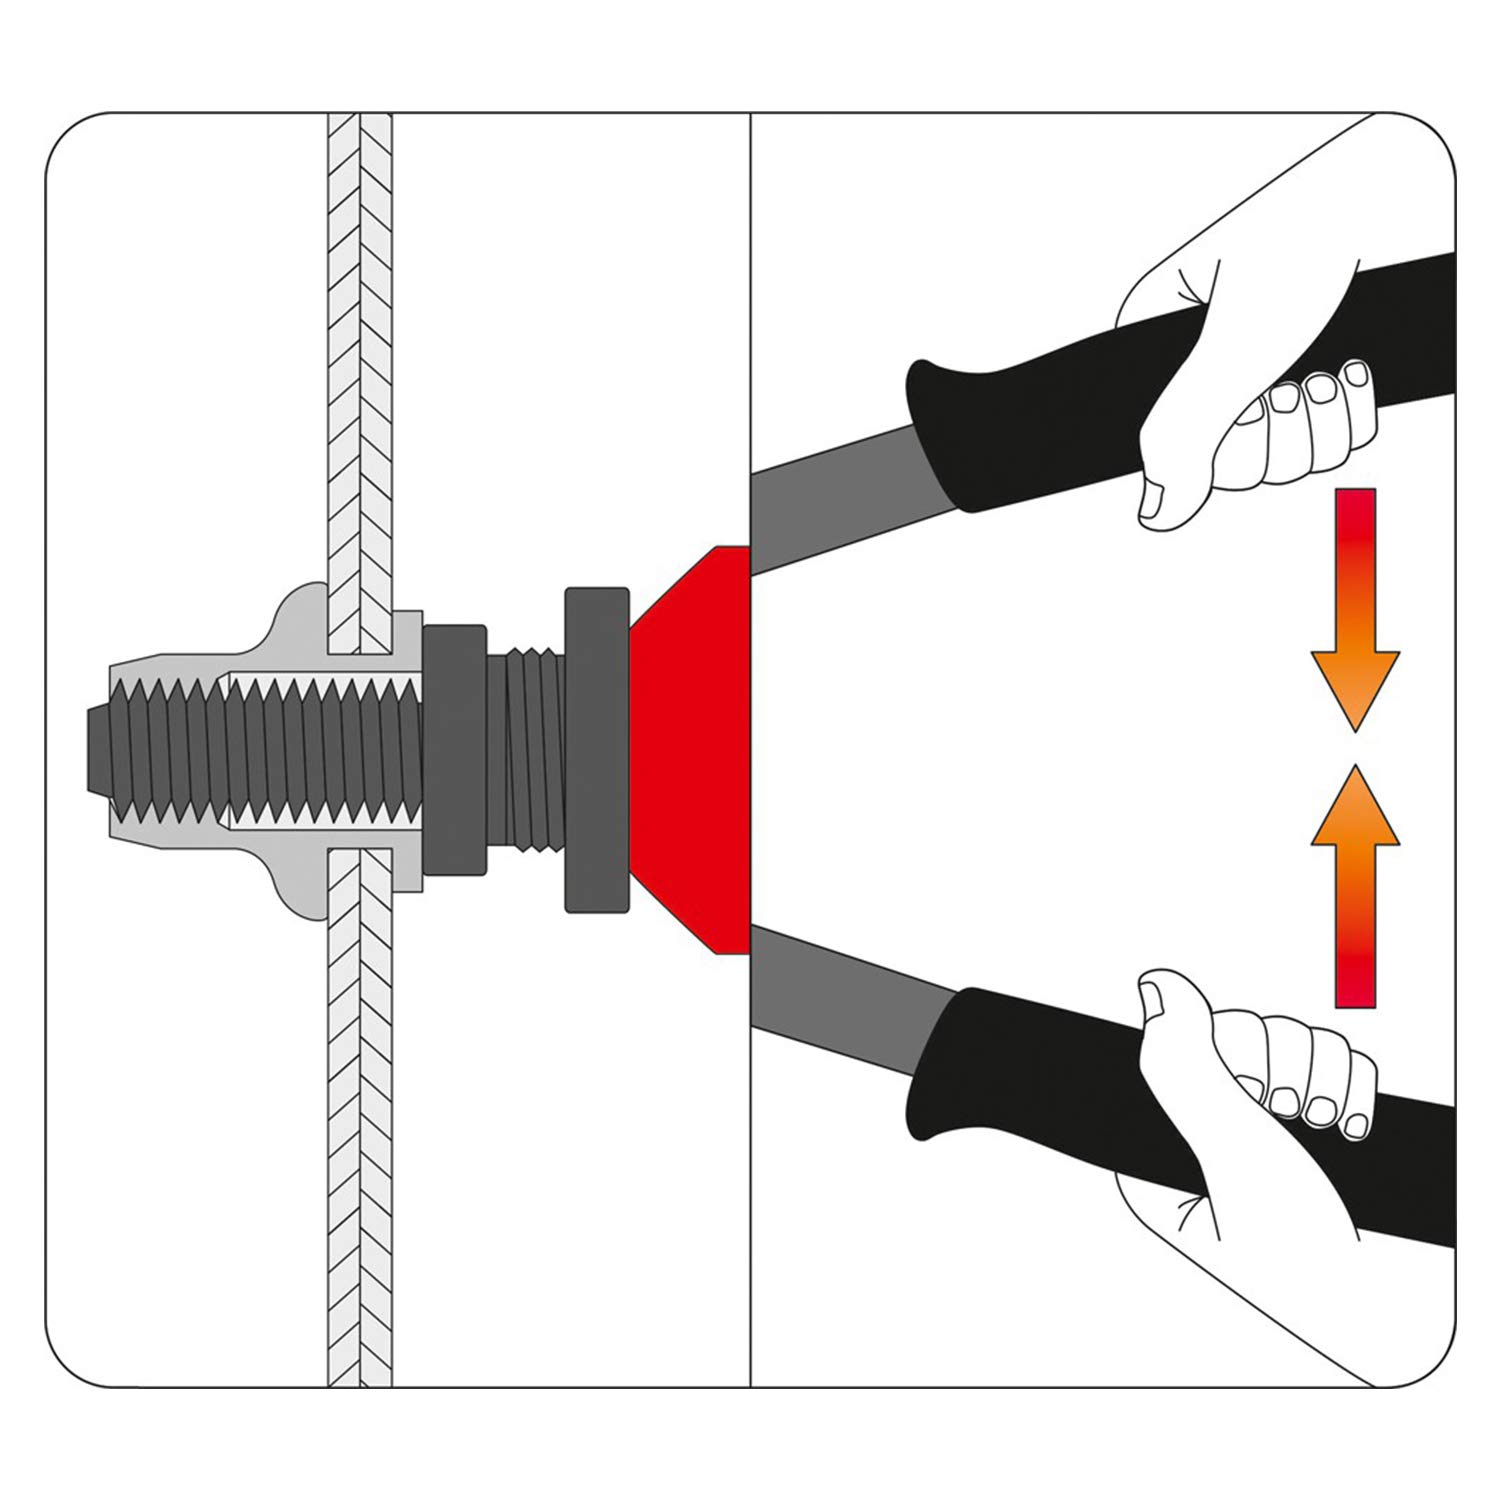
Image 5.1: Diagram illustrating the process of setting a rivet nut with a hand riveter. The image shows the tool pulling the mandrel to deform the rivet nut against the material.
6. Maintenance
- Cleaning: After each use, wipe the riveter clean with a dry cloth to remove any dust or debris.
- Lubrication: Periodically apply a small amount of light machine oil to the moving parts and pivot points to ensure smooth operation.
- Storage: Store the riveter in a dry place, away from moisture and corrosive environments, to prevent rust and damage. Keep all mandrels and nosepieces organized.
- Inspection: Regularly inspect the tool for any signs of wear, damage, or loose components. Replace worn parts as necessary.
7. Troubleshooting
- Rivet Nut Not Setting Properly:
- Ensure the correct mandrel and nosepiece are installed for the rivet nut size.
- Verify that the rivet nut is fully threaded onto the mandrel before insertion.
- Apply sufficient force when squeezing the handles.
- Check if the material thickness is within the rivet nut's specified grip range.
- Mandrel Jams or Breaks:
- Do not over-tighten the rivet nut during installation, as this can stress the mandrel.
- Ensure the mandrel is clean and free of debris.
- Replace worn or damaged mandrels immediately.
- Difficulty Removing Riveter from Set Nut:
- Ensure the riveter is unscrewed counter-clockwise from the rivet nut after setting.
- Check for any burrs or damage on the rivet nut's threads or the mandrel.
8. Warranty and Support
For warranty information or technical support regarding your Yato YT-36140 Hand Riveter, please refer to the documentation provided with your purchase or contact Yato customer service directly. Keep your proof of purchase for warranty claims.
Manufacturer: Yato Tools(Shanghai)Co. Ltd
Country of Origin: China