NEWTRY 6108
NEWTRY Pneumatic Rivet Nut Setting Kit 6108 User Manual
Model: 6108 (M6, M8, M10 Heads)
1. Introduction
Thank you for choosing the NEWTRY Pneumatic Rivet Nut Setting Kit Model 6108. This tool is designed for efficient and reliable installation of rivet nuts in various applications. This manual provides essential information for the safe and effective operation, maintenance, and troubleshooting of your pneumatic rivet nut setter. Please read this manual thoroughly before use and retain it for future reference.

Image 1: Overview of the NEWTRY Pneumatic Rivet Nut Setting Kit 6108, showing the main tool, M6, M8, M10 heads, and a wrench.
2. Safety Instructions
Always observe basic safety precautions to reduce the risk of personal injury and damage to the tool. Failure to follow these instructions may result in serious injury.
- Wear Eye Protection: Always wear ANSI-approved safety goggles or safety glasses with side shields.
- Wear Hearing Protection: Prolonged exposure to noise can cause hearing damage.
- Wear Hand Protection: Use appropriate gloves to protect hands from injury.
- Maintain a Clean Work Area: Cluttered areas invite accidents.
- Do Not Overreach: Keep proper footing and balance at all times.
- Disconnect Air Supply: Always disconnect the air supply before making adjustments, changing accessories, or servicing the tool.
- Use Correct Air Pressure: Ensure the air supply pressure does not exceed the maximum recommended pressure for the tool.
- Inspect Tool Before Use: Check for damaged parts, misalignment, or any other condition that may affect its operation.
- Keep Children Away: Do not allow children or untrained persons to operate the tool.
3. Product Components and Structure
Familiarize yourself with the various parts of your NEWTRY pneumatic rivet nut setting tool for proper operation and maintenance.

Image 2: Detailed diagram illustrating the main components of the pneumatic rivet nut tool.
- Frosted Alloy Steel Shell: Provides a durable and ergonomic grip.
- Polished Alloy Steel Shell: Houses the internal mechanisms.
- Start Switch: Activates the tool's operation.
- Air Regulating Valve: Controls the air flow and pressure.
- 1/4 Gas Pipe Joint: Connection point for the air supply hose.
- Exhaust Valve: Releases air during operation.
- Gun Heads (M6, M8, M10): Interchangeable heads for different rivet nut sizes.
- Hexagon Wrench: Used for changing gun heads.

Image 3: Exploded view of the gun head assembly, detailing internal components like the pull rod, bearings, and gaskets.
4. Setup and Head Installation
Before operating the tool, ensure the correct rivet nut head is installed and the air supply is properly connected.
4.1 Connecting Air Supply
- Ensure the air compressor is off and depressurized.
- Connect a 1/4-inch air hose to the 1/4 Gas Pipe Joint on the tool.
- Set the air compressor pressure to the recommended operating range (refer to specifications).
- Turn on the air compressor.
4.2 Changing Rivet Nut Heads
The NEWTRY 6108 kit includes M6, M8, and M10 self-locking gun heads for quick replacement.
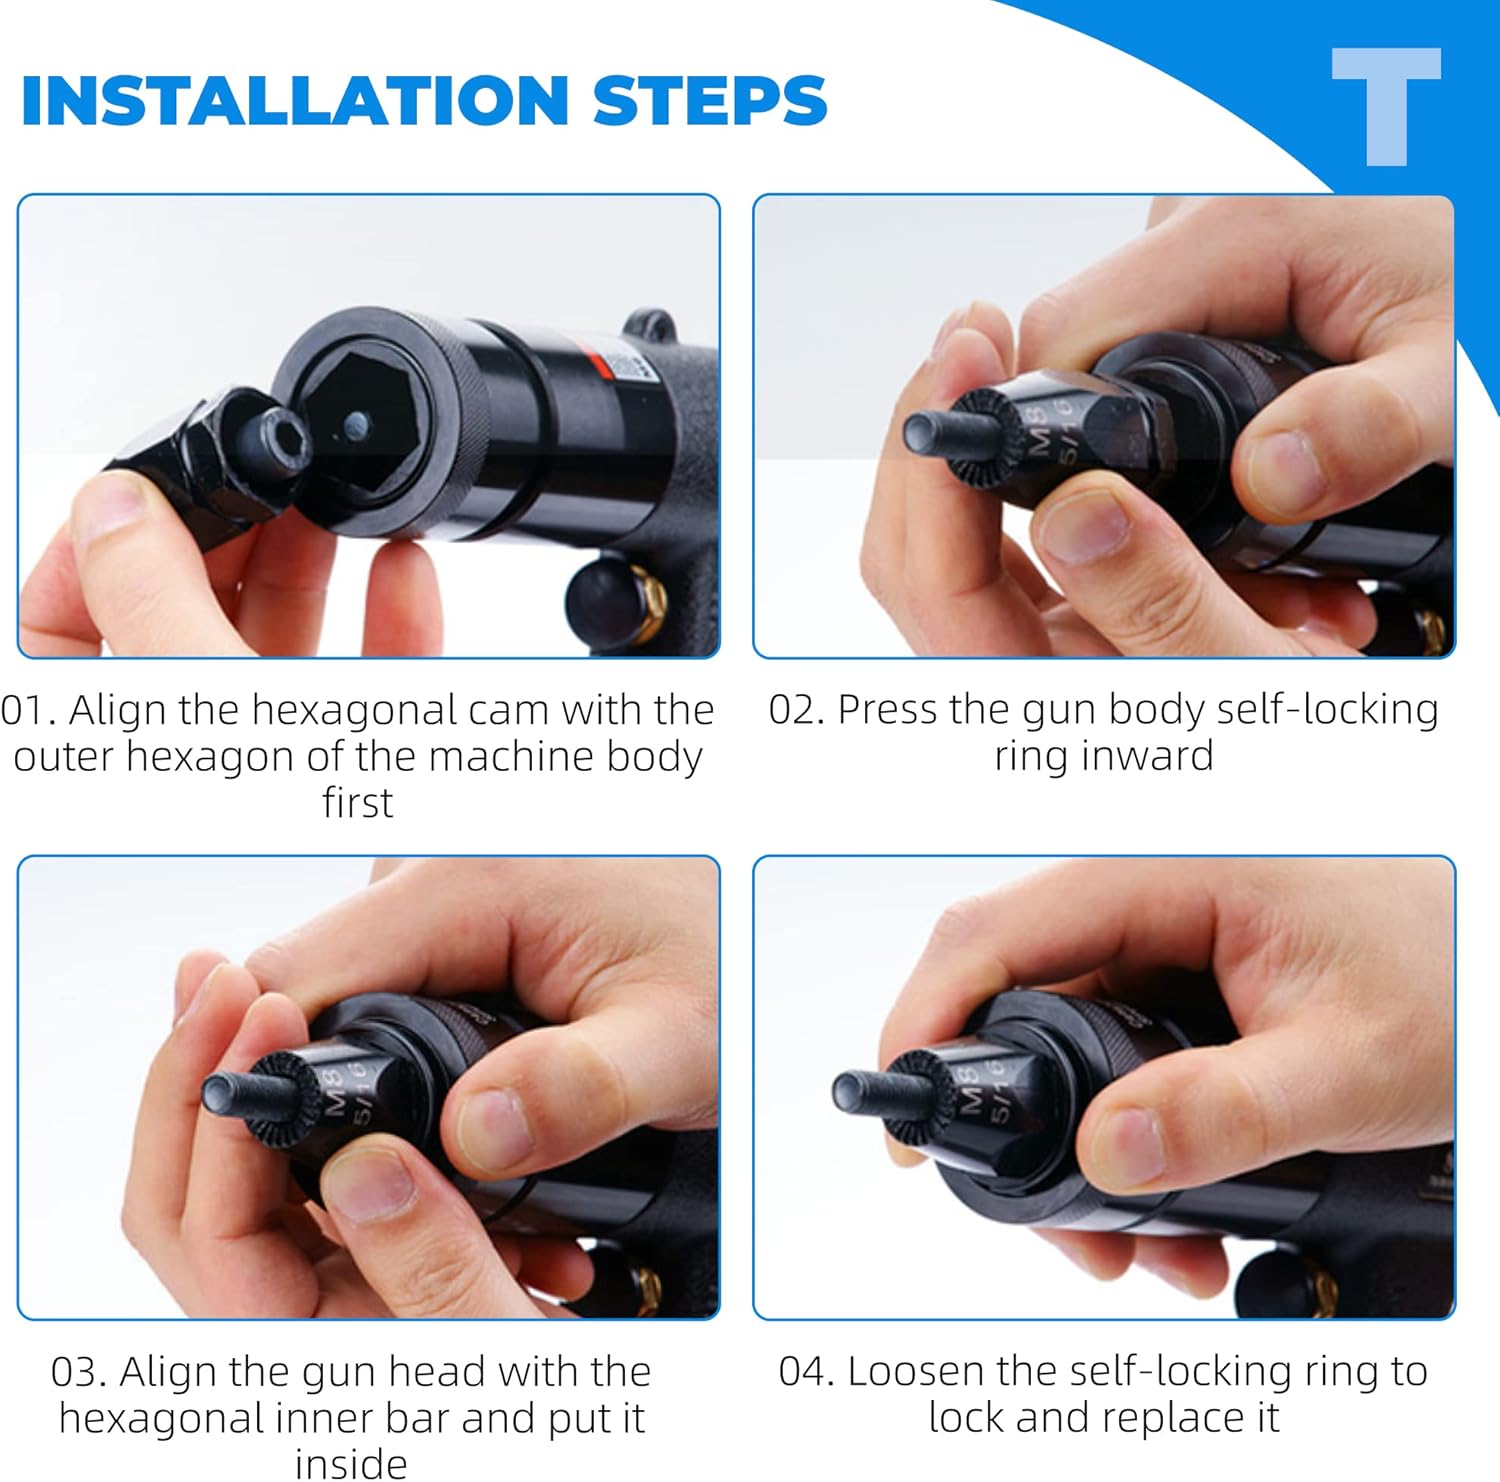
Image 4: Step-by-step guide for installing or changing the rivet nut gun head.
- Disconnect Air Supply: Always disconnect the air hose from the tool before changing heads.
- Remove Current Head (if applicable): If a head is already installed, press the gun body's self-locking ring inward and unscrew the head.
- Align Hexagonal Cam: Align the hexagonal cam of the desired gun head (M6, M8, or M10) with the outer hexagon of the machine body.
- Press Self-Locking Ring: Press the gun body's self-locking ring inward.
- Insert Gun Head: Align the gun head with the hexagonal inner bar and push it firmly into place.
- Secure Head: Loosen the self-locking ring to lock the gun head securely. Ensure it is fully seated and cannot be easily pulled out.
5. Operating Instructions
Follow these steps for effective and safe operation of your pneumatic rivet nut setter.

Image 5: The tool in action, demonstrating its ease of use and automatic retraction feature.
- Select Correct Head: Ensure the appropriate M6, M8, or M10 head is installed for your rivet nut size.
- Thread Rivet Nut: Thread the rivet nut onto the mandrel of the installed gun head.
- Insert into Workpiece: Insert the rivet nut into the pre-drilled hole in your workpiece.
- Activate Tool: Press the start switch to activate the tool. The tool will pull the rivet nut, deforming it to create a secure thread in the material.
- Automatic Retraction: After the rivet nut is fully deformed and set, the rod will automatically retract, releasing the tool from the installed rivet nut.
- Inspect Installation: Verify that the rivet nut is securely fastened and properly set.
5.1 Application Scenarios
This tool is suitable for various applications including home construction, decoration, assembly, automotive parts, box manufacturing, and aviation riveting.
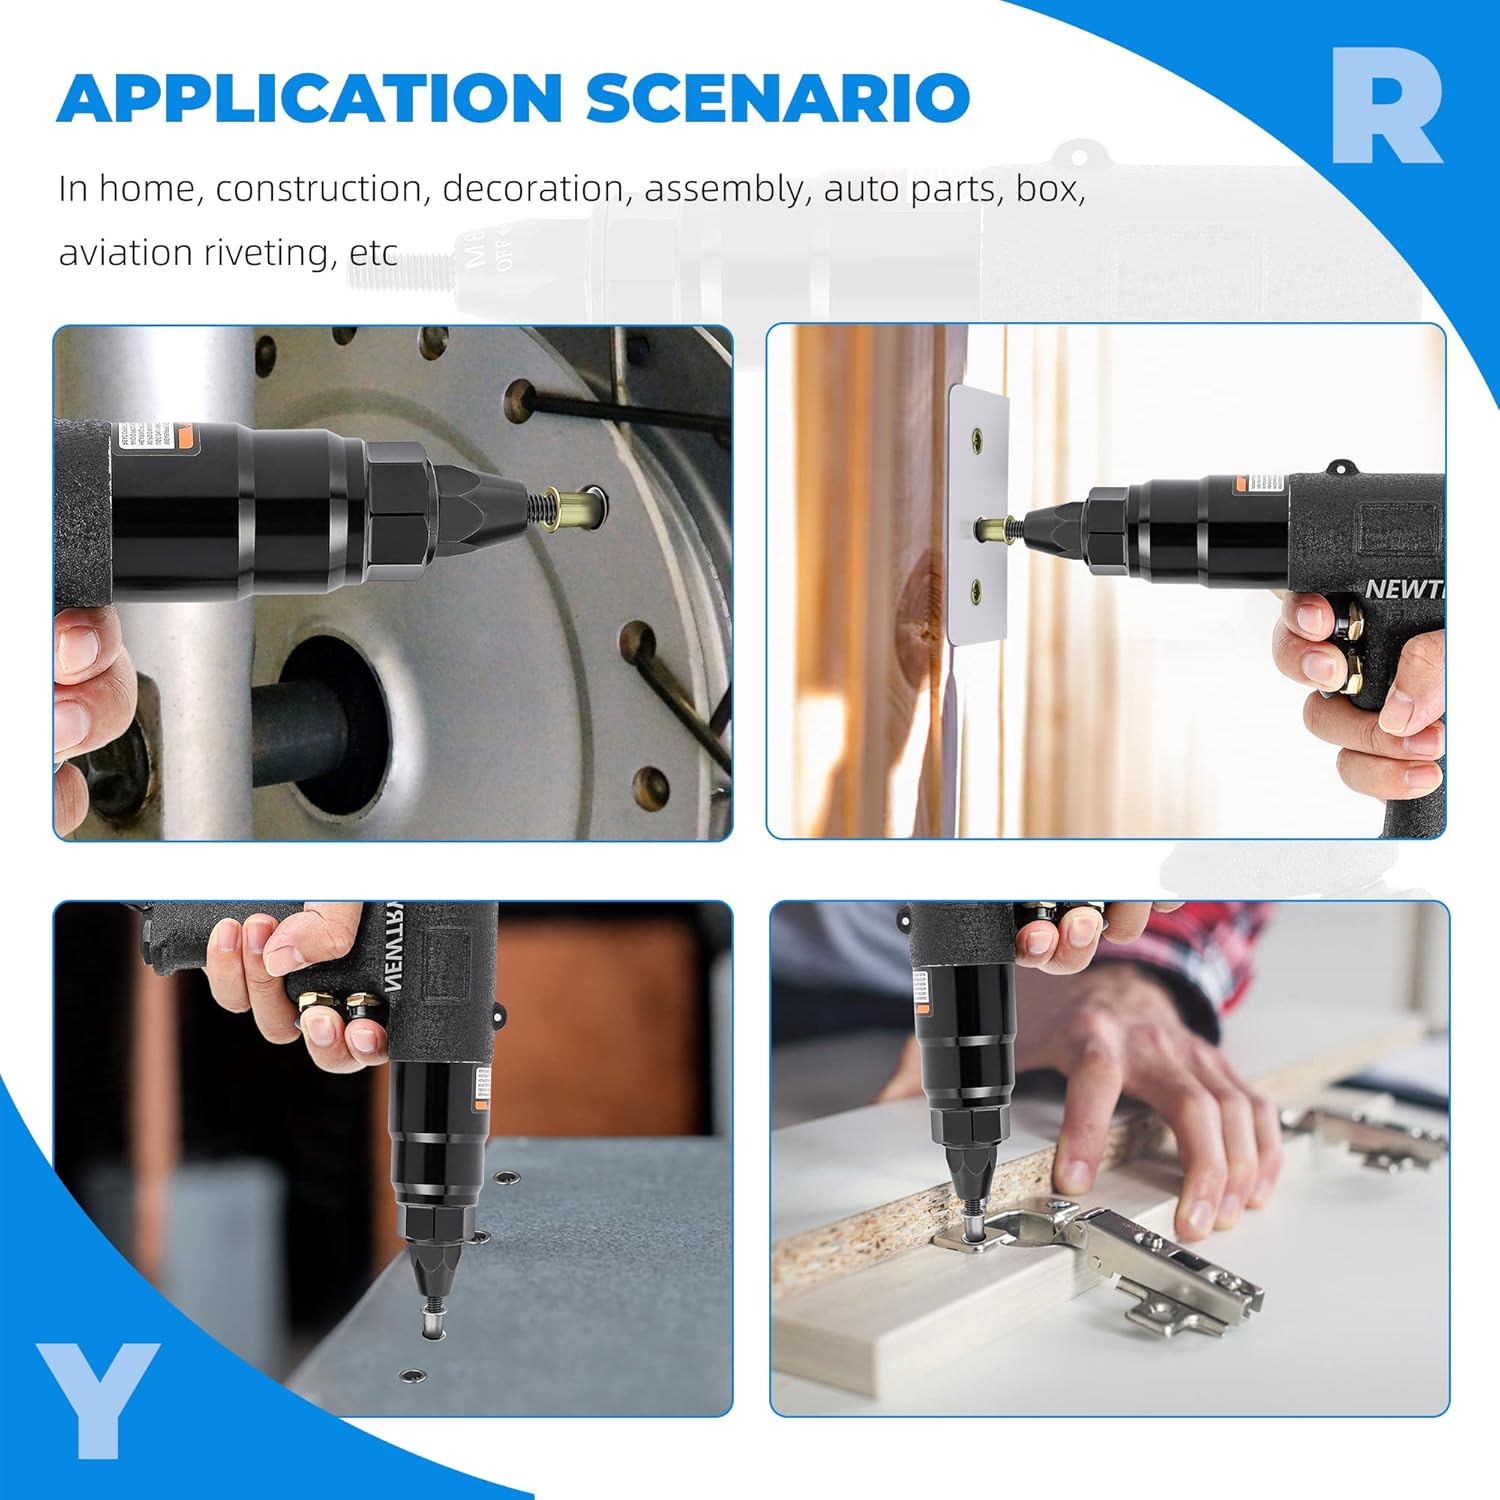
Image 6: Examples of where the pneumatic rivet nut tool can be effectively used.
6. Maintenance
Regular maintenance ensures the longevity and optimal performance of your tool.
- Lubrication: Apply a few drops of pneumatic tool oil into the air inlet before and after each use.
- Cleaning: Keep the tool clean and free from debris. Wipe down the exterior with a clean cloth.
- Storage: Store the tool in a dry, clean environment away from direct sunlight and extreme temperatures.
- Inspect Air Hose: Regularly check the air hose for wear, cuts, or leaks. Replace if damaged.
- Check Gun Heads: Inspect gun heads for wear or damage. Replace worn heads to ensure proper rivet nut setting.
7. Troubleshooting
Refer to this section for common issues and their solutions.
| Problem | Possible Cause | Solution |
|---|---|---|
| Tool does not operate or operates weakly. | Low air pressure; air leak; clogged air inlet; insufficient lubrication. | Check air compressor pressure; inspect air hose connections; clean air inlet; lubricate tool. |
| Rivet nut not setting properly or spinning. | Incorrect gun head size; worn gun head; low air pressure; poor quality rivet nut. | Ensure correct head for rivet nut size; replace worn head; check air pressure; use high-quality rivet nuts. |
| Air leaks from tool. | Loose connections; damaged O-rings or seals. | Tighten connections; inspect and replace damaged seals. |
If problems persist after attempting these solutions, please contact NEWTRY customer support.
8. Specifications
| Feature | Detail |
|---|---|
| Model | 6108 (YX-306) |
| Applicable Rivet Nut Sizes | M6, M8, M10 |
| Air Consumption | 5 CFM (approximate, for similar models) |
| Rotation Speed (6108) | 400 RPM |
| Package Dimensions | 26 x 23 x 6.7 cm |
| Weight | 1.94 kg |
| Manufacturer | NEWTRY |
Note: Specifications are subject to change without notice for product improvement.
9. Warranty Information
NEWTRY products are manufactured to high-quality standards. For specific warranty details, including coverage period and terms, please refer to the warranty card included with your purchase or visit the official NEWTRY website. Keep your proof of purchase for any warranty claims.
10. Customer Support
For technical assistance, spare parts, or any inquiries regarding your NEWTRY Pneumatic Rivet Nut Setting Kit, please contact NEWTRY customer service. Contact information can typically be found on the product packaging, the official NEWTRY website, or through your point of purchase.
Visit the NEWTRY Store on Amazon for more products and information.
Ask a question about this manual
Ask about setup, troubleshooting, compatibility, parts, safety, or missing instructions. Manuals+ will review the question and use this page’s manual context to help answer it.