
1. Product Overview
The Lindby Ticino LED Ceiling Light is a modern and energy-efficient lighting solution designed for various indoor spaces such as living rooms, dining rooms, bedrooms, kitchens, and hallways. This fixture features a stylish silver and chrome finish with five G9 LED light sources, providing ample illumination while conserving energy.

Image: The Lindby Ticino LED Ceiling Light, featuring five spherical, mesh-covered light sources, installed on a ceiling.
Key Features:
- Energy-Efficient LED Technology: Equipped with 5 x 3W LED bulbs for low power consumption.
- Modern Design: Silver and chrome metal construction suitable for contemporary interiors.
- Included Light Sources: Comes with high-quality LED bulbs for immediate use.
- Versatile Application: Ideal for various rooms including living rooms, dining rooms, and hallways.
2. Safety Instructions
Please read these safety instructions carefully before installation and use. Failure to follow these instructions may result in electric shock, fire, or personal injury.
- Electrical Safety: Installation must be performed by a qualified electrician in accordance with all local and national wiring regulations.
- Power Disconnection: Always disconnect the power supply at the main circuit breaker before attempting any installation, maintenance, or bulb replacement.
- Voltage: Ensure the supply voltage matches the fixture's rating (230V).
- IP Rating: This fixture has an IP20 rating, meaning it is protected against solid objects larger than 12.5mm but has no protection against water. Do not install in bathrooms or other areas where it may be exposed to water or high humidity.
- Bulb Type: Use only G9 LED bulbs as specified. Do not exceed the maximum wattage of 3W per bulb.
- Handling: Handle the fixture and bulbs with care. Avoid touching bulbs with bare hands as oils can reduce bulb life.
3. Package Contents
Verify that all components are present before beginning installation:
- Lindby Ticino LED Ceiling Light fixture
- 5 x G9 LED bulbs (3W each)
- Mounting hardware (screws, wall plugs)
- Instruction manual
4. Setup and Installation
Follow these steps for safe and proper installation of your Lindby Ticino LED Ceiling Light.
Tools Required (Not Included):
- Screwdriver (Phillips and flathead)
- Drill and drill bits (appropriate for your ceiling material)
- Wire strippers
- Voltage tester
- Pencil
Installation Steps:
- Turn Off Power: Locate the main circuit breaker for the room where you are installing the light and turn off the power. Use a voltage tester to confirm that the power is off at the ceiling outlet.
- Prepare Mounting Surface: Remove any existing light fixture. The mounting bracket for the Ticino light fixture will attach to your ceiling. Mark the drilling points using the bracket as a template.
- Install Mounting Bracket: Drill holes at the marked points. Insert appropriate wall plugs (if necessary) and secure the mounting bracket to the ceiling using the provided screws.
- Wire Connection: Carefully connect the electrical wires from your ceiling to the terminal block on the light fixture. Ensure correct polarity: Live (L), Neutral (N), and Earth (E). Refer to the diagram below.

Image: Wiring compartment of the light fixture, showing the terminal block.
- Secure Fixture: Once wiring is complete, carefully attach the main body of the light fixture to the mounting bracket, ensuring all wires are tucked safely inside the ceiling rose. Secure it with the provided screws or fasteners.
- Install Bulbs: Gently insert the G9 LED bulbs into their respective sockets. Do not overtighten.

Image: Close-up of a G9 bulb socket.
- Restore Power: Once installation is complete and all connections are secure, restore power at the main circuit breaker.
- Test Light: Turn on the light switch to ensure the fixture is working correctly.
5. Operating Instructions
The Lindby Ticino LED Ceiling Light operates via a standard wall switch connected to your home's electrical circuit.
- Turning On/Off: Flip the wall switch to turn the light fixture on or off.
- Energy Efficiency: This fixture uses energy-saving LED technology, providing bright illumination with minimal power consumption.
6. Maintenance
Regular maintenance will help prolong the life and appearance of your Lindby Ticino LED Ceiling Light.
Cleaning:
- Disconnect Power: Always turn off the power supply before cleaning.
- Dusting: Gently dust the fixture with a soft, dry cloth.
- Wiping: For more thorough cleaning, use a slightly damp cloth with a mild, non-abrasive cleaner. Avoid harsh chemicals or abrasive materials, as these can damage the finish.
- Drying: Ensure the fixture is completely dry before restoring power.
Bulb Replacement:
- Disconnect Power: Turn off the power supply at the circuit breaker.
- Allow to Cool: Allow the old bulb to cool down completely before touching it.
- Remove Old Bulb: Gently pull the old G9 bulb straight out from its socket.
- Insert New Bulb: Carefully insert a new G9 LED bulb (max 3W) straight into the socket. Do not twist.
- Restore Power: Restore power and test the new bulb.
7. Troubleshooting
If you encounter issues with your Lindby Ticino LED Ceiling Light, refer to the following common problems and solutions:
| Problem | Possible Cause | Solution |
|---|---|---|
| Light does not turn on. | No power supply. | Check the circuit breaker and wall switch. |
| Loose wiring connection. | Turn off power, check wiring connections at the fixture and switch. Consult a qualified electrician if unsure. | |
| Faulty bulb. | Turn off power, replace the bulb with a new G9 LED bulb. | |
| Light flickers. | Loose bulb or wiring. | Turn off power, ensure bulbs are securely seated and wiring connections are tight. |
| Incompatible dimmer switch. | This fixture is not specified as dimmable. If a dimmer is used, it may cause flickering. Replace with a standard ON/OFF switch. |
8. Specifications
| Attribute | Value |
|---|---|
| Model Number | 9620782 |
| Brand | Lindby |
| Material | Metal |
| Color | Silver, Chrome |
| Dimensions (L x W x H) | 65 x 20 x 30 cm |
| Weight | 875 grams |
| Socket Type | G9 |
| Light Source | 5 x 3W LED |
| Voltage | 230 Volts |
| IP Code | IP20 |
| Protection Class | I |
| Luminous Efficacy | 1500 lm (total) |
| Energy Label | F (as per 2019/2015 regulation) |
| Power Consumption | 4 kWh/1000h |
Energy Label Information:
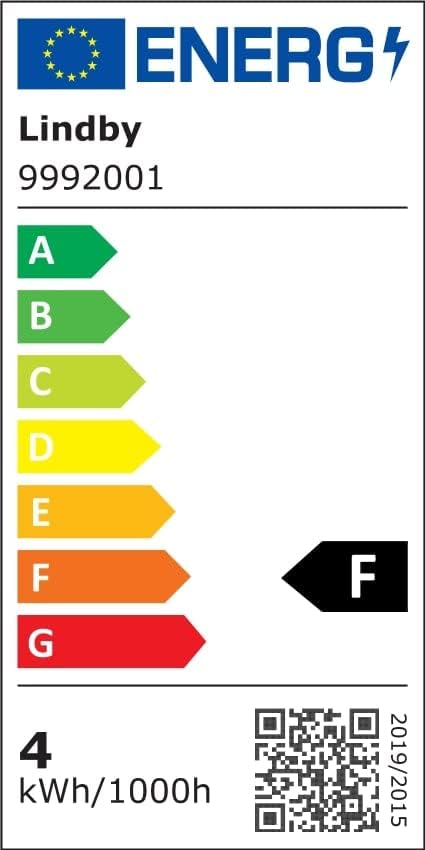
Image: Energy label for the Lindby light fixture.
For detailed product data, please refer to the EPREL database: https://eprel.ec.europa.eu/qr/741245
9. Warranty and Support
Lindby products are manufactured to high-quality standards. For warranty information or technical support, please contact your retailer or the Lindby customer service department. Keep your proof of purchase for any warranty claims.


