
RYOBI 5133003713
Ryobi RBC18X20B4F Brushcutter User Manual
Model: 5133003713
1. Important Safety Information
WARNING: Wear appropriate safety gear, including eye protection, when operating. Be aware of potential flying debris and cut hazards. Always read and understand all safety warnings and instructions before operating this product. Failure to follow the warnings and instructions may result in electric shock, fire, and/or serious injury.
- Always wear eye protection that complies with applicable standards.
- Wear long pants, heavy boots, and gloves. Do not wear loose clothing, short pants, sandals, or go barefoot.
- Secure long hair above shoulder level to prevent entanglement in moving parts.
- Keep all bystanders, children, and pets at least 15 meters (50 feet) away from the operating area.
- Inspect the work area before each use. Remove all objects such as rocks, broken glass, nails, wire, or string that can be thrown or become entangled in the cutting head.
2. Product Overview
The Ryobi RBC18X20B4F Brushcutter is a versatile 18V ONE+ tool designed for efficient lawn and garden maintenance. It features a powerful motor and comes with both a wire head and a blade for different cutting tasks. The ergonomic bike handle ensures comfortable operation, making it suitable for maintaining lawns up to 350m perimeter with the included 4.0 Ah battery.

Figure 2.1: The Ryobi RBC18X20B4F Brushcutter kit, including the main unit, 18V ONE+ battery, and charger.
Key Features:
- Dual Functionality: Supplied with both a wire head and a blade for versatile cutting.
- Cutting Width: 20cm (blade) - 33cm (wire) for efficient coverage.
- Variable Speed: Allows for optimal control during operation.
- Ergonomic Bike Handle: Designed for comfortable and balanced use.
- 18V ONE+ System: Powered by a 4.0 Ah Li-ion battery, compatible with other Ryobi ONE+ tools.
3. Setup and Assembly
Before first use, ensure all components are present and undamaged. Refer to the packaging contents list.
3.1 Attaching the Handle
- Loosen the handle clamp bolts on the main shaft.
- Position the bike handle onto the shaft at a comfortable height and angle.
- Tighten the clamp bolts securely to prevent rotation during use.
3.2 Installing the Cutting Head
The brushcutter can be used with either the wire head or the blade.
For Wire Head:
- Ensure the brushcutter is turned off and the battery is removed.
- Align the wire head with the spindle and twist to secure.
- Ensure it clicks into place or is tightened according to the specific mechanism.
For Blade:
- Ensure the brushcutter is turned off and the battery is removed.
- Place the blade onto the spindle, ensuring it sits flush.
- Secure the blade with the provided washer and nut, tightening firmly with the wrench.
- Attach the blade guard if not already installed, ensuring it is correctly positioned for safety.
3.3 Charging the Battery
- Connect the charger to a standard power outlet.
- Slide the 4.0 Ah Li-ion battery into the charger.
- Allow approximately 120 minutes for a full charge. The charger indicator light will change when charging is complete.
- Once charged, remove the battery from the charger.
3.4 Attaching the Harness
The included harness helps distribute the weight of the brushcutter for improved comfort and control.
- Put on the harness and adjust the straps for a snug, comfortable fit.
- Attach the brushcutter to the harness hook, ensuring it is balanced and the cutting head is clear of the ground.

Figure 3.1: Proper attachment of the battery and harness for balanced operation.
4. Operating Instructions
Always ensure you are wearing appropriate personal protective equipment (PPE) before starting.
4.1 Starting the Brushcutter
- Ensure the battery is fully charged and securely inserted into the battery compartment.
- Hold the brushcutter firmly with both hands on the bike handles.
- Press the safety lock-off button (if present) and then squeeze the trigger to start the motor.
- The variable speed control allows you to adjust the cutting speed as needed.
4.2 Cutting Techniques
For optimal results and safety, use the following techniques:
- Sweeping Motion: Move the cutting head in a side-to-side sweeping motion, cutting on the left side of the head for best results with the wire.
- Blade Use: When using the blade, approach thicker vegetation slowly and allow the blade to cut through. Avoid hitting hard objects.
- Maintain Distance: Keep the cutting head away from your body and legs.
- Clear Area: Ensure the area is clear of bystanders and obstacles.
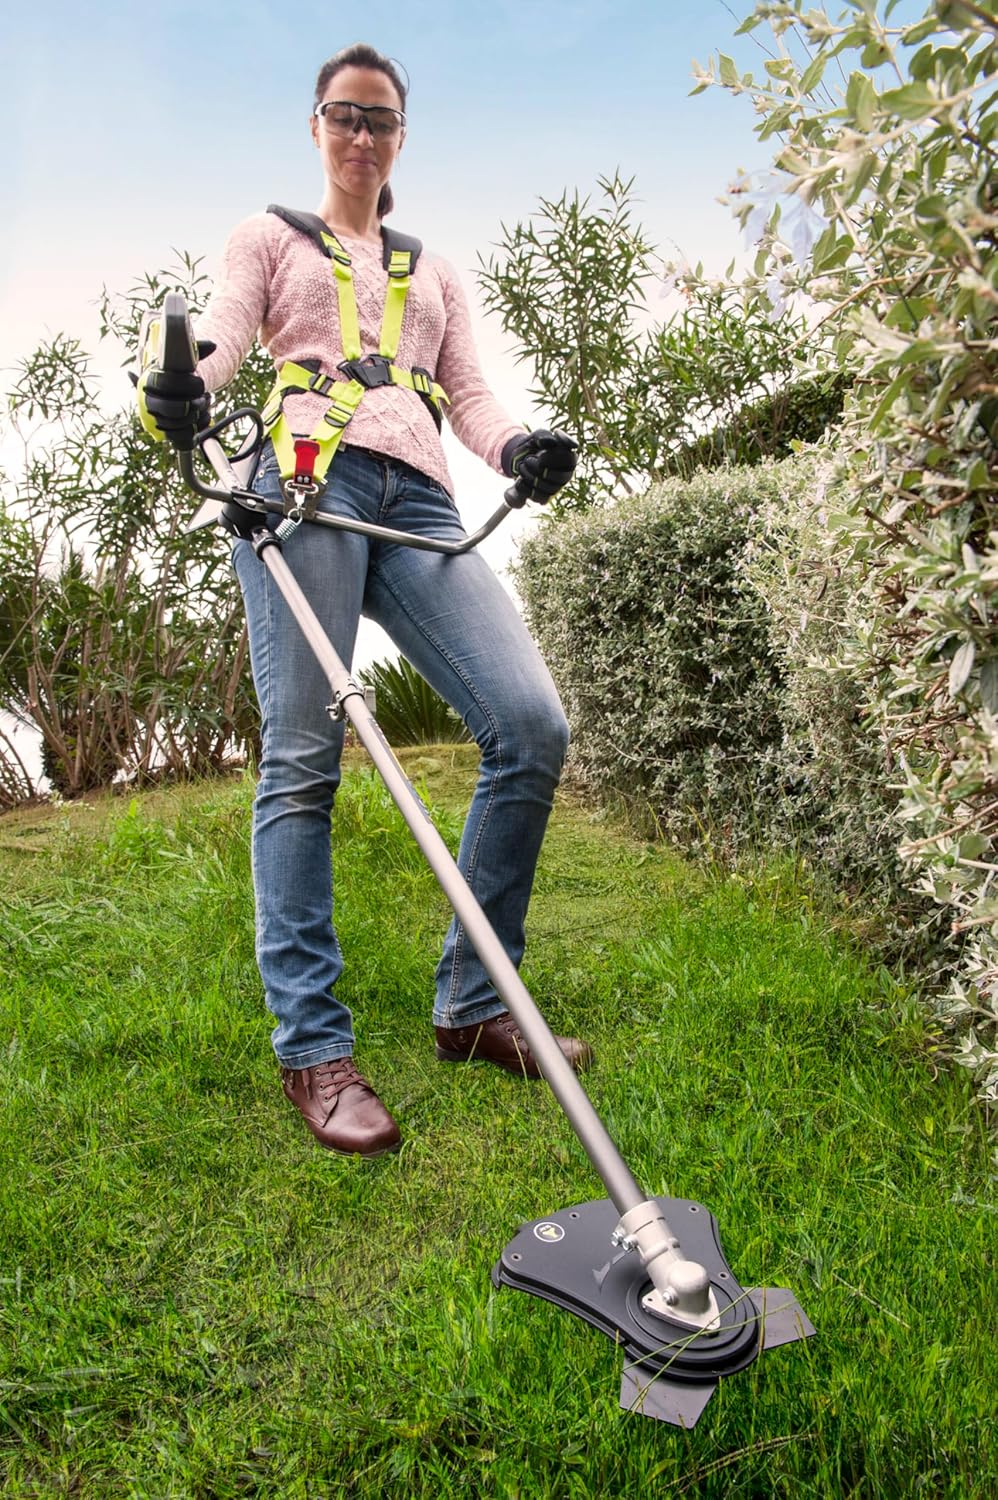
Figure 4.1: Demonstrating proper operating posture and technique while trimming grass.

Figure 4.2: Overview of the user operating the brushcutter in a garden setting.
4.3 Stopping the Brushcutter
Release the trigger to stop the motor. Always remove the battery when not in use, before cleaning, or performing maintenance.
5. Maintenance and Care
Regular maintenance ensures the longevity and optimal performance of your Ryobi brushcutter. Always ensure the tool is off and the battery is removed before any maintenance.
5.1 Cleaning
- After each use, clean the exterior of the tool with a soft, damp cloth.
- Remove any grass, dirt, or debris from the cutting head and guard.
- Do not use strong detergents or solvents, as these may damage the plastic components.
- Ensure ventilation openings are clear of debris to prevent overheating.
5.2 Blade and Line Replacement
- Blade: Inspect the blade for sharpness and damage regularly. Replace dull or damaged blades with genuine Ryobi replacement blades. Follow the blade installation steps in Section 3.2.
- Cutting Line: Replace the cutting line when it becomes short or worn. Refer to your specific wire head model for instructions on how to reload the line. Use only the recommended line diameter (1.6 mm).
5.3 Storage
- Store the brushcutter in a dry, secure place, out of reach of children.
- Remove the battery before storing for extended periods.
- Store the battery in a cool, dry place, away from direct sunlight and extreme temperatures.
6. Troubleshooting
This section provides solutions to common issues you might encounter.
| Problem | Possible Cause | Solution |
|---|---|---|
| Brushcutter does not start. | Battery not charged or not inserted correctly. Safety lock-off not engaged. | Ensure battery is fully charged and properly seated. Press safety lock-off button before squeezing trigger. |
| Reduced cutting performance. | Dull blade or short/worn cutting line. Excessive debris in cutting head. | Replace blade or cutting line. Clean cutting head and guard. |
| Motor stops during operation. | Overload protection activated. Battery charge low. | Reduce load on the tool. Allow motor to cool. Recharge battery. |
| Excessive vibration. | Damaged or unbalanced blade/head. Loose components. | Inspect blade/head for damage and replace if necessary. Check all fasteners for tightness. |
7. Technical Specifications
| Feature | Specification |
|---|---|
| Model Number | 5133003713 |
| Power Source | Battery Powered (18V ONE+) |
| Battery Type | Li-ion |
| Battery Capacity | 4.0 Ah (included) |
| Charging Time | Approx. 120 minutes |
| Cutting Width (Wire) | 33 cm (13 inches) |
| Cutting Width (Blade) | 20 cm (7.9 inches) |
| Wire Diameter | 1.6 mm |
| Weight with Battery | 5.4 kg (11.9 lbs) |
| Sound Power Level (Lwa) | 93.5 dB(A) |
| Vibration Level (Left Handle) | 1.6 m/s² |
| Vibration Level (Right Handle) | 1.4 m/s² |
| Product Dimensions (L x W x H) | 42.52 x 6.85 x 11.42 inches |
8. Warranty and Support
Ryobi products are manufactured to high quality standards and are backed by a comprehensive warranty. For specific warranty details, including duration and coverage, please refer to the warranty card included with your product or visit the official Ryobi website.
For technical support, spare parts, or service inquiries, please contact Ryobi customer service or an authorized service center. Contact information can typically be found on the Ryobi website or in your product documentation.
Online Resources: For additional information, FAQs, and product registration, visit www.ryobitools.com.
Related documents5133003713


Ask a question about this manual
Ask about setup, troubleshooting, compatibility, parts, safety, or missing instructions. Manuals+ will review the question and use this page’s manual context to help answer it.