
Product Overview
This Gibbon Mounts dual monitor and laptop mount is designed to provide adjustable and ergonomic positioning for your monitor and laptop. It features full motion capabilities, allowing for optimal viewing angles and efficient use of desk space.
Key Features
- Compatibility: Fits VESA 75x75mm and 100x100mm monitors up to 27 inches and 17.6 lbs per arm. The removable laptop holder accommodates most 13-inch to 15.6-inch laptops.
- High Quality Construction: Manufactured from high-strength alloy steel with a rust-proof coating for durability.
- Fully Adjustable: Offers 360° rotation, +90°/-35° tilt, and ±90° swivel. Supports both portrait and landscape screen orientations. The central pole measures 23.6 inches.
- Integrated Cable Management: Detachable cable clips on the arms and central pole assist in organizing power and AV cables.
- Secure Desk Clamp: A heavy-duty C-clamp mounts to desks or tables with a thickness of up to 2.3 inches. The design includes an increased contact area to protect the desk surface.
Package Contents
Please verify that all components are present before proceeding with the installation.
- Main Pole with Desk Clamp
- Monitor Arms (2)
- Laptop Tray
- VESA Plates (2)
- Mounting Hardware (screws, washers, Allen wrenches)
- Cable Management Clips
Setup Instructions
Step 1: Attach the Desk Clamp
Position the main pole on your desk and secure it using the heavy-duty C-clamp. Ensure your desk thickness is within the compatible range (maximum 2.3 inches). Tighten the clamp screw firmly until the pole is stable.

Image: The main pole is secured to a desk edge using the C-clamp mechanism.
Step 2: Install Monitor Arms
Slide the monitor arms onto the central pole. Adjust their vertical position as desired. Use the provided Allen wrench to tighten the securing screws on the arm collars, fixing them in place.

Image: A monitor arm being slid onto the central pole, with an Allen wrench shown for tightening.
Step 3: Attach VESA Plates to Monitors
Align the VESA plates with the mounting holes on the back of your monitors. Secure the plates using the appropriate screws from the hardware kit. This mount supports VESA patterns of 75x75mm and 100x100mm.

Image: A VESA plate being screwed onto the back of a monitor.
Step 4: Mount Monitors and Laptop Tray
Slide the monitors (with VESA plates attached) onto the ends of the monitor arms. If using a laptop, attach the laptop tray to the second arm. Ensure both are securely seated.

Image: A monitor and a laptop tray attached to the dual arms of the mount.
Step 5: Cable Management
Utilize the integrated cable management clips located on the arms and central pole to route and organize your power and video cables, maintaining a tidy workspace.
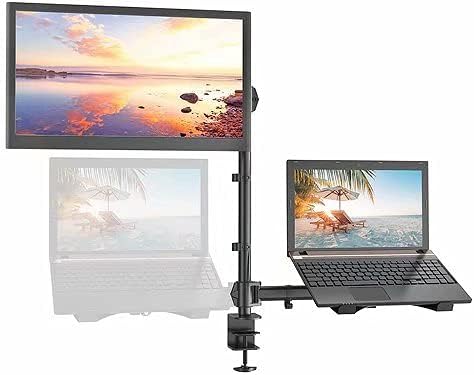
Image: Cables neatly routed through clips on the monitor arm.
Operating Instructions
Adjusting Height
The monitor and laptop arms can be adjusted vertically along the central pole. To adjust, loosen the securing screws on the arm collars, slide the arms to your desired height, and then re-tighten the screws firmly to secure the position.

Image: A diagram illustrating the height adjustment range of the monitor and laptop arms on the central pole, showing measurements.
Tilting and Swiveling
The monitor and laptop tray can be tilted +90° to -35° and swiveled ±90° to achieve optimal viewing angles. Gently adjust the screen or tray to your preferred position. Ensure all pivot points are tightened sufficiently to hold the desired angle.
Image: A graphic showing the tilt and swivel capabilities of the monitor arm, with angle indicators.
Screen Rotation
The VESA plate allows for 360° screen rotation, enabling seamless switching between portrait and landscape orientations. Rotate the monitor gently to achieve the desired display orientation.
Maintenance
- Regularly inspect all screws and connections to ensure they remain tight and secure. Re-tighten as necessary to maintain stability.
- Clean the mount surfaces with a soft, dry cloth. Avoid using abrasive cleaners or solvents, which may damage the finish.
- Do not exceed the maximum weight capacity of 17.6 lbs (8 kg) per arm to prevent damage to the mount or connected devices.
Troubleshooting
Mount is unstable or sways:
- Ensure the desk clamp is fully tightened to the desk surface.
- Verify that the monitor arms are securely fastened to the central pole.
- Confirm that the weight of your monitor(s) and laptop does not exceed the maximum capacity of 17.6 lbs per arm.
Difficulty adjusting monitor or laptop position:
- Some joints on the arms may have tension screws that require adjustment. Use an Allen wrench to slightly loosen or tighten these screws to achieve the desired resistance for movement.
Specifications
| Feature | Detail |
|---|---|
| Model | B078WP1C9H |
| Brand | Gibbon Mounts |
| Mounting Type | Tabletop Mount |
| Movement Type | Articulating, Fixed, Rotate, Swivel, Tilt |
| Material | Alloy Steel |
| Color | Black |
| Compatible Devices | Laptop, Monitor |
| Max Monitor Size | 27 Inches (per arm) |
| Max Laptop Size | 15.6 Inches |
| Weight Capacity | 17.6 lbs (8 kg) per arm |
| VESA Compatibility | 75x75mm, 100x100mm |
| Central Pole Height | 23.6 Inches |
| Desk Clamp Thickness | Max 2.3 Inches |
| Item Weight | 8.8 Pounds |
Warranty and Support
For detailed warranty information and technical support, please refer to the official Gibbon Mounts website or contact their customer service directly. It is recommended to retain your purchase receipt for any warranty claims.
You can visit the official Gibbon Mounts store for more information: