
WishRing RF550D
RF550D Macro LED Ring Flash Light User Manual
Model: RF550D | Brand: WishRing
1. Product Overview
The WishRing RF550D Macro LED Ring Flash Light is designed to provide consistent and bright illumination for macro photography. It features a ring-shaped light source that mounts directly to your camera lens, ensuring even lighting without harsh shadows, ideal for close-up shots.
Key Features:
- Visual LCD Display: High-definition LCD for clear settings and status indication.
- 48-Piece LED Array: Consists of 48 LEDs for higher luminance and lower static power consumption.
- Left and Right Flash Function: Allows for selective illumination to enhance object dimensionality.
- Natural Light Quality: High-quality LEDs provide light close to natural daylight.
- Seven Luminance Levels: Adjustable light output to meet various photographic needs.
- Camera Mountable: Can be mounted directly onto a camera as a photography light.
- Ergonomic Design: Designed for ease of reading and operation.
Package Contents:

Figure 1: All components included in the RF550D Macro LED Ring Flash Light package. This image displays the macro ring head, the power control unit with an LCD display, various adapter rings, and flash diffusers.
- 1x Macro Ring Head
- 1x Power Control Unit with LCD Display
- 8x Adapter Rings (49mm, 52mm, 55mm, 58mm, 62mm, 67mm, 72mm, 77mm)
- 4x Flash Diffusers (Orange, Blue, Oyster White, and Transparent)
2. Setup Guide
2.1 Battery Installation
The RF550D Macro LED Ring Flash Light requires 4x AA batteries for operation. Ensure batteries are inserted with correct polarity.
- Locate the battery compartment on the Power Control Unit.
- Open the battery compartment cover.
- Insert 4x AA batteries, observing the polarity markings (+/-).
- Close the battery compartment cover securely.
2.2 Attaching Adapter Rings
Select the appropriate adapter ring that matches the filter thread size of your camera lens. The kit includes 8 common sizes.
- Determine your camera lens's filter thread size (usually printed on the front of the lens or on the lens cap).
- Screw the corresponding adapter ring onto the front of your camera lens.
2.3 Mounting the Ring Flash Head
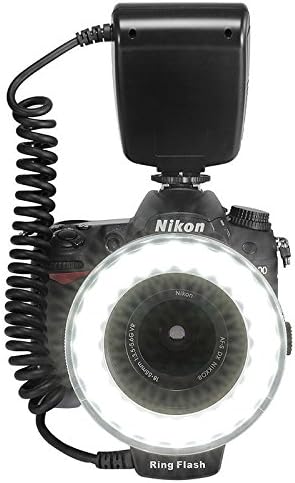
Figure 2: The RF550D ring flash head attached to a camera lens via an adapter ring. The flash unit encircles the lens, providing even illumination.
- Slide the Macro Ring Head onto the adapter ring attached to your lens.
- Ensure it clicks into place or is securely fastened, depending on the design.
2.4 Mounting the Power Control Unit

Figure 3: A detailed view of the RF550D power control unit securely mounted on the camera's hot shoe. The LCD display and control buttons are clearly visible.
- Slide the hot shoe mount of the Power Control Unit into your camera's hot shoe.
- Tighten the locking wheel or lever on the control unit to secure it.
- Connect the coiled cable from the Macro Ring Head to the Power Control Unit.
2.5 Attaching Flash Diffusers

Figure 4: Examples of the RF550D ring flash with various colored diffusers (blue, white, orange) attached, demonstrating their effect on light temperature.
The kit includes four diffusers (orange, blue, oyster white, and transparent) to modify the color temperature and softness of the light.
- Gently snap the desired diffuser onto the front of the Macro Ring Head.
- Ensure it is securely seated.
3. Operating Instructions
3.1 Power On/Off
Press the "ON/OFF" button on the Power Control Unit to turn the flash light on or off. The LCD display will illuminate when powered on.
3.2 Adjusting Light Output (Luminance)
The RF550D offers seven levels of luminance adjustment, including "Semi Power" and "Full Power" modes.
- With the unit powered on, use the "LIGHT" button or arrow keys (if available) to cycle through the luminance levels.
- Observe the LCD display for the current light output setting.
3.3 Using Left/Right Flash Function
This feature allows you to illuminate only the left or right side of the ring flash, adding depth and dimension to your subjects.
- Press the "MODE" button to switch between full ring illumination and left/right flash modes.
- The LCD display will indicate which side (L or R) is active.
3.4 Sync Speed
The flash unit has a sync speed of 1/100S. Ensure your camera's shutter speed is set to 1/100S or slower for proper synchronization.
4. Maintenance
4.1 Cleaning
- Use a soft, dry cloth to clean the exterior of the flash unit and control panel.
- For the LED ring and diffusers, use a lens cleaning cloth or a microfiber cloth to gently wipe away dust or smudges.
- Do not use harsh chemicals, solvents, or abrasive cleaners.
4.2 Battery Care
- Remove batteries if the unit will not be used for an extended period to prevent leakage.
- Dispose of used batteries responsibly according to local regulations.
4.3 Storage
Store the RF550D in a cool, dry place, away from direct sunlight and extreme temperatures. Keep it in its original packaging or a protective case to prevent damage.
5. Troubleshooting
| Problem | Possible Cause | Solution |
|---|---|---|
| Flash does not power on. |
|
|
| Flash does not fire when camera shutter is pressed. |
|
|
| Uneven or insufficient light. |
|
|
6. Specifications
| Feature | Detail |
|---|---|
| Guide Number | 15 |
| Effective Distance | 5cm - 150cm |
| Sync Speed | 1/100S |
| Power Rate | Semi Power, Full Power |
| Power Source | 4 × AA Batteries |
| LED Quantity | 48 PCS |
| Color Temperature | 3000K - 15000K |
| Weight of Kit | Approx. 200g |
| Compatible Mountings | Nikon, Canon, Olympus DSLR Cameras with Standard Hot-shoe |
| Camera Flash Type | Hotshoe |
| Wireless Communication | Optical Pulse |
| Mounting Type | Hot Shoe Mount |
| Manufacturer | HKSUNKIN |
7. Warranty and Support
For warranty information, technical support, or service inquiries regarding your WishRing RF550D Macro LED Ring Flash Light, please contact the seller or manufacturer directly. Retain your proof of purchase for any warranty claims.
Manufacturer: HKSUNKIN
Related documentsRF550D

Ask a question about this manual
Ask about setup, troubleshooting, compatibility, parts, safety, or missing instructions. Manuals+ will review the question and use this page’s manual context to help answer it.