
1. Introduction
This manual provides comprehensive instructions for the safe and effective use, assembly, operation, maintenance, and troubleshooting of the Ryobi Universal Router Table, model A25RT03. This router table is designed to enhance woodworking projects by providing a stable and versatile platform for various routing applications.
The Ryobi Universal Router Table is compatible with most major router brands, allowing you to mount your router upside down for precise control over workpieces. Key features include an adjustable fence, integrated vacuum port, and multiple throat plates for diverse routing needs.
2. Important Safety Information
Always read and understand all safety warnings and instructions provided with this product and your router before use. Failure to follow these instructions may result in electric shock, fire, and/or serious injury.
- Work Area Safety: Keep the work area clean and well-lit. Cluttered or dark areas invite accidents.
- Electrical Safety: Do not expose power tools to rain or wet conditions. Ensure the power cord is in good condition and avoid using the tool in damp locations.
- Personal Safety: Always wear eye protection, hearing protection, and appropriate respiratory protection. Do not overreach. Maintain proper footing and balance at all times.
- Tool Use and Care: Do not force the tool. Use the correct tool for your application. Disconnect the plug from the power source before making any adjustments, changing accessories, or storing power tools.
- Router Table Specific Safety: Ensure the router is securely mounted to the table. Always use the appropriate throat plate for the router bit. Keep hands clear of the router bit during operation. Use push sticks or feather boards when necessary.
- Proposition 65 Warning: This product may expose you to chemicals including lead, which is known to the State of California to cause cancer and birth defects or other reproductive harm. For more information go to www.P65Warnings.ca.gov.
3. Assembly and Setup
Assembly of the Ryobi Universal Router Table is required. Please follow these general steps. Refer to the detailed instructions in the included operator's manual for specific assembly procedures and diagrams.
3.1 Unpacking and Component Identification
Carefully remove all components from the packaging. Verify that all parts listed below are present:
- Universal Router Table (A25RT03)
- Miter Gauge
- Five (5) Throat Plates (1/2 in., 1 in., 13/16 in., 1 1/2 in., 2 in.)
- Switch Key
- Three (3) sets of hardware to attach routers to table
- Feather Board
- Operator's Manual
3.2 Table Assembly
- Attach the legs to the router table top using the provided hardware. Ensure all fasteners are tightened securely.
- Position the router table on a stable, level surface.
3.3 Router Mounting
The router table includes hardware for attaching various router brands. Consult your router's manual for specific mounting instructions. Ensure your router is securely fastened to the underside of the table insert.
Note: See the operator's manual for a list of compatible routers.
3.4 Fence and Accessory Installation
- Install the adjustable fence onto the table. The fence is outfitted with sacrificial MDF pieces and an aluminum T-track for versatility.
- Attach the feather board to the table or fence as needed for workpiece control.
- Select the appropriate throat plate for your router bit and insert it into the table opening.
- Connect a shop vacuum to the built-in vacuum port (accommodates 1-1/4 in. or 2-1/2 in. attachments) for dust collection.
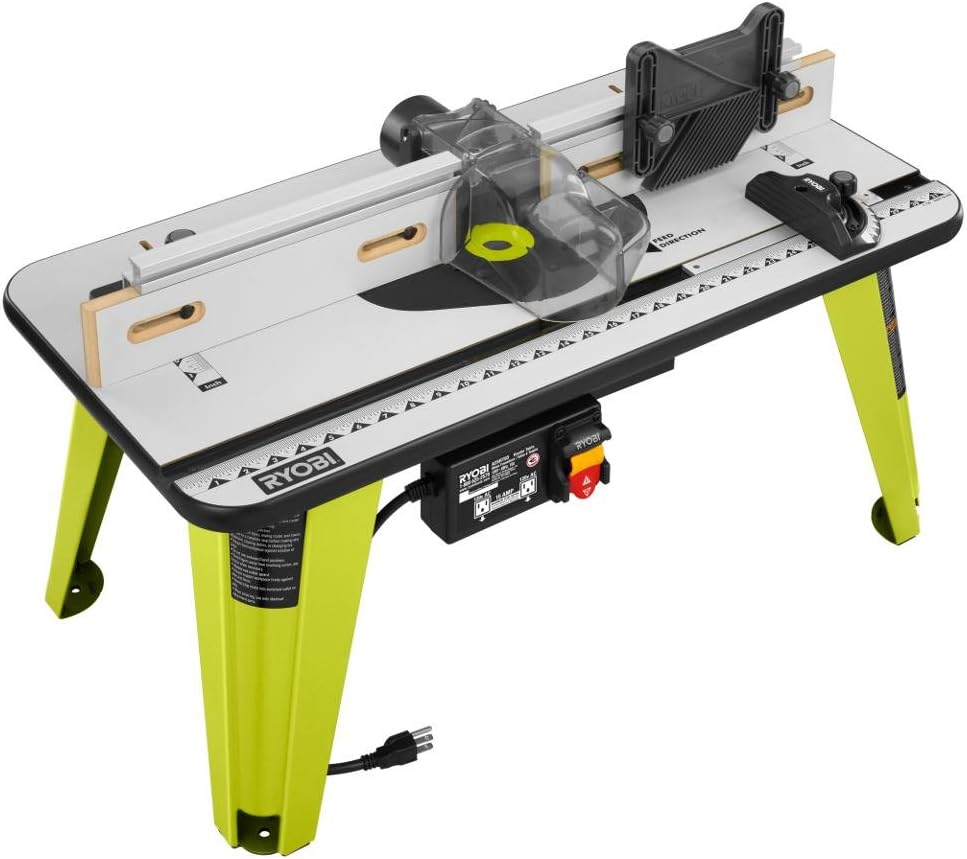
Figure 1: Fully assembled Ryobi Universal Router Table A25RT03, showing the table top, adjustable fence, and integrated power switch.

Figure 2: Front view of the Ryobi Universal Router Table A25RT03, highlighting the fence, throat plate area, and power switch module.
4. Operating Instructions
Before operating, ensure all safety precautions are followed and the router is securely mounted with the correct throat plate.
4.1 Router Bit Installation and Adjustment
- Ensure the router is unplugged.
- Install the desired router bit into the router collet according to your router's instructions.
- Adjust the router bit height using your router's depth adjustment mechanism.
- Select and install the throat plate that provides the smallest opening possible for the chosen router bit to maximize support for the workpiece.
4.2 Fence Adjustment
The adjustable fence allows for precise control over the routing path.
- Loosen the fence locking knobs.
- Slide the fence to the desired position relative to the router bit.
- For joining operations, the fence has capabilities to offset the outfeed side. Refer to your router table's manual for specific instructions on setting up the fence for joining.
- Ensure the sacrificial MDF pieces are properly aligned and replace them if they become excessively worn.
- Tighten the fence locking knobs securely before operation.
4.3 Using the Miter Gauge and Feather Board
- Miter Gauge: Insert the miter gauge into the T-slot on the table. Adjust it to the desired angle for cross-cutting or angled routing operations.
- Feather Board: Position the feather board to apply gentle, consistent pressure against the workpiece, holding it firmly against the fence or table surface. This helps prevent kickback and ensures a smooth, consistent cut.
4.4 Routing Techniques
- Always feed the workpiece against the rotation of the router bit (climb cutting is generally unsafe and should be avoided). The table includes a "FEED DIRECTION" indicator.
- Maintain a firm grip on the workpiece. Use push blocks or push sticks for small pieces.
- Make multiple shallow passes instead of one deep pass, especially with larger bits or hard materials, to reduce strain on the router and improve cut quality.
- Ensure the vacuum port is connected to a dust collection system to maintain a clear work area and reduce airborne dust.
5. Maintenance
Regular maintenance ensures the longevity and safe operation of your router table.
- Cleaning: After each use, disconnect the router table from power and clean all dust and debris from the table surface, fence, and router mounting area. Use a soft cloth; avoid harsh chemicals.
- Inspection: Periodically inspect all fasteners for tightness. Check the power cord for damage. Examine the sacrificial MDF fence pieces for wear and replace them if necessary.
- Storage: Store the router table in a clean, dry location away from direct sunlight and extreme temperatures.
6. Troubleshooting
This section addresses common issues you might encounter with your Ryobi Universal Router Table. For issues related to the router itself, refer to your router's instruction manual.
- Router not starting:
- Ensure the router table's power switch is in the "ON" position and the switch key is inserted.
- Verify the router is properly plugged into the table's power outlet and the table is plugged into a working wall outlet.
- Check the circuit breaker or fuse.
- Poor cut quality (e.g., burning, rough finish):
- Ensure the router bit is sharp and clean.
- Adjust the feed rate; feeding too fast or too slow can affect cut quality.
- Make sure the fence is parallel to the bit and securely locked.
- Take shallower passes, especially with hard materials.
- Excessive dust:
- Verify the vacuum hose is securely connected to the vacuum port and the dust collection system is operating effectively.
- Ensure the correct throat plate is used, minimizing the opening around the bit.
- Workpiece kickback:
- Always feed the workpiece against the rotation of the bit.
- Use a feather board to maintain constant pressure against the fence.
- Ensure the router bit is sharp and clean.
7. Specifications
| Feature | Specification |
|---|---|
| Brand | RYOBI |
| Model Number | A25RT03 |
| Material | Laminated MDF |
| Power Source | Corded Electric |
| Product Dimensions (W x H) | 32"W x 16"H |
| Voltage | 230 Volts (2.3E+2 Volts) |
| Item Weight | 28 Pounds |
| Base Type | Fixed |
8. Warranty and Support
The Ryobi Universal Router Table (Model A25RT03) is backed by a 3-year manufacturer's warranty. This warranty covers defects in materials and workmanship under normal use.
For warranty claims, technical assistance, or to order replacement parts, please contact Ryobi customer service. Keep your proof of purchase for warranty validation.
For the most current support information, please visit the official RYOBI website or refer to the contact details provided in your original operator's manual.


