
Technomate TM-RF HD IR
Technomate TM-RF HD IR HDMI RF Modulator User Manual
Model: TM-RF HD IR
1. Introduction
The Technomate TM-RF HD IR is an advanced HDMI RF Modulator designed to convert an HDMI signal into a DVB-T compatible RF signal. This allows you to distribute high-definition 1080p video and audio over existing coaxial cable systems to multiple televisions. This model features 9V Infra-Red (IR) control over the coaxial cable, enabling remote control of your source device from other rooms, and an HDMI loop-through for local viewing.
This manual provides detailed instructions for the installation, operation, and maintenance of your TM-RF HD IR modulator. Please read this manual thoroughly before use to ensure proper setup and optimal performance.
2. Safety Information
Please observe the following safety precautions to prevent damage to the device and ensure your safety:
- Power Supply: Use only the provided power adapter. Ensure the power outlet matches the voltage requirements of the adapter.
- Ventilation: Do not block ventilation openings. Ensure adequate airflow around the device to prevent overheating.
- Water and Moisture: Do not expose the device to water, moisture, or excessive humidity. Do not operate with wet hands.
- Cleaning: Disconnect power before cleaning. Use a soft, dry cloth. Do not use liquid or aerosol cleaners.
- Location: Place the device on a stable, flat surface. Avoid placing it near heat sources, direct sunlight, or in areas with high vibration.
- Servicing: Do not attempt to service this product yourself. Refer all servicing to qualified service personnel.
- Cables: Ensure all cables are securely connected and not pinched or damaged.
3. Package Contents
Verify that all items listed below are included in your package:
- Technomate TM-RF HD IR Modulator Unit
- IR Transmitter Cable
- IR Receiver ("Magic Eye")
- Power Adapter
- User Manual (this document)
4. Product Overview
4.1. Front Panel
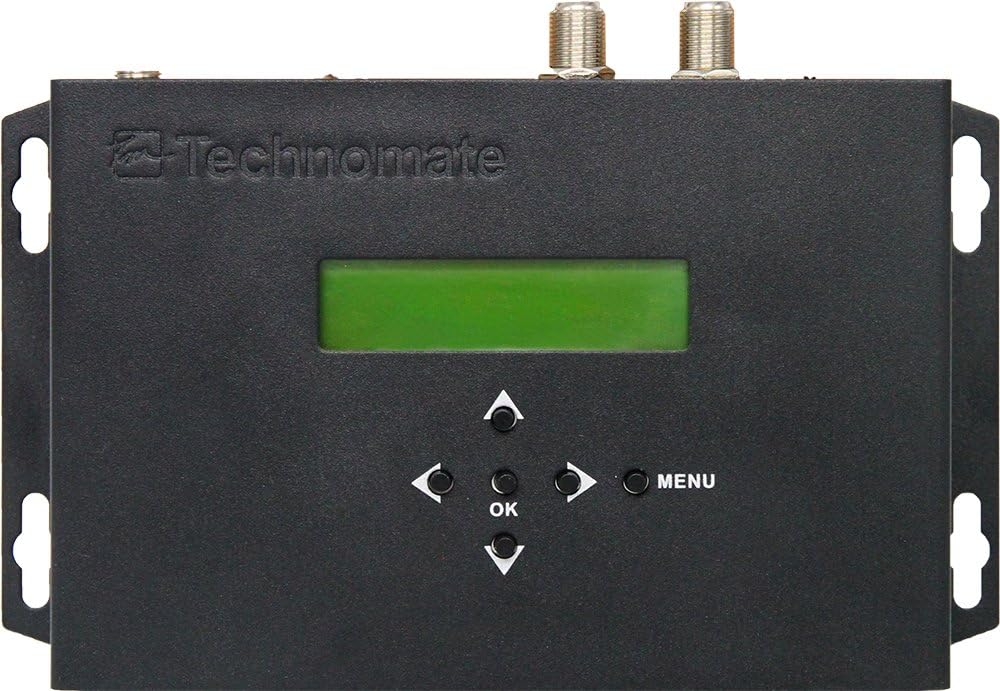
Figure 1: Front View of TM-RF HD IR Modulator
The front panel features a green LCD display for status and menu navigation, along with directional buttons (Up, Down, Left, Right), an OK button for selection, and a MENU button to access settings.
- LCD Display: Shows current channel, settings, and menu options.
- Navigation Buttons: Used to navigate through menus and adjust settings.
- OK Button: Confirms selections.
- MENU Button: Enters and exits the main menu.
4.2. Rear Panel

Figure 2: Rear View of TM-RF HD IR Modulator Ports
The rear panel provides all necessary connection ports for input, output, and control.
- IR OUT: Connects the IR Transmitter cable.
- 9V IR OFF/ON Switch: Enables or disables the 9V power for the IR system over the coaxial cable.
- RF OUT: Connects to your TV's antenna input or RF distribution system.
- RF IN: For cascading multiple modulators or connecting an existing RF signal.
- HDMI OUT (Loop-through): Connects to a local TV or display for direct HDMI viewing.
- HDMI IN: Connects to your HDMI source device (e.g., satellite receiver, Blu-ray player).
- SERVICE PORT (USB): Used for firmware updates or configuration file transfers.
- 12V DC: Power input for the included power adapter.
4.3. IR Receiver ("Magic Eye")
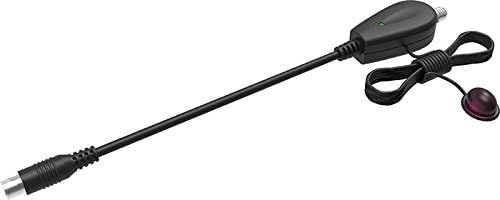
Figure 3: IR Receiver ("Magic Eye")
The IR Receiver is connected to the coaxial cable at the remote TV location and receives IR signals from your remote control, sending them back to the modulator to control the source device.
5. Setup Instructions
Follow these steps for initial setup of your TM-RF HD IR modulator:
5.1. Basic Connection
- Connect HDMI Source: Connect an HDMI cable from your source device (e.g., satellite receiver, Blu-ray player, CCTV system) to the HDMI IN port on the TM-RF HD IR modulator.
- Connect to TV (RF): Connect a coaxial cable from the RF OUT port of the modulator to the antenna/RF input of your television.
- Connect to Local TV (HDMI Loop-through - Optional): If you wish to view the source locally via HDMI, connect an HDMI cable from the HDMI OUT port of the modulator to an HDMI input on your local TV.
- Connect IR Transmitter: Plug the IR Transmitter cable into the IR OUT port on the modulator. Position the small IR emitter head directly in front of the IR sensor of your HDMI source device.
- Power On: Connect the provided power adapter to the 12V DC input on the modulator and then plug it into a power outlet. The modulator will power on.
- Scan for Channels: On your television, perform an automatic channel scan (or manual scan for DVB-T/UHF channels). The modulator's output will appear as a new digital channel.
5.2. IR Control Setup for Remote TVs
To enable IR control from a remote television:
- Ensure the 9V IR OFF/ON switch on the rear of the modulator is set to ON.
- At the remote TV location, connect the IR Receiver ("Magic Eye") to the coaxial cable coming from the modulator. This typically involves connecting the coaxial cable to the IR Receiver, and then the IR Receiver to the TV's antenna input.
- Point your source device's remote control at the IR Receiver to control the source device connected to the modulator.
Note: For multiple remote TVs with IR control, a mains-powered bypass amplifier/splitter (e.g., Technomate TM-AMP B models) is required to send the 9V IR signal to all locations. Additional IR Receivers ("Magic Eyes") may be needed.
5.3. Connecting to Existing RF Systems
If you have an existing RF distribution system, you can integrate the TM-RF HD IR:
- Connect your existing RF signal (e.g., from an antenna or another modulator) to the RF IN port of the TM-RF HD IR.
- The modulator will combine its output with the incoming RF signal and send the combined signal out through the RF OUT port.
- Ensure the output channel of the TM-RF HD IR does not conflict with existing channels in your system. Adjust the output channel via the modulator's menu if necessary.
5.4. Cascading Multiple Modulators
Up to 35 TM-RF HD IR units can be cascaded in one system to distribute multiple HDMI sources:
- Connect the RF OUT of the first modulator to the RF IN of the second modulator.
- Continue this chain for all modulators. The final modulator's RF OUT connects to your main RF distribution system or TV.
- Ensure each modulator is set to a unique output channel to avoid interference.
- For easier configuration of multiple units, you can use the USB SERVICE PORT to upload and download settings. Refer to the "Operating Instructions" section for details.
6. Operating Instructions
6.1. Basic Viewing
Once connected and your TV has scanned for channels, simply select the channel assigned to the TM-RF HD IR modulator on your television to view the HDMI source content.
6.2. Using the On-Screen Menu (LCD Display)
The front panel LCD and buttons allow you to configure various settings:
- Press the MENU button to enter the main menu.
- Use the Up/Down navigation buttons to scroll through menu options.
- Press OK to select an option or enter a sub-menu.
- Use Left/Right buttons to adjust values or settings.
- Press MENU again to exit the current menu or save changes (if prompted).
Key configurable settings include:
- Output Channel: Select the UHF channel for the RF output (Channels 21-69).
- Bandwidth: Configure 6 MHz, 7 MHz, or 8 MHz.
- Constellation, FEC, ONID, LCN: Advanced DVB-T parameters for specific system requirements.
- Video/Audio Settings: Adjust encoding parameters if necessary.
6.3. USB Configuration (Advanced)
The SERVICE PORT (USB) allows for advanced configuration and firmware updates:
- You can upload configuration data from the modulator to a USB device.
- Edit these settings on a PC using compatible software (contact Technomate Support for details).
- Download the modified settings back to the modulator via the USB port. This is particularly useful for configuring multiple units with identical or similar settings.
7. Maintenance
The Technomate TM-RF HD IR modulator requires minimal maintenance:
- Cleaning: Disconnect the power adapter before cleaning. Use a soft, dry, lint-free cloth to wipe the exterior of the unit. Do not use liquid cleaners, aerosols, or abrasive materials.
- Ventilation: Ensure that the ventilation holes are not obstructed by dust or debris. Periodically check and clean if necessary.
- Storage: If storing the device for an extended period, disconnect it from power and store it in a cool, dry place away from direct sunlight and extreme temperatures.
8. Troubleshooting
If you encounter issues with your TM-RF HD IR modulator, refer to the following common problems and solutions:
No Picture or Sound on TV
- Check Power: Ensure the modulator is powered on and the power adapter is securely connected.
- HDMI Connection: Verify the HDMI cable from your source device is securely connected to the HDMI IN port.
- RF Connection: Ensure the coaxial cable from RF OUT is securely connected to your TV's antenna input.
- TV Channel Scan: Perform a new channel scan on your TV. Ensure your TV is set to the correct input (Antenna/RF).
- TV Compatibility: The TM-RF HD IR only works with 1080p Full HD & 4K UHD TVs. If your TV is 720p HD Ready, it will not work directly. You may need a Freeview HD box (DVB-T2 box) connected between the modulator and your HD Ready TV.
- Output Channel Conflict: If using with an existing RF system, ensure the modulator's output channel does not conflict with other active channels. Adjust the modulator's output channel via its menu.
IR Control Not Working
- 9V IR Switch: Ensure the 9V IR OFF/ON switch on the modulator's rear panel is set to ON.
- IR Transmitter Placement: Verify the IR emitter head is directly in front of the IR sensor of your source device.
- IR Receiver Connection: Ensure the IR Receiver ("Magic Eye") is properly connected to the coaxial cable at the remote TV location.
- Bypass Amplifier (for multiple TVs): If using multiple remote TVs, confirm you are using a mains-powered bypass amplifier/splitter that supports 9V IR signal pass-through.
- Remote Control Batteries: Check the batteries in your source device's remote control.
Lip Sync Issues (Audio/Video Out of Sync)
- The TM-RF HD IR is designed for minimal delay. If you experience lip sync issues, ensure your source device and TV are functioning correctly.
- Try restarting both the modulator and the source device.
- If issues persist, contact Technomate Support for further assistance.
Poor Picture Quality / Signal Interference
- Cable Quality: Use high-quality coaxial and HDMI cables.
- Cable Length: Excessive cable length can degrade signal quality.
- Channel Interference: If you have other RF signals, try changing the output channel of the modulator to an unused frequency.
- Signal Strength: For long cable runs or multiple TVs, a signal amplifier may be required.
9. Specifications
| Model | TM-RF HD IR |
| Input | HDMI (1080p Full HD, 4K UHD compatible) |
| Output | DVB-T (UHF Channels 21-69) |
| HDMI Loop-through | Yes |
| IR Control | 9V Infra-Red over Coaxial Cable |
| Delay | Less than 0.8s (can be reduced to < 0.5s for video-only devices) |
| Bandwidth | 6 MHz, 7 MHz, 8 MHz configurable |
| Cascading | Up to 35 units |
| Dimensions | 10 x 14.5 x 2.3 cm |
| Weight | 700 g |
| Power Supply | 12V DC (via included adapter) |
| Compatibility | 1080p Full HD & 4K UHD TVs (720p HD Ready TVs require DVB-T2 box) |
10. Warranty and Support
For warranty information, please refer to the documentation provided with your purchase or visit the official Technomate website. If you encounter any issues not covered in this manual or require further assistance, please contact Technomate Support.
When contacting support, please have your product model number (TM-RF HD IR) and a detailed description of the issue ready.
Contact information for Technomate Support can typically be found on their official website or on your product packaging.
Related documentsTM-RF HD IR

Ask a question about this manual
Ask about setup, troubleshooting, compatibility, parts, safety, or missing instructions. Manuals+ will review the question and use this page’s manual context to help answer it.