
1. Introduction
Thank you for choosing the JOYOUNG Soymilk Maker DJ13U-G91. This appliance is designed to prepare fresh soymilk, nut milk, rice paste, porridge, and juice with ease. Please read this manual thoroughly before operating the appliance to ensure safe and efficient use. Keep this manual for future reference.
2. Important Safety Instructions
When using electrical appliances, basic safety precautions should always be followed to reduce the risk of fire, electric shock, and injury to persons, including the following:
- Read all instructions before use.
- Do not immerse the motor head in water or other liquids. Only wipe the exterior with a damp cloth.
- Unplug from outlet when not in use, before putting on or taking off parts, and before cleaning.
- Do not operate any appliance with a damaged cord or plug, or after the appliance malfunctions or has been damaged in any manner.
- The use of accessory attachments not recommended by the appliance manufacturer may cause injuries.
- Do not let the cord hang over the edge of a table or counter, or touch hot surfaces.
- Do not place on or near a hot gas or electric burner, or in a heated oven.
- Extreme caution must be used when moving an appliance containing hot liquids.
- Always attach plug to appliance first, then plug cord into the wall outlet. To disconnect, turn any control to 'off', then remove plug from wall outlet.
- Do not use the appliance for other than intended use.
- This appliance is not intended for use by persons (including children) with reduced physical, sensory or mental capabilities, or lack of experience and knowledge, unless they have been given supervision or instruction concerning use of the appliance by a person responsible for their safety.
- Children should be supervised to ensure that they do not play with the appliance.
- Caution: The blade is sharp. Handle with care.
- Warning: Hot surfaces. Avoid contact with hot parts during and after operation.
3. Product Overview
Familiarize yourself with the components of your JOYOUNG Soymilk Maker DJ13U-G91.

Figure 3.1: Overall view of the JOYOUNG Soymilk Maker DJ13U-G91. The appliance features a white main body with a black handle on top and a side handle for pouring.
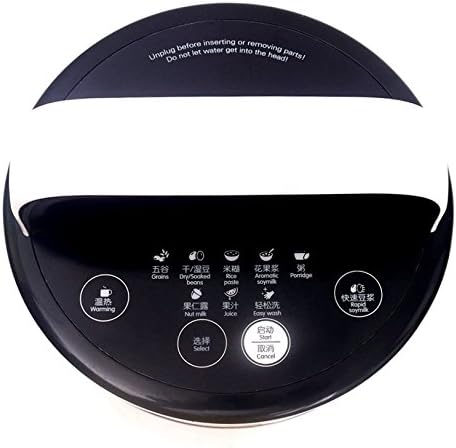
Figure 3.2: Top-down view of the control panel. It includes buttons for various functions such as Grains, Dry/Soaked Beans, Rice Paste, Aromatic Soymilk, Porridge, Nut Milk, Juice, Warming, Easy Wash, Rapid Soymilk, Select, Start, and Cancel.
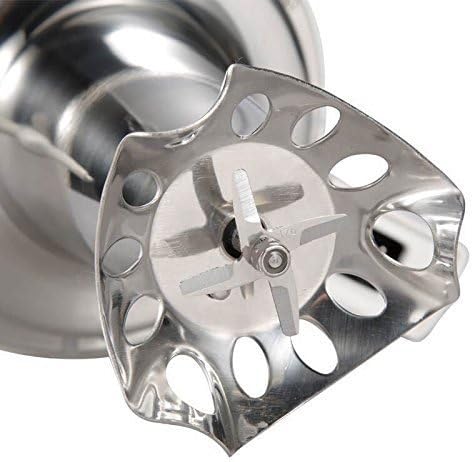
Figure 3.3: Close-up view of the stainless steel blade assembly located at the bottom of the motor head, designed for efficient grinding and blending.

Figure 3.4: Interior view of the pitcher showing clear measurement markings for 900ml, 1100ml, and 1300ml, indicating minimum and maximum fill levels.
4. Setup
- Unpack: Carefully remove all components from the packaging. Retain packaging for future storage or transport.
- Clean Before First Use: Wash the pitcher, filter cup (if applicable), and the exterior of the motor head with a soft sponge and mild detergent. Rinse thoroughly. Do not immerse the motor head in water. Wipe the motor head with a damp cloth.
- Assemble: Place the motor head securely onto the pitcher. Ensure it is properly seated.
- Position: Place the soymilk maker on a stable, flat, and dry surface.
- Connect Power: Plug the power cord into a grounded electrical outlet. The appliance will beep, and indicator lights may illuminate.
5. Operating Instructions
Follow these steps to operate your JOYOUNG Soymilk Maker for various functions.
General Operation:
- Add desired ingredients (e.g., soaked soybeans, nuts, grains) and water to the pitcher. Ensure the water level is between the MIN (900ml) and MAX (1300ml) markings.
- Place the motor head onto the pitcher, ensuring it is securely locked.
- Plug the power cord into an electrical outlet.
- Press the Select button repeatedly to cycle through the available programs (Grains, Dry/Soaked Beans, Rice Paste, Aromatic Soymilk, Porridge, Nut Milk, Juice, Warming, Rapid Soymilk, Easy Wash). The indicator light for the selected program will flash.
- Once your desired program is selected, press the Start button. The appliance will begin operation, and the indicator light will remain solid.
- The appliance will automatically stop and beep when the program is complete. Unplug the power cord.
- Carefully remove the motor head (it may be hot) and pour out the contents.
Specific Program Notes:
- Dry/Soaked Beans: For making traditional soymilk from dry or pre-soaked soybeans. Soaking beans typically yields a smoother texture.
- Nut Milk: Ideal for preparing various nut milks (e.g., almond milk, cashew milk).
- Rice Paste: For making creamy rice paste or congee.
- Porridge: For cooking various types of porridge.
- Juice: For blending fruits and vegetables into fresh juices. Note: This function does not heat.
- Warming: To gently heat or keep beverages warm.
- Rapid Soymilk: A quicker cycle for soymilk preparation.
- Easy Wash: A cleaning cycle to assist with maintenance.
6. Maintenance and Cleaning
Proper cleaning and maintenance will extend the life of your appliance.
- Always Unplug: Before cleaning, ensure the appliance is unplugged from the power outlet and has cooled down.
- Clean the Pitcher: Wash the inside of the pitcher with warm, soapy water and a soft sponge. Rinse thoroughly.
- Clean the Motor Head: Wipe the exterior of the motor head with a damp cloth. For the blade and heating element area, use a brush (if provided) or a damp cloth to remove any residue. Do not immerse the motor head in water.
- Use Easy Wash Function: For light cleaning, add water to the pitcher up to the MIN line, select the Easy Wash program, and press Start. After the cycle, rinse the pitcher and wipe the motor head.
- Stubborn Stains: For stubborn stains inside the pitcher, you can use a small amount of baking soda mixed with water to create a paste, then scrub gently.
- Storage: Store the clean and dry appliance in a cool, dry place.
7. Troubleshooting
If you encounter issues with your soymilk maker, refer to the following common problems and solutions.
| Problem | Possible Cause | Solution |
|---|---|---|
| Appliance does not start. | Not plugged in; motor head not properly seated; power outage. | Ensure power cord is securely plugged in. Re-seat the motor head firmly onto the pitcher. Check household power supply. |
| Soymilk/Nut milk is too thin. | Insufficient ingredients; too much water. | Increase the amount of beans/nuts. Ensure water level is within recommended range (900ml-1300ml) and adjust based on desired consistency. |
| Overflow during operation. | Too many ingredients; water level above MAX line. | Reduce the amount of ingredients. Ensure water level does not exceed the 1300ml MAX marking. |
| Burning smell. | Food residue on heating element; motor overheating. | Unplug immediately. Allow to cool. Clean heating element thoroughly. If smell persists, discontinue use and contact support. |
If the problem persists after trying these solutions, please contact customer support.
8. Specifications
- Model: DJ13U-G91
- Brand: JOYOUNG
- ASIN: B07814P3S7
- Capacity: 900ml - 1300ml
- Item Weight: Approximately 6.91 pounds (3.13 kg)
- Package Dimensions: 14.17 x 10.24 x 9.06 inches (36 x 26 x 23 cm)
- Date First Available: December 8, 2017
- Power: (Specific power details not provided in source, refer to product label)
- Voltage: (Specific voltage details not provided in source, refer to product label)
9. Warranty and Support
JOYOUNG products are manufactured to high-quality standards. For information regarding warranty coverage, please refer to the warranty card included with your purchase or visit the official JOYOUNG website. If you require technical assistance or customer support, please contact JOYOUNG customer service through their official channels.
JOYOUNG Official Store: Visit the JOYOUNG Store on Amazon


