1. Introduction
Thank you for purchasing the Ridgeway QS-J1205 Portable Trolley Speaker. This device is designed to provide high-quality audio with versatile connectivity options, including Bluetooth, USB, TF card, FM radio, and microphone/guitar inputs. Its portable design with a trolley handle and wheels makes it suitable for various indoor and outdoor activities. Please read this manual thoroughly before operating the speaker to ensure proper use and to maximize its performance and lifespan.
2. Safety Instructions
- Power Source: Use only the specified power adapter for charging. Ensure the voltage matches the speaker's requirements.
- Water and Moisture: Do not expose the speaker to water, rain, or high humidity. This can cause electric shock or damage.
- Ventilation: Do not block ventilation openings. Ensure adequate airflow around the speaker to prevent overheating.
- Heat Sources: Keep the speaker away from heat sources such as radiators, heat registers, stoves, or other heat-producing appliances.
- Cleaning: Disconnect the power before cleaning. Use a dry, soft cloth. Do not use liquid cleaners or aerosol cleaners.
- Servicing: Do not attempt to service this product yourself. Refer all servicing to qualified service personnel. Opening the unit may expose you to dangerous voltages or other hazards.
- Battery: The speaker contains a rechargeable battery. Do not dispose of the battery in fire. Follow local regulations for battery disposal.
- Placement: Place the speaker on a stable, flat surface to prevent it from falling.
- Volume: Avoid prolonged listening at high volume levels to prevent hearing damage.
3. Package Contents
Please check the package contents upon unboxing to ensure all items are present and undamaged:
- Ridgeway QS-J1205 Portable Trolley Speaker
- Wired Microphone
- Remote Control
- Audio Cable (RCA to 3.5mm)
- Power Adapter/Charging Cable
- Instruction Manual

Image 3.1: Contents of the Ridgeway QS-J1205 speaker package, including the speaker, wired microphone, remote control, audio cables, and instruction manual.
4. Product Features
- Powerful Audio Output: 40W portable speaker with a 12-inch woofer for clear and robust sound.
- Multiple Playback Modes: Bluetooth, USB, TF Card, FM Radio, AUX Input.
- Microphone & Guitar Inputs: Dedicated 1/4" inputs with individual volume controls for karaoke or live performances.
- Equalizer Controls: Adjustable Bass and Treble for customized sound.
- LED Light Display: Integrated LED lights that synchronize with music.
- Rechargeable Battery: Long-lasting battery provides up to 4 hours of music playback.
- Portability: Extendable handle and rolling wheels for easy transport.
- Durable Construction: Made with robust ABS nylon fiber for heavy-duty use.
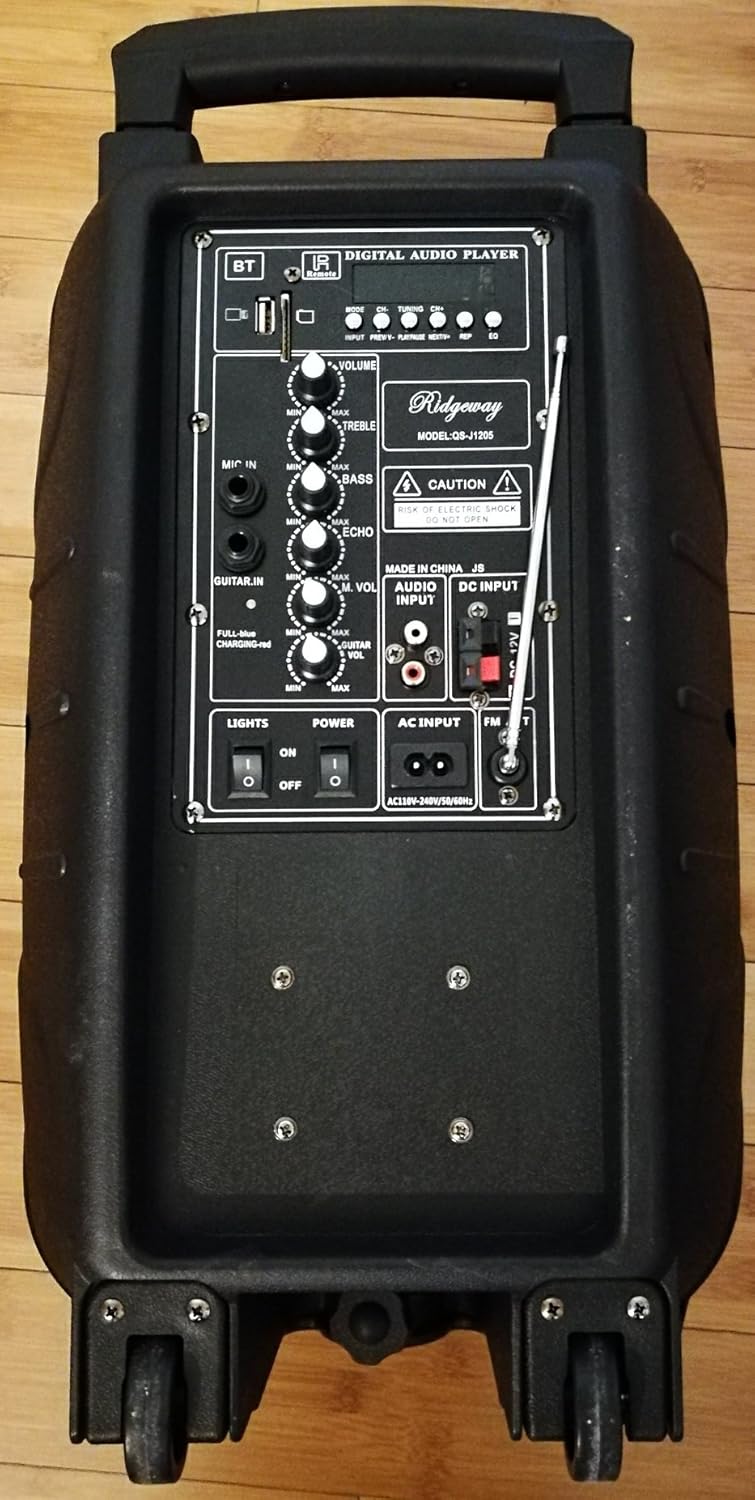
Image 4.1: Front view of the Ridgeway QS-J1205 Portable Trolley Speaker, showcasing its design and portability features.
5. Controls and Connections
Familiarize yourself with the control panel located on the rear of the speaker:
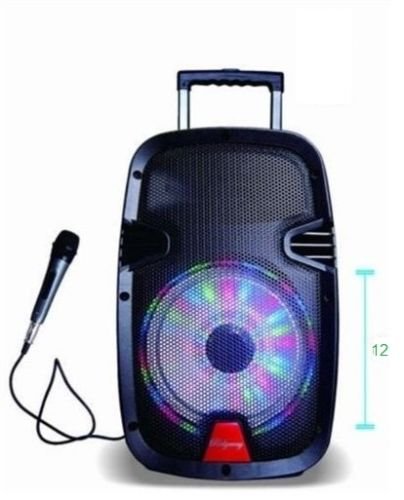
Image 5.1: Rear control panel of the Ridgeway QS-J1205 speaker, showing various inputs, outputs, and control knobs.
- Digital Audio Player Controls:
- MODE: Switches between Bluetooth, FM Radio, USB, TF Card, and AUX modes.
- PREV/CH-: Short press for previous track/station; long press for fast rewind (USB/TF).
- PLAY/PAUSE: Play/pause music; long press for TWS pairing (Bluetooth).
- NEXT/CH+: Short press for next track/station; long press for fast forward (USB/TF).
- REC: Record function (requires USB/TF and microphone).
- REPEAT: Repeats current track or all tracks (USB/TF).
- USB Port: For USB flash drives.
- TF Card Slot: For TF (MicroSD) cards.
- Volume Controls:
- VOLUME: Master volume control for all audio output.
- TREBLE: Adjusts high-frequency sound.
- BASS: Adjusts low-frequency sound.
- MIC VOL: Adjusts the volume of the connected microphone.
- ECHO: Adjusts the echo effect for the microphone.
- GUITAR VOL: Adjusts the volume of the connected guitar.
- Inputs/Outputs:
- MIC IN: 1/4" input for wired microphone.
- GUITAR IN: 1/4" input for guitar.
- AUDIO INPUT (AUX): RCA stereo input for external audio devices.
- DC INPUT: 12V DC input for external power or charging.
- AC INPUT: AC110V-240V/50-60Hz input for main power and charging.
- Switches:
- LIGHTS ON/OFF: Controls the LED light display.
- POWER ON/OFF: Main power switch for the speaker.
- FM Antenna: Extendable antenna for improved FM radio reception.
6. Setup
6.1 Initial Charging
Before first use, fully charge the speaker's internal battery. Connect the provided power adapter to the AC INPUT on the rear panel and plug it into a wall outlet. The charging indicator light (if present, usually red during charging and green when full) will illuminate. Charging typically takes 4-6 hours. The speaker can be used while charging.
6.2 Powering On/Off
Locate the POWER ON/OFF switch on the rear panel. Flip it to the "ON" position to power on the speaker. Flip it to "OFF" to power off the speaker.
6.3 Positioning the Speaker
Place the speaker on a stable, flat surface. For optimal sound projection, position it in an open area. Use the trolley handle and wheels for easy transportation.
7. Operating Instructions
7.1 Bluetooth Mode
- Power on the speaker. The speaker will automatically enter Bluetooth mode or you can press the MODE button until "Bluetooth" is announced or displayed.
- Enable Bluetooth on your mobile device (smartphone, tablet, etc.).
- Search for available Bluetooth devices. You should find "QS-J1205" or "Ridgeway Speaker" in the list.
- Select the speaker to pair. Once paired, you will hear a confirmation sound.
- You can now play music from your device through the speaker. Use the VOLUME knob on the speaker and your device's volume controls to adjust the sound level.
- Use the PREV/CH-, PLAY/PAUSE, and NEXT/CH+ buttons on the speaker or remote control to manage playback.
7.2 USB/TF Card Mode
- Insert a USB flash drive into the USB Port or a TF (MicroSD) card into the TF Card Slot. Ensure the card is inserted correctly.
- The speaker will automatically switch to USB or TF card mode and begin playing music. If not, press the MODE button until the correct mode is selected.
- Use the PREV/CH-, PLAY/PAUSE, and NEXT/CH+ buttons to control playback.
- Press the REPEAT button to cycle through repeat modes (e.g., repeat one, repeat all).
7.3 FM Radio Mode
- Extend the FM antenna on the rear panel for better reception.
- Press the MODE button until "FM Radio" is announced or displayed.
- To auto-scan and save available stations, long press the PLAY/PAUSE button. The speaker will scan and store stations automatically.
- Use the PREV/CH- and NEXT/CH+ buttons to navigate through the saved stations.
7.4 AUX Input Mode
- Connect an external audio device (e.g., MP3 player, laptop) to the AUDIO INPUT (AUX) using the provided RCA to 3.5mm audio cable.
- Press the MODE button until "AUX" or "Audio Input" is announced or displayed.
- Play audio from your connected device. Adjust the volume using both the speaker's VOLUME knob and the external device's volume controls.
7.5 Microphone and Guitar Inputs
- Connect a wired microphone to the MIC IN jack or a guitar to the GUITAR IN jack.
- Adjust the microphone volume using the MIC VOL knob.
- Adjust the guitar volume using the GUITAR VOL knob.
- Use the ECHO knob to add an echo effect to the microphone.
- Ensure the master VOLUME is set to an appropriate level.
7.6 LED Lights
Flip the LIGHTS ON/OFF switch to "ON" to activate the integrated LED light display. The lights will move and change color with the music. Flip to "OFF" to disable them.
8. Charging the Battery
The speaker is equipped with a built-in rechargeable battery. When the battery is low, the speaker may indicate this with an audible prompt or a flashing indicator light. To charge:
- Connect the power adapter to the AC INPUT on the rear panel.
- Plug the adapter into a standard AC power outlet (110V-240V, 50/60Hz).
- The charging indicator will illuminate. Allow 4-6 hours for a full charge.
- Once fully charged, the indicator light may change color or turn off. Disconnect the charger when not needed to prolong battery life.
Note: The speaker can operate while charging, but it is recommended to fully charge it before initial use for optimal battery performance.
9. Maintenance
- Cleaning: Use a soft, dry cloth to wipe the exterior of the speaker. Do not use abrasive cleaners, waxes, or solvents.
- Storage: When not in use for extended periods, store the speaker in a cool, dry place. It is recommended to charge the battery every 3-6 months to maintain its health.
- Battery Care: Avoid completely draining the battery frequently. Charge it before it runs out completely to extend its lifespan.
- Avoid Extreme Temperatures: Do not expose the speaker to extreme heat or cold, as this can damage internal components and the battery.
10. Troubleshooting
| Problem | Possible Cause | Solution |
|---|---|---|
| Speaker does not power on. | Battery is drained. Power switch is off. Power adapter not connected properly. |
Charge the battery. Ensure the POWER switch is in the "ON" position. Check power cable connections. |
| No sound. | Volume is too low. Incorrect input mode selected. Device not properly connected/paired. |
Increase the master VOLUME and source device volume. Press MODE to select the correct input. Reconnect/re-pair the device. Check cable connections for AUX/Mic/Guitar. |
| Bluetooth pairing fails. | Speaker not in Bluetooth mode. Device too far from speaker. Speaker already paired with another device. |
Press MODE to select Bluetooth. Move your device closer to the speaker (within 10 meters). Disconnect from other devices and try again. |
| USB/TF card not playing. | Incorrect file format. Card/drive not inserted correctly. Card/drive is corrupted or empty. |
Ensure audio files are in supported formats (e.g., MP3). Reinsert the USB drive or TF card. Try a different USB drive or TF card. |
| Poor FM radio reception. | Antenna not extended. Weak signal in the area. |
Fully extend the FM antenna. Try repositioning the speaker or antenna. |
11. Specifications
- Model: QS-J1205
- Output Power: 40W
- Woofer Size: 12 inches (30.5 cm)
- Connectivity: Bluetooth, USB, TF Card, FM Radio, AUX (RCA), Microphone (1/4"), Guitar (1/4")
- Power Input: AC 110V-240V, 50/60Hz; DC 12V
- Battery Life: Up to 4 hours (music playback only)
- Dimensions (L x W x H): Approximately 30.5 x 25.4 x 50.8 cm (12 x 10 x 20 inches)
- Weight: Approximately 0.28 kg (0.62 lbs) - Note: This weight seems unusually low for a speaker of this size. Please refer to product packaging for accurate weight.
- Compatible Devices: Laptop, Smartphone, MP3 Players, etc.
- UPC: 670739021470
12. Warranty and Support
Ridgeway products are designed for reliability and performance. For specific warranty information, please refer to the warranty card included in your product packaging or contact your retailer. Keep your purchase receipt as proof of purchase for any warranty claims.
For technical support or inquiries, please contact the customer service provided by your retailer or visit the official Ridgeway website for contact information.


