
1. Introduction
Thank you for purchasing the Makita 14.4V Cordless Driver Drill MDF347DS. This manual provides essential information for the safe and efficient operation, maintenance, and troubleshooting of your tool. Please read this manual thoroughly before use and keep it for future reference.
2. Safety Instructions
Always follow basic safety precautions to reduce the risk of fire, electric shock, and personal injury. Keep your work area clean and well-lit. Do not operate power tools in explosive atmospheres, such as in the presence of flammable liquids, gases, or dust. Keep children and bystanders away while operating a power tool.
2.1. Electrical Safety
- Avoid body contact with earthed or grounded surfaces such as pipes, radiators, ranges, and refrigerators.
- Do not expose power tools to rain or wet conditions. Water entering a power tool will increase the risk of electric shock.
2.2. Personal Safety
- Always wear eye protection and hearing protection when operating the tool.
- Dress properly. Do not wear loose clothing or jewelry. Keep your hair, clothing, and gloves away from moving parts.
- Stay alert, watch what you are doing, and use common sense when operating a power tool.
2.3. Power Tool Use and Care
- Do not force the power tool. Use the correct power tool for your application.
- Disconnect the battery pack from the power tool before making any adjustments, changing accessories, or storing power tools.
- Store idle power tools out of the reach of children and do not allow persons unfamiliar with the power tool or these instructions to operate the power tool.
2.4. Battery Tool Use and Care
- Recharge only with the charger specified by the manufacturer.
- Use power tools only with specifically designated battery packs.
- When the battery pack is not in use, keep it away from other metal objects that can make a connection from one terminal to another.
3. Product Overview
The Makita MDF347DS is a 14.4V cordless driver drill designed for both drilling and screwdriving applications. It features a durable construction, a 2-speed mechanical gear, a 16-stage clutch plus direct drive, and a keyless chuck for easy bit changes.

Figure 3.1: Main Components of the Driver Drill
This diagram illustrates the key components of the Makita MDF347DS driver drill, including the Tightening Force Adjustment Ring (Clutch Ring), Drill Chuck, Trigger Switch, Battery, Speed Change Lever, and Forward/Reverse Rotation Change Lever.
3.1. Components
- Tightening Force Adjustment Ring (Clutch Ring): Used to select the desired torque setting for screwdriving or the drill mode for drilling.
- Drill Chuck: Holds the drill bits or screwdriver bits securely. Features a keyless design for quick changes.
- Trigger Switch: Activates the tool and controls the rotational speed (variable speed).
- Battery: Provides power to the tool. This model uses a 14.4V slide-type Li-ion battery.
- Speed Change Lever: Allows selection between high-speed and low-speed modes.
- Forward/Reverse Rotation Change Lever: Controls the direction of rotation (forward for tightening, reverse for loosening).
4. Package Contents
Upon opening the package, ensure all items are present and undamaged:
- Makita 14.4V Cordless Driver Drill MDF347DS Unit
- 1.5Ah Lithium-ion Battery (BL1415G type)
- Battery Charger
- Carrying Case
- +Bit 2-65 (Screwdriver bit)
- Instruction Manual (this document)
5. Setup
5.1. Battery Installation and Removal
To install the battery, align the battery pack with the grooves in the tool's handle and slide it in until it clicks into place. To remove, press the release button on the battery pack and slide it out.
5.2. Charging the Battery
Insert the battery pack into the charger. The charging indicator light on the charger will show the charging status. Refer to the charger's instruction manual for detailed charging procedures and indicator meanings.
5.3. Bit Installation and Removal (Keyless Chuck)
To install a bit, rotate the chuck counter-clockwise to open the jaws. Insert the bit fully into the chuck, then rotate the chuck clockwise to tighten the jaws securely around the bit. Ensure the bit is centered and firmly held. To remove, rotate the chuck counter-clockwise to loosen the jaws and pull the bit out.
6. Operating Instructions
6.1. Power Switch (Trigger Switch)

Figure 6.1: Trigger Switch
The trigger switch controls the power and speed of the drill. Pressing the trigger switch activates the tool. The speed is variable; pressing the trigger further increases the rotational speed.
The tool is equipped with a variable speed trigger switch. The rotational speed increases as you press the trigger further. Release the trigger to stop the tool. For safety, always ensure the forward/reverse rotation switch is in the neutral position when not in use or when changing bits.
6.2. Forward/Reverse Rotation
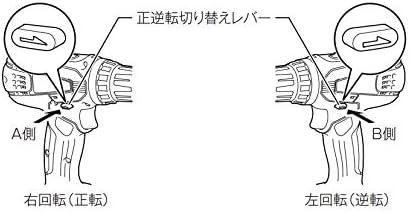
Figure 6.2: Forward/Reverse Rotation Change Lever
This diagram illustrates the positions of the forward/reverse rotation change lever. Pushing the lever to the 'A Side' (left) sets the tool for right rotation (forward), used for tightening screws. Pushing it to the 'B Side' (right) sets it for left rotation (reverse), used for loosening screws.
The forward/reverse rotation change lever is located above the trigger switch. Push the lever from the left side for forward rotation (clockwise, for tightening screws). Push the lever from the right side for reverse rotation (counter-clockwise, for loosening screws). When the lever is in the center position, the trigger switch is locked, preventing accidental startup.
6.3. Speed Selection

Figure 6.3: Speed Change Lever
This diagram shows the speed change lever. Position '1' is for low speed, suitable for heavy-duty applications or larger screws. Position '2' is for high speed, ideal for faster drilling or smaller screws.
The speed change lever is located on top of the tool. Slide the lever to position '1' for low speed (0-400 RPM) or to position '2' for high speed (0-1,400 RPM). Always ensure the tool has come to a complete stop before changing the speed setting to prevent gear damage.
6.4. Torque Adjustment (Clutch)
The tightening force adjustment ring (clutch ring) allows you to select from 16 torque settings plus a drill mode. Rotate the ring to align the desired number with the arrow on the tool body. Lower numbers indicate lower torque, suitable for smaller screws or softer materials. Higher numbers provide more torque. The drill symbol (drill bit icon) bypasses the clutch for maximum torque, ideal for drilling applications.
6.5. Drilling and Screwdriving
- For Screwdriving: Select a low-speed setting and an appropriate clutch setting. Start with a lower torque setting and increase if necessary to avoid overtightening or stripping the screw.
- For Drilling: Select the drill mode on the clutch ring and choose either high or low speed depending on the material and drill bit size. Use high speed for smaller holes and softer materials, and low speed for larger holes and harder materials. Apply steady, even pressure.
7. Maintenance
7.1. Cleaning
Regularly clean the tool's ventilation openings to prevent overheating. Use a soft, damp cloth to wipe down the tool. Do not use strong detergents or solvents. Ensure the battery terminals are clean and free of debris.
7.2. Storage
Store the tool and battery in a cool, dry place, away from direct sunlight and moisture. Ensure the battery is partially charged (not fully discharged or fully charged) for long-term storage. Keep out of reach of children.
7.3. Battery Care
Avoid fully discharging the battery frequently. Recharge the battery before it is completely depleted. Do not store the battery in extreme temperatures. If the battery is not used for an extended period, charge it periodically to maintain its lifespan.
8. Troubleshooting
| Problem | Possible Cause | Solution |
|---|---|---|
| Tool does not start | Battery not charged or improperly installed; Forward/reverse lever in neutral position. | Charge battery and ensure proper installation; Move forward/reverse lever to forward or reverse position. |
| Reduced power or speed | Battery charge low; Overload; Incorrect speed setting. | Recharge battery; Reduce load; Select higher speed setting if appropriate. |
| Bit wobbles or falls out | Bit not properly tightened in chuck; Damaged chuck. | Retighten bit firmly; If problem persists, chuck may need replacement. |
9. Specifications
| Feature | Specification |
|---|---|
| Model Number | MDF347DS |
| Voltage | DC 14.4V |
| Battery Type | Lithium-ion (1.5Ah) |
| Chuck Type | Keyless Chuck |
| Chuck Capacity | 0.8 - 10 mm |
| Max Torque | 30 N·m |
| No-load Speed (High) | 0 - 1,400 RPM |
| No-load Speed (Low) | 0 - 400 RPM |
| Drilling Capacity (Steel) | 10 mm |
| Drilling Capacity (Wood) | 25 mm |
| Screw Tightening Capacity (Wood Screw) | φ5.1 x 63 mm |
| Screw Tightening Capacity (Small Screw) | M6 |
| Dimensions (L x W x H) | 198 x 83 x 235 mm |
| Net Weight (with battery) | 1.4 kg |
| Included Accessories | +Bit 2-65, Battery, Charger, Case |
10. Warranty and Support
Warranty information for the Makita MDF347DS Cordless Driver Drill is not provided in the product details. For specific warranty terms, service, or technical support, please contact your local Makita authorized service center or the retailer where the product was purchased.
You can find contact information for Makita support on their official website: Makita Official Website


