Introduction
Thank you for choosing the Rexing V1GW-4K Ultra HD Car Dash Cam. This manual provides detailed instructions for the proper installation, operation, and maintenance of your device. Please read this manual thoroughly before using the dash cam to ensure optimal performance and safety. The V1GW-4K features 4K Ultra HD video recording, a built-in GPS logger, Wi-Fi connectivity, a 170-degree wide-angle lens, and a supercapacitor for enhanced durability.
Safety Information
- Do not operate the dash cam while driving. Adjust settings or review footage only when the vehicle is safely parked.
- Ensure the dash cam is securely mounted and does not obstruct the driver's view or interfere with vehicle controls.
- Use only original Rexing accessories and power cables to prevent damage and ensure proper operation.
- Avoid exposing the dash cam to extreme temperatures outside its operating range (-20 to 176°F).
- Keep the lens clean to ensure clear video recordings.
- Do not attempt to disassemble or repair the device yourself. Contact customer support for assistance.
What's in the Box
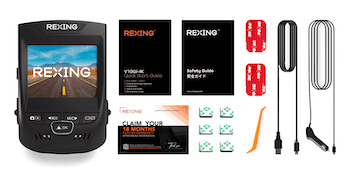
The Rexing V1GW-4K package includes the following components:
- Rexing V1GW-4K Dash Cam
- Car Power Cable
- 3M Adhesive Mount
- USB Cable
- Cable Management Clips
- User Manual
- Quick Start Guide

Product Overview
Familiarize yourself with the main components and controls of your Rexing V1GW-4K Dash Cam.

The dash cam features a compact design with a 2.4-inch LCD screen, intuitive buttons for navigation, and ports for power, GPS, and memory card. The main lens is located on the front, capturing a wide 170-degree view.
Setup
1. Inserting the Micro SD Card
Before first use, insert a high-endurance Micro SD card (up to 256GB, Class 10 or higher recommended) into the designated slot on the side of the dash cam. Ensure the card is inserted correctly until it clicks into place.
2. Mounting the Dash Cam
Clean the windshield area where you intend to mount the dash cam. Attach the 3M adhesive mount to the dash cam, then firmly press the mount onto the windshield, ensuring it does not obstruct your view. The ideal placement is typically behind the rearview mirror.
3. Connecting Power
Connect the car power cable to the dash cam's power input and plug the other end into your vehicle's 12V power outlet (cigarette lighter socket). The dash cam will automatically power on and begin recording when the vehicle starts.
4. Initial Power On and Formatting
Upon first power on, the dash cam may prompt you to format the Micro SD card. It is highly recommended to format the card directly on the device to ensure compatibility and optimal performance. Navigate through the menu using the buttons and confirm the format operation.
5. Built-in GPS Logger
The V1GW-4K features a built-in GPS logger. Once powered on, the GPS module will automatically attempt to acquire a satellite signal. This allows for recording of speed, location, and time data which can be viewed during video playback using the Rexing Connect App or the dedicated GPS Logger Software on your computer.

6. Wi-Fi Connection and Mobile App
To connect your dash cam to your smartphone via Wi-Fi:
- Download the 'Rexing Connect' app from your smartphone's app store.
- On the dash cam, enable Wi-Fi from the settings menu.
- On your smartphone, go to Wi-Fi settings and connect to the dash cam's Wi-Fi network (SSID and password displayed on the dash cam screen).
- Open the Rexing Connect app. You can now view live footage, playback recordings, download files, and adjust settings wirelessly.
Operating Instructions
1. Recording Modes
The V1GW-4K supports several recording modes:
- Loop Recording: The dash cam continuously records video in short segments (e.g., 1, 3, or 5 minutes). When the memory card is full, the oldest unlocked files are automatically overwritten. It is highly recommended to keep Loop Recording enabled.
- G-Sensor (Gravity Sensor): In the event of a sudden impact or collision, the G-Sensor automatically detects the event and locks the current video segment, preventing it from being overwritten by loop recording. The sensitivity of the G-Sensor can be adjusted in the settings.

2. Parking Monitor
The Parking Monitor feature allows the dash cam to record when the vehicle is parked. There are two main modes:
- Vibration Detection: The dash cam will automatically turn on and record a 20-second video if it detects vibration while parked.
- Time Lapse Video: For 24/7 surveillance, the dash cam can capture frames to create a time-lapse video. This mode requires a smart hardwire kit (sold separately) to provide continuous power.
3. Video Playback
Videos can be played back directly on the dash cam's LCD screen, via the Rexing Connect app on your smartphone, or by removing the Micro SD card and playing files on a computer using compatible media players (e.g., VLC Media Player for HEVC codec files) or the Rexing GPS Logger Software.

4. Settings Adjustment
Access the settings menu on the dash cam to adjust various parameters such as video resolution (up to 2160p), loop recording duration, G-Sensor sensitivity, exposure, time zone, and Wi-Fi settings. These settings can also be managed through the Rexing Connect app.
5. Superior Night Vision & WDR
The V1GW-4K is equipped with an F/1.7 aperture lens and Wide Dynamic Range (WDR) technology. This combination enhances picture quality in low-light conditions and balances exposure to create clear, detailed images and footage, even at night or in challenging lighting environments.

Maintenance
1. SD Card Formatting
It is recommended to format the Micro SD card regularly (e.g., once a month) to prevent file corruption and ensure smooth operation. This can be done directly through the dash cam's menu or via the Rexing Connect app.
2. Cleaning the Lens
Use a soft, lint-free cloth to gently clean the dash cam lens. Avoid using abrasive cleaners or solvents that could damage the lens coating.
3. Firmware Updates
Periodically check the Rexing website for available firmware updates. Firmware updates can improve performance, add new features, and resolve potential issues. Follow the instructions provided with the firmware update carefully.
Troubleshooting
| Problem | Possible Cause | Solution |
|---|---|---|
| Dash cam does not power on. | No power from car charger; faulty cable; damaged dash cam. | Check car charger connection and vehicle's 12V outlet. Try a different power source or cable. Contact support if issue persists. |
| Recording stops unexpectedly. | SD card full or corrupted; incompatible SD card; G-Sensor triggered too often. | Format SD card regularly. Ensure using a high-endurance Class 10 SD card. Adjust G-Sensor sensitivity. |
| Wi-Fi connection issues. | Incorrect password; app issues; distance from dash cam. | Verify Wi-Fi password. Restart dash cam and phone. Ensure phone is close to the dash cam. Reinstall app if necessary. |
| Video quality is poor. | Dirty lens; low resolution setting; extreme lighting conditions. | Clean the lens. Set video resolution to 4K (2160p) in settings. WDR should help with lighting. |
| GPS not logging data. | Poor satellite signal; GPS module issue. | Ensure clear view of the sky. Wait for GPS signal acquisition. If issue persists, contact support. |
Specifications
| Feature | Description |
|---|---|
| Model | V1GW-4K |
| Video Resolution | Up to 2160p (4K Ultra HD) |
| Lens Angle | 170° Wide Angle |
| Display | 2.4" LCD Screen |
| Storage | Supports Micro SD cards up to 256GB (Class 10+ recommended) |
| GPS | Built-in GPS Logger |
| Connectivity | Wi-Fi |
| Sensor | G-Sensor (Gravity Sensor) |
| Power Source | Supercapacitor (Operating Temp: -20 to 176°F) |
| Special Features | Loop Recording, Parking Monitor (requires hardwire kit for 24/7), WDR |
| Product Dimensions | 3.9 x 5.51 x 5.24 inches |
| Item Weight | 4.8 ounces |


Official Product Video
Warranty and Support
Rexing products come with a standard warranty. For detailed warranty information, please refer to the warranty card included in your product packaging or visit the official Rexing website. If you encounter any issues or have questions regarding your V1GW-4K Dash Cam, please contact Rexing customer support.
Rexing Customer Support:
- Visit the Rexing website for FAQs, troubleshooting guides, and contact information.
- Email support is available for technical assistance.
- Phone support may be available during business hours.