1. Introduction
This manual provides essential information for the safe and efficient operation of your Roadstar TSPK-990CDBT Portable Stereo System. Please read these instructions thoroughly before using the device and retain them for future reference. The TSPK-990CDBT is a versatile multimedia tower speaker featuring CD playback, FM radio, Bluetooth connectivity, USB playback, and an AUX-in port.
2. Safety Information
- Power Source: Ensure the power supply voltage matches the requirements specified on the unit. Use only the provided power adapter.
- Ventilation: Do not block any ventilation openings. Maintain adequate space around the unit for proper airflow.
- Water and Moisture: Do not expose the unit to rain, moisture, or dripping/splashing liquids. Do not place objects filled with liquids, such as vases, on the unit.
- Heat: Keep the unit away from heat sources such as radiators, heat registers, stoves, or other apparatus (including amplifiers) that produce heat.
- Cleaning: Unplug the unit from the power outlet before cleaning. Use a soft, dry cloth. Do not use liquid cleaners or aerosol cleaners.
- Servicing: Do not attempt to service this product yourself. Refer all servicing to qualified service personnel.
- CD Player: This product utilizes a Class 1 laser. Do not open the CD compartment while a disc is playing.
3. Package Contents
Carefully unpack the box and ensure all items are present and in good condition. If any items are missing or damaged, contact your retailer.
- Roadstar TSPK-990CDBT Main Unit
- Remote Control
- AC Power Adapter
- Audio Cable (3.5mm to RCA)
- Mounting Screws for Base (if applicable)

Figure 3.1: Included accessories: remote control, power adapter, and audio cable.
4. Product Overview
4.1 Front and Top Panel
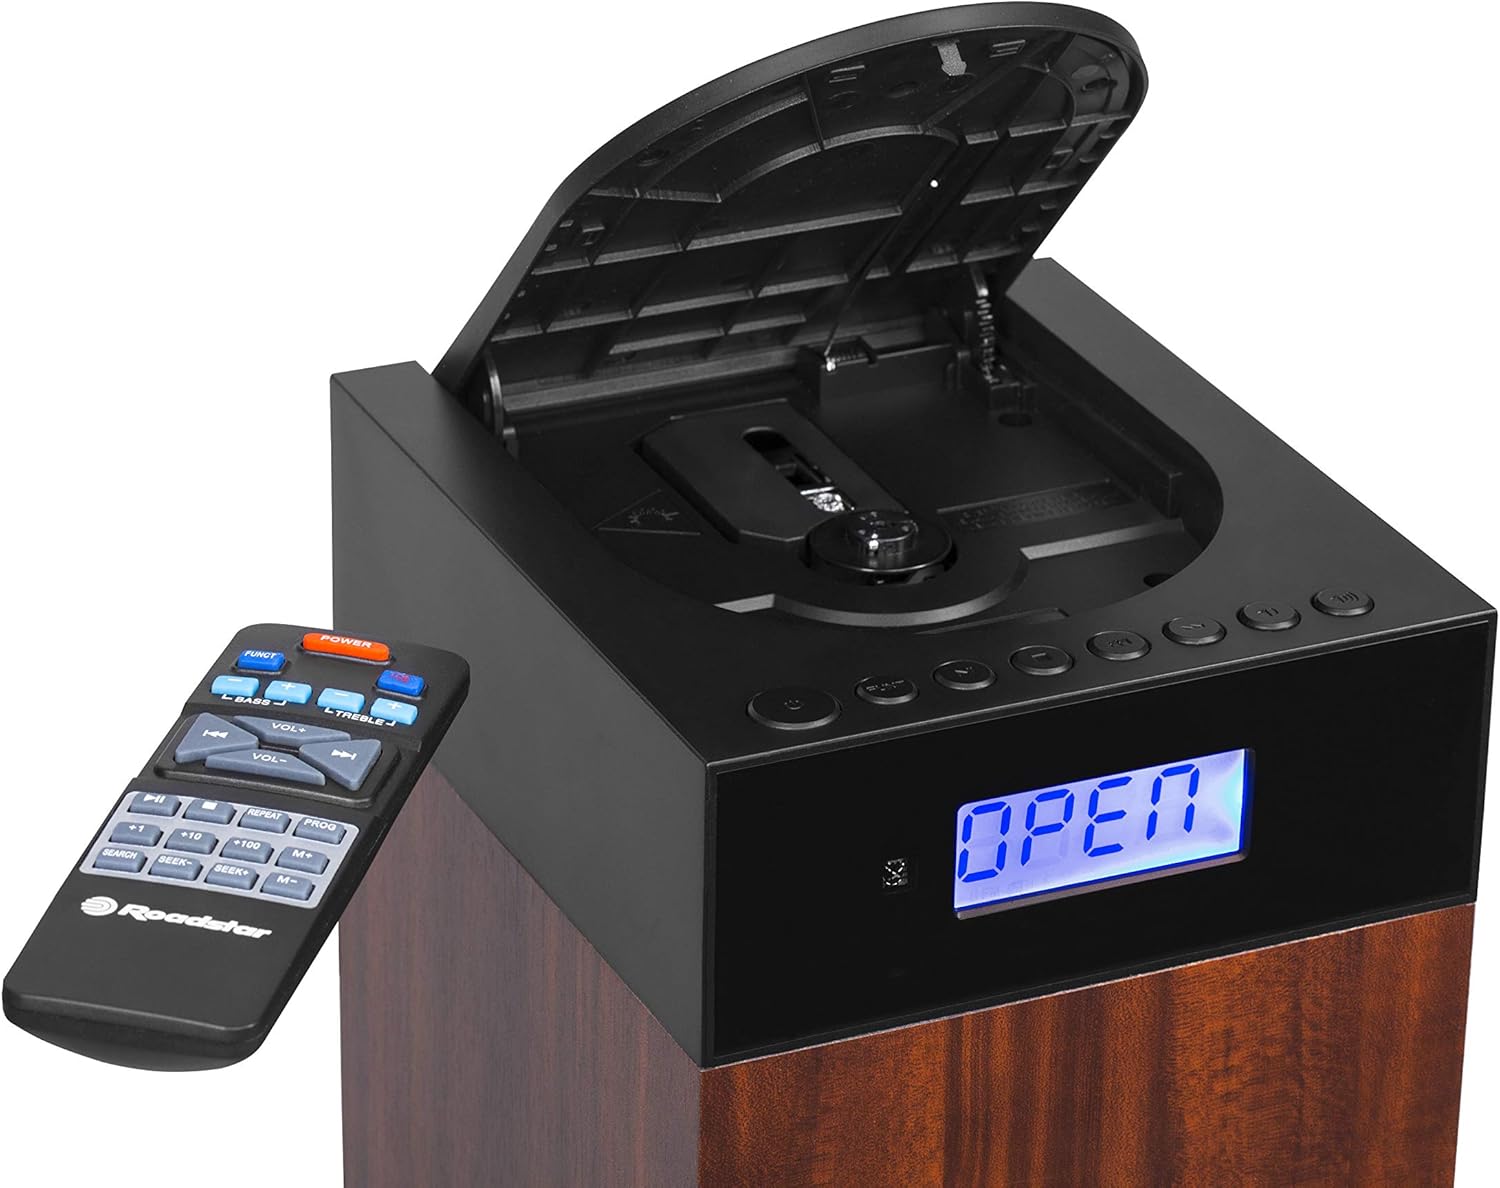
Figure 4.1: Front view showing the LCD display, control buttons, and open CD compartment.
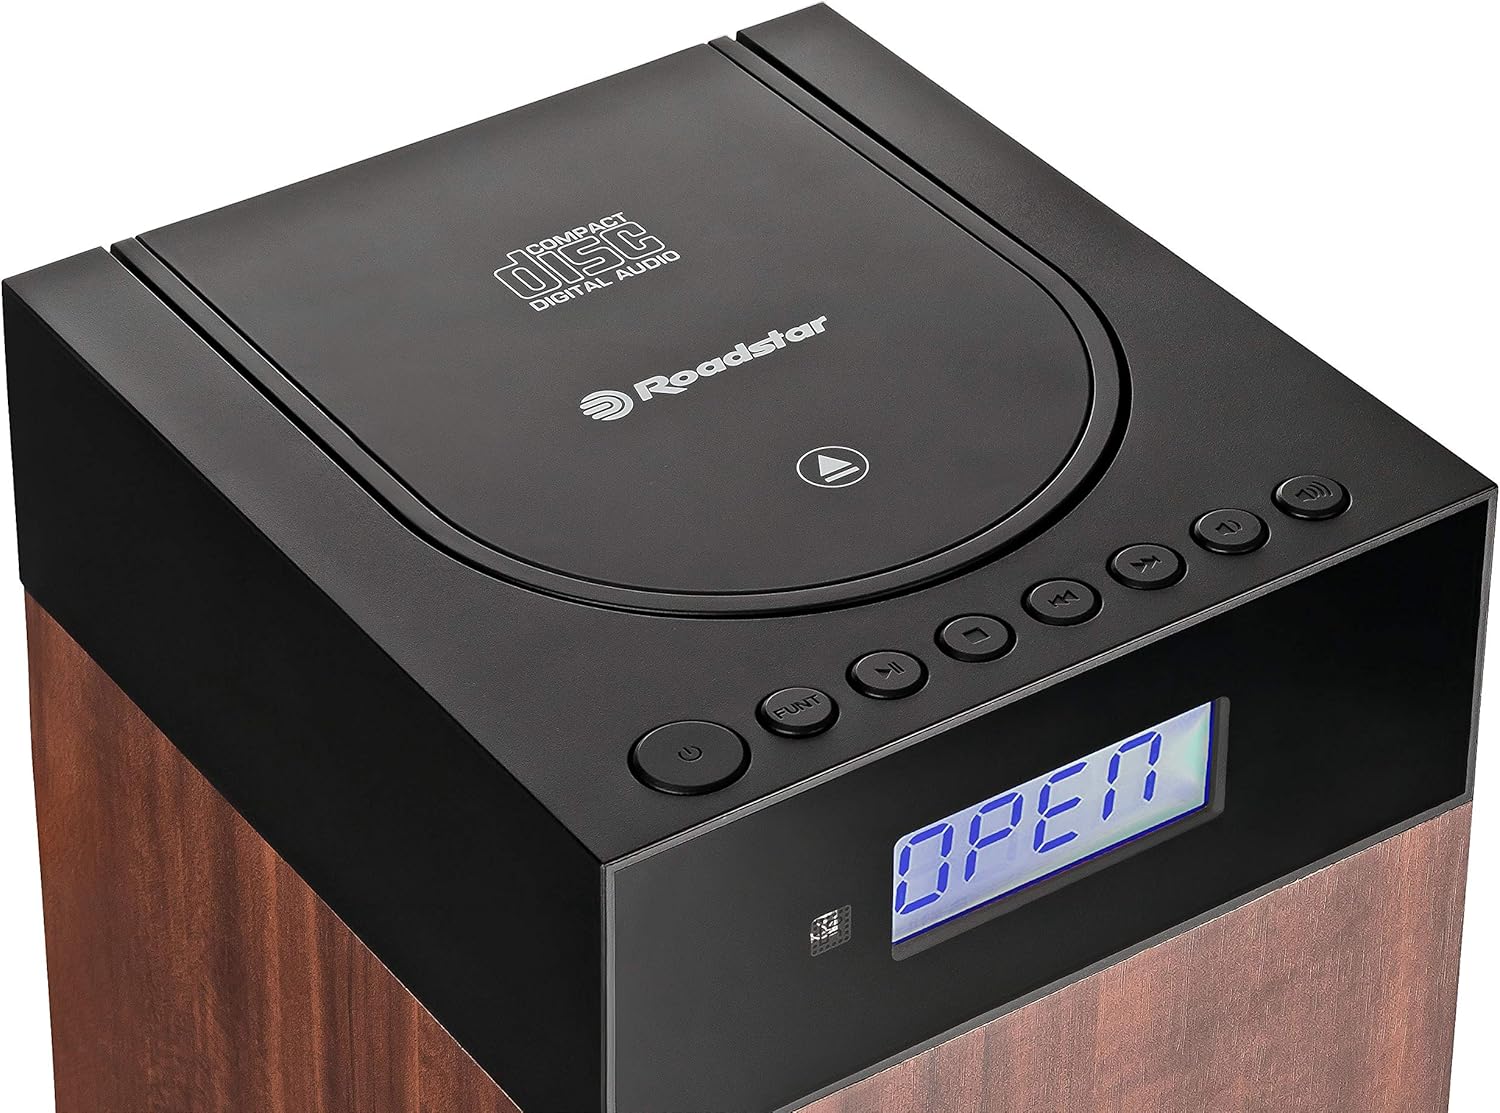
Figure 4.2: Top view showing the CD compartment lid and main controls.
The front panel features an LCD display for status information and mode indicators. The top section houses the CD player compartment and primary control buttons such as Power, Function, Play/Pause, Skip, and Volume.
4.2 Rear Panel Connections

Figure 4.3: Rear panel connections: DC IN, Power ON/OFF switch, USB port, and AUX IN.
The rear panel includes the DC IN port for power, a master ON/OFF switch, a USB port for media playback, and an AUX IN port for connecting external audio devices.
5. Setup
5.1 Unpacking and Placement
- Remove the unit and all accessories from the packaging.
- Place the stereo system on a stable, flat surface. Ensure there is sufficient space around the unit for ventilation.
- Avoid placing the unit near heat sources, direct sunlight, or areas with high humidity or dust.
5.2 Power Connection
- Connect the supplied AC power adapter to the DC IN port on the rear of the unit.
- Plug the other end of the power adapter into a standard wall outlet.
- Ensure the master ON/OFF switch on the rear panel is in the 'ON' position.
5.3 Remote Control Battery Installation
- Open the battery compartment cover on the back of the remote control.
- Insert two AAA batteries (not included) according to the polarity markings (+ and -) inside the compartment.
- Close the battery compartment cover securely.
6. Operating Instructions
6.1 Power On/Off and Mode Selection
- Press the POWER button on the unit or remote control to turn the system on or off.
- Press the FUNCTION button repeatedly to cycle through available modes: CD, FM, Bluetooth, USB, AUX. The selected mode will be displayed on the LCD.
6.2 CD Playback
- Press the FUNCTION button to select CD mode.
- Gently open the CD compartment lid on the top of the unit.
- Place a CD (CD-DA, CD-R, or CD-RW) with the label side facing up onto the spindle.
- Close the CD compartment lid. The unit will read the disc, and playback should begin automatically.
- Use the PLAY/PAUSE button to pause or resume playback.
- Press the SKIP FORWARD or SKIP BACKWARD buttons to navigate between tracks.
- Use the REPEAT button to repeat the current track or the entire disc.
- Use the RANDOM button for shuffled playback.
6.3 FM Radio Operation
- Press the FUNCTION button to select FM mode.
- For automatic station search, press and hold the PLAY/PAUSE button (or SCAN on remote). The radio will scan and save available stations.
- To manually tune, use the SKIP FORWARD or SKIP BACKWARD buttons to adjust the frequency.
- To save a preset, tune to the desired station, then press the PROG button, use SKIP buttons to select a preset number, and press PROG again to confirm.
- To recall a preset, use the M+ or M- buttons on the remote.
6.4 Bluetooth Connection

Figure 6.1: Bluetooth connectivity for wireless audio streaming.
- Press the FUNCTION button to select Bluetooth mode. The LCD will display "BT" or a similar indicator, and the unit will enter pairing mode.
- On your Bluetooth-enabled device (e.g., smartphone), enable Bluetooth and search for available devices.
- Select "TSPK-990CDBT" from the list of devices.
- Once paired, you can play audio from your device through the stereo system.
- Control playback (Play/Pause, Skip) using your connected device or the remote control.
6.5 USB Playback
- Insert a USB flash drive containing MP3, WMA, or WAV audio files into the USB port on the rear panel.
- Press the FUNCTION button to select USB mode.
- Playback should begin automatically. If not, use the PLAY/PAUSE button.
- Use the SKIP FORWARD or SKIP BACKWARD buttons to navigate between tracks.
6.6 AUX-in Connection
- Connect one end of the supplied audio cable (or a standard 3.5mm audio cable) to the headphone jack or line-out port of your external audio device.
- Connect the other end of the cable to the AUX IN port on the rear panel of the stereo system.
- Press the FUNCTION button to select AUX mode.
- Play audio from your external device. The sound will be output through the stereo system.
6.7 Remote Control Usage
The remote control provides full functionality for the stereo system. Point the remote control towards the front of the main unit. Ensure there are no obstructions between the remote and the unit.
- POWER: Turns the unit on/off.
- FUNC: Selects the input source (CD, FM, BT, USB, AUX).
- VOL+/-: Adjusts the volume level.
- BASS+/-: Adjusts bass level.
- TREBLE+/-: Adjusts treble level.
- PLAY/PAUSE (►/−): Play/Pause for CD/USB/BT. Scan for FM.
- SKIP (◀◀/►►): Skips tracks/files. Tunes FM frequency.
- STOP (■): Stops CD/USB playback.
- REPEAT: Repeats current track or all tracks.
- PROG: Programs FM presets or CD playback order.
- M+/M-: Recalls saved FM presets.
- SEARCH: Initiates auto-scan for FM stations.
7. Maintenance
7.1 Cleaning the Unit
Wipe the exterior of the unit with a soft, dry cloth. Do not use abrasive cleaners, waxes, or solvents as they may damage the finish. Ensure the unit is unplugged before cleaning.
7.2 CD Care
Handle CDs by their edges. Keep them clean and free of scratches. If a CD is dirty, wipe it gently with a soft, lint-free cloth from the center outwards. Do not use harsh chemicals.
7.3 Storage
If the unit will not be used for an extended period, unplug it from the power outlet and store it in a cool, dry place, away from direct sunlight and extreme temperatures.
8. Troubleshooting
If you encounter problems with your stereo system, refer to the following table for possible solutions.
| Problem | Possible Cause | Solution |
|---|---|---|
| No power | Power adapter not connected; Master switch OFF; Power outlet faulty. | Check power adapter connection; Ensure master ON/OFF switch is ON; Try a different power outlet. |
| No sound | Volume too low; Mute activated; Incorrect input mode selected. | Increase volume; Check if mute is active; Select the correct input mode (CD, FM, BT, USB, AUX). |
| CD not playing | CD inserted incorrectly; CD dirty or scratched; CD compartment not closed. | Insert CD with label side up; Clean or replace CD; Ensure CD lid is fully closed. |
| Bluetooth not connecting | Unit not in Bluetooth mode; Device not in pairing mode; Device too far. | Select Bluetooth mode on the unit; Ensure your device's Bluetooth is on and discoverable; Move device closer to the unit. |
| Poor FM reception | Antenna not extended or positioned correctly; Interference. | Adjust the position of the FM antenna wire; Move the unit away from other electronic devices. |
| Remote control not working | Batteries depleted or inserted incorrectly; Obstruction between remote and unit. | Replace batteries, ensuring correct polarity; Remove any obstructions; Point remote directly at the unit. |
9. Specifications
| Feature | Specification |
|---|---|
| Model Number | TSPK-990CDBT |
| Brand | Roadstar |
| Dimensions (L x W x H) | 17 x 20 x 100 cm |
| Weight | 6.6 kg |
| Power Output | 55 Watts |
| Connectivity | Bluetooth, USB, Auxiliary (3.5mm) |
| Speaker Type | Multimedia Tower |
| Power Source | AC (Alternating Current) |
| Compatible Devices | Smartphone, CD players, USB drives |
| CD Playback Formats | CD-DA, CD-R, CD-RW |
| USB Playback Formats | MP3, WMA, WAV |
| Radio Tuner | Digital FM with PLL |
10. Warranty and Support
This product is covered by a manufacturer's warranty. Please refer to the warranty card included with your purchase or visit the official Roadstar website for detailed warranty terms and conditions. For technical support, service inquiries, or replacement parts, please contact Roadstar customer service through their official channels.
You can find more information and support on the official Roadstar website: Roadstar Official Store


