1. Introduction
This manual provides comprehensive instructions for the safe and efficient installation, operation, and maintenance of your ONKRON Full Motion TV Wall Mount, model M4-WHT. Please read all instructions carefully before installation to ensure proper setup and to prevent damage or injury.
2. Important Safety Information
- Weight Capacity: Do not exceed the maximum weight capacity of 77 lbs (35 kg). Exceeding this limit may result in serious injury or property damage.
- Screen Size: This mount is designed for TVs between 32 and 65 inches.
- VESA Compatibility: Ensure your TV's VESA pattern (100x100mm to 400x400mm) is compatible with this mount.
- Wall Type: This mount is suitable for installation on solid concrete walls, brick walls, and wood stud walls. Do not install on drywall alone.
- Professional Installation: If you have any doubts about the installation process or the suitability of your wall, consult a qualified professional.
- Tools: Use appropriate tools and follow all safety precautions when drilling and tightening fasteners.
- Children: Keep children away from the installation area during setup.
3. Package Contents
Verify that all components are present and undamaged before beginning installation. If any parts are missing or defective, contact ONKRON customer support.
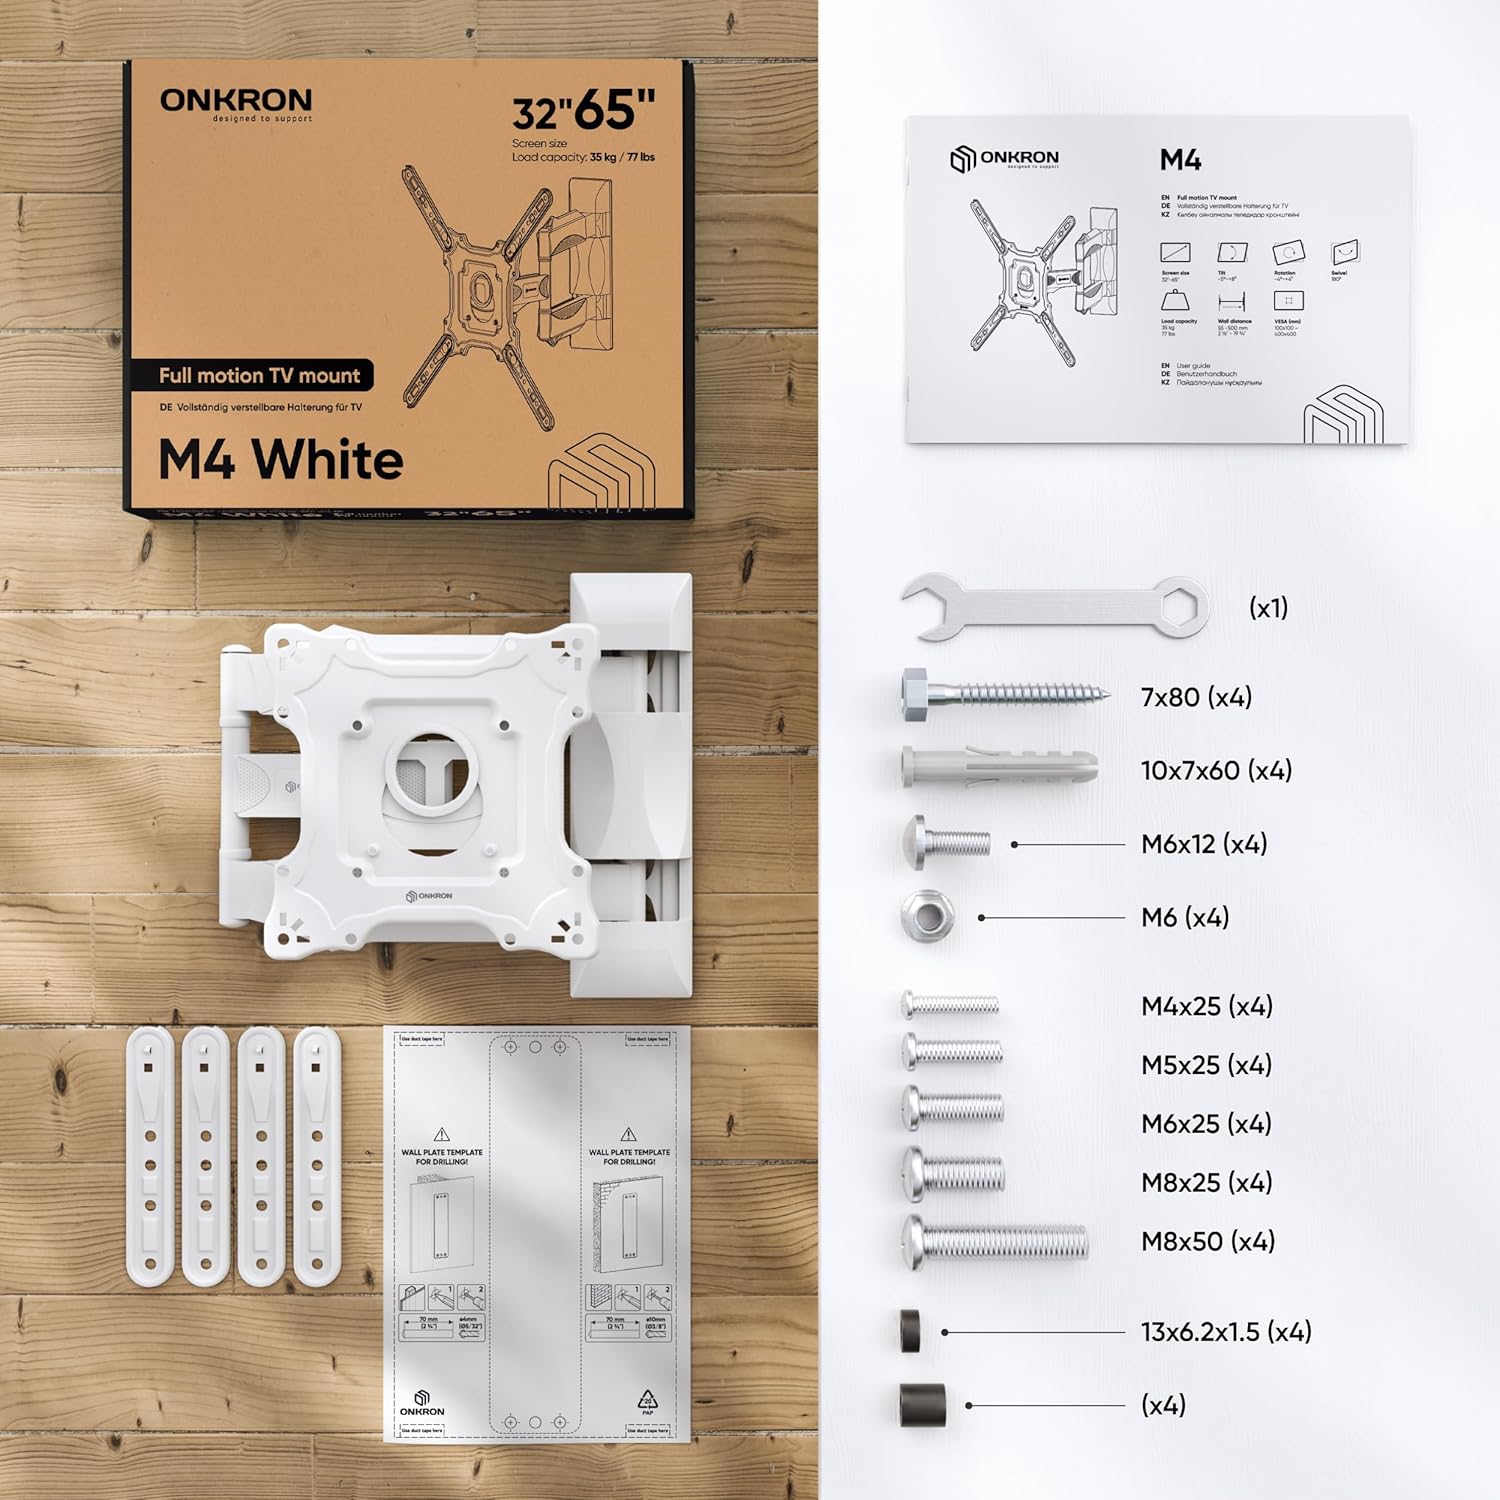
Figure 1: All necessary fasteners and a clear manual are included in the TV mounting kit.
- Wall Plate Assembly (pre-assembled)
- VESA Panel
- VESA Extenders (4 pieces)
- Plastic Covers for cable management
- Hardware Kit (various screws, washers, anchors, wrench)
- Drilling Template
4. Tools Required (Not Included)
- Pencil
- Hammer
- Phillips Head Screwdriver
- Electric Drill
- Drill Bits (specific sizes depending on wall type)
- Level
- Stud Finder (for wood stud installation)
5. Installation Guide
Watch the official ONKRON M4 Assembly and Configuration Instructions video for a visual guide:
Video 1: ONKRON M4 Assembly and Configuration Instructions. This video demonstrates the step-by-step process of installing the M4 TV wall mount.
5.1. Prepare the Mount
- Use the provided wrench to unscrew the nuts and detach the VESA panel from the main mount assembly.
- Carefully detach the plastic covers from the mount arms. These will be reattached later for cable management.
5.2. Mark Drill Holes on the Wall
Determine your desired TV height and position on the wall.
- For Wood Stud Walls:
- Use a stud finder to locate the center of a wood stud.
- Place the drilling template against the wall at the desired height, ensuring it is level.
- Mark the drill hole locations with a pencil.
- Drill pilot holes with a 5/32" (4mm) drill bit to a minimum depth of 3.1" (80mm). No dowels are needed for wood studs.
- For Concrete/Brick Walls:
- Place the drilling template against the wall at the desired height, ensuring it is level.
- Mark the drill hole locations with a pencil.
- Drill holes with a 3/8" (10mm) drill bit to a minimum depth of 3.1" (80mm).
- Insert the provided concrete anchors (dowels) into the drilled holes. Tap gently with a hammer until flush with the wall.
5.3. Install the Wall Plate
- Align the main wall plate assembly with the drilled holes.
- Secure the wall plate to the wall using the appropriate screws and washers from the hardware kit. Tighten firmly with the wrench.
5.4. Attach VESA Panel to TV
The ONKRON M4-WHT supports VESA patterns from 100x100mm to 400x400mm.

Figure 2: The VESA panel can be extended to fit larger VESA patterns.
- Place your TV face down on a soft, clean surface to prevent scratches.
- Identify your TV's VESA mounting holes.
- If your TV's VESA pattern is 100x100, 100x200, or 200x200, you may not need the VESA extenders. Attach the VESA panel directly to the TV using the correct screws and plastic spacers (if needed to compensate for bolt length or curved screens).
- If your TV's VESA pattern is larger (e.g., 200x300, 200x400, 300x200, 300x300, 300x400, 400x200, 400x300, 400x400), attach the VESA extenders to the VESA panel first, then secure the entire assembly to the TV using the appropriate screws and spacers.
- Tighten all screws securely, but do not overtighten.
5.5. Hang Your TV onto the Mount
- With assistance, carefully lift your TV and align the VESA panel (attached to the TV) with the mounting plate on the wall arm.
- Hook the VESA panel onto the mount.
- Secure the TV to the mount by tightening the safety screws located on the VESA panel.
5.6. Cable Management
- Route your TV cables through the designated channels on the mount arms.
- Reattach the plastic covers to conceal the cables and provide a clean appearance.
6. Operating the TV Mount
The ONKRON M4-WHT offers versatile adjustments for optimal viewing.
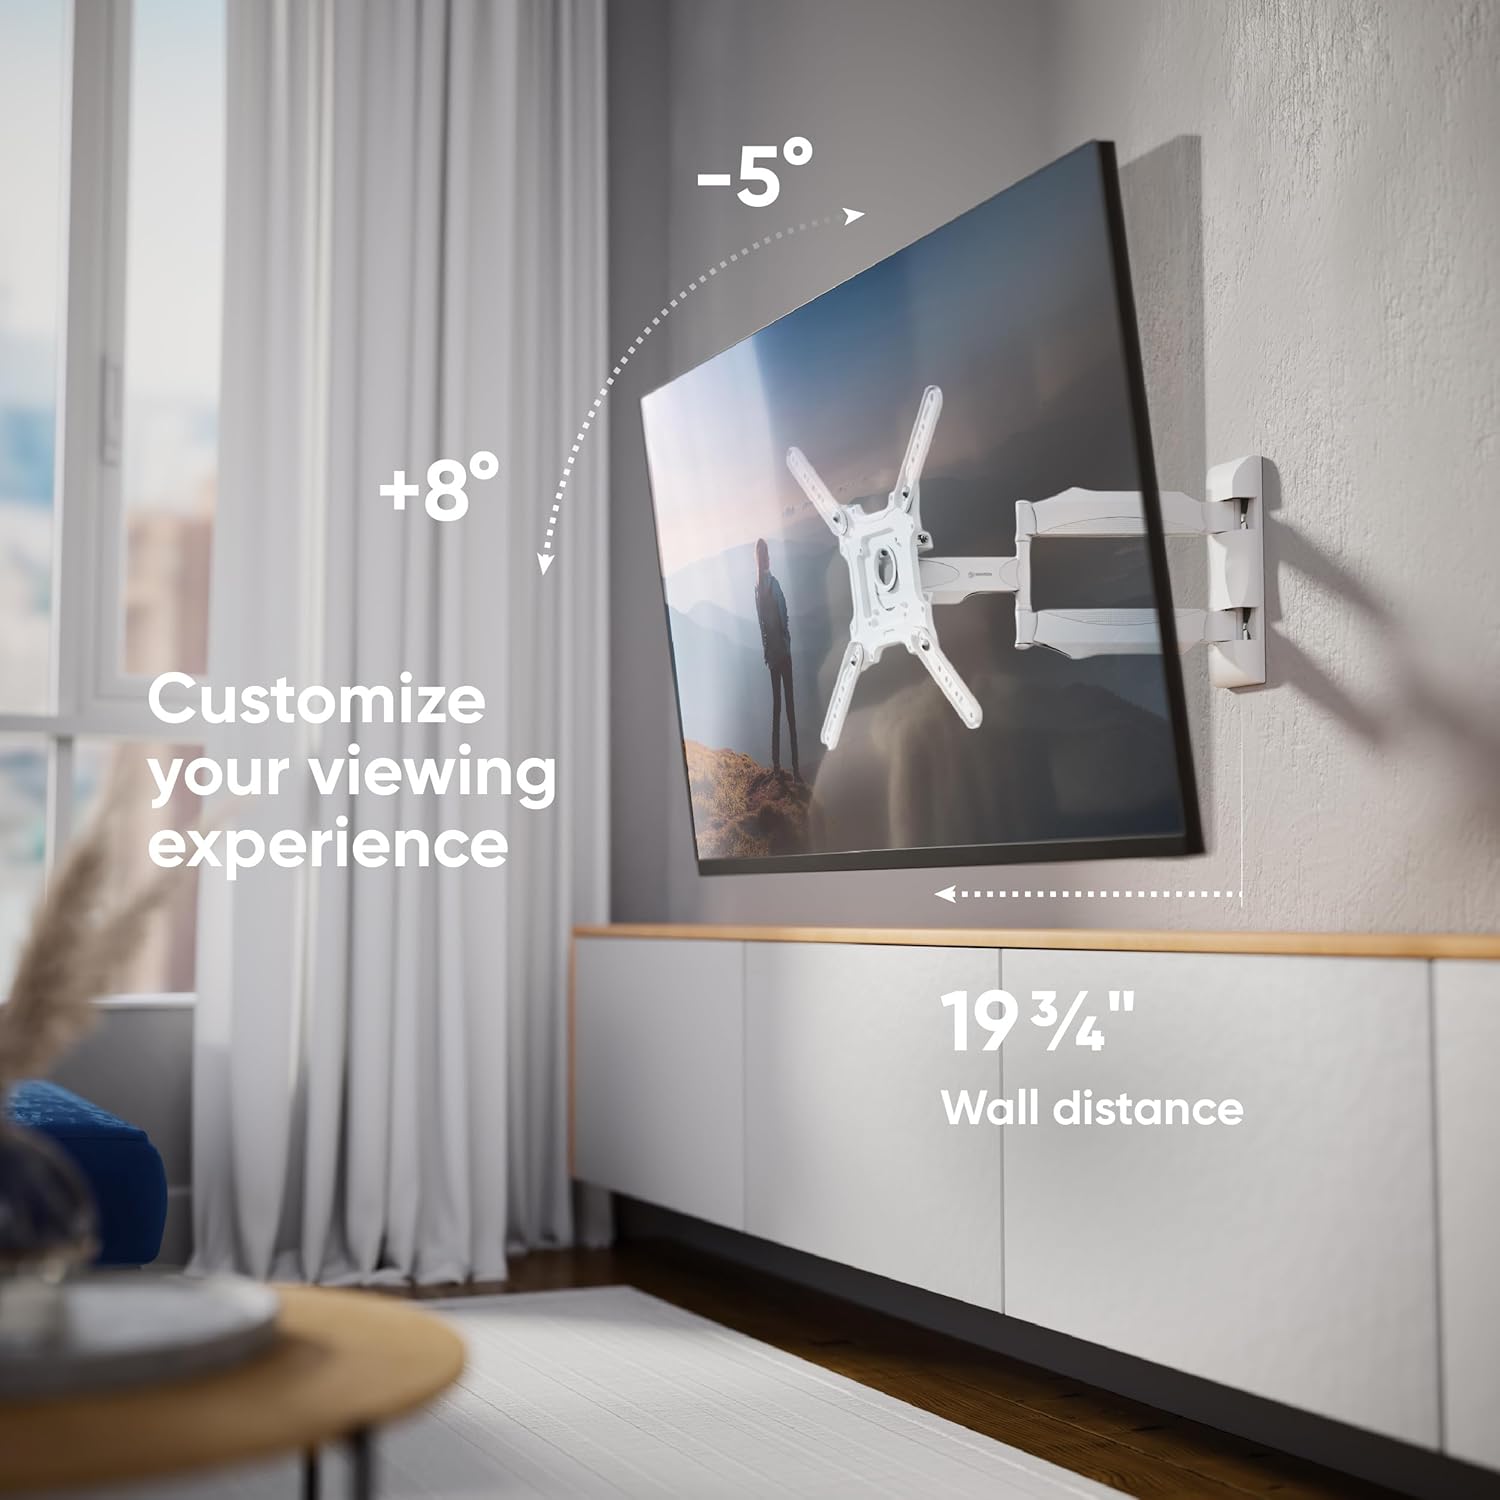
Figure 3: Customize your viewing experience with tilt and extension.
- Tilt Adjustment: The mount allows for a tilt range of -5° to +8°. Loosen the tilt adjustment screws on the VESA panel, adjust the screen to your desired angle, and then re-tighten the screws to secure the position.
- Swivel Adjustment: The articulating arm allows the TV to swivel up to 180° (depending on TV size and wall distance). Gently push or pull the TV to achieve the desired viewing angle.
- Extension: The mount can extend from a minimum distance of 2.1 inches (55mm) from the wall to a maximum of 19.7 inches (500mm).
- Screen Leveling: After installation, the screen can be aligned horizontally by slightly rotating the VESA panel before tightening the final screws.

Figure 4: Achieve a perfect view from anywhere with the 180-degree swivel.
7. Maintenance
- Cleaning: Clean the mount with a soft, dry cloth. Avoid abrasive cleaners or solvents.
- Periodic Inspection: Periodically check all screws and connections to ensure they remain tight and secure. Re-tighten if necessary.
- Moving Parts: The articulating arms are designed for smooth movement. No lubrication is typically required.
8. Troubleshooting
- TV Not Level: If the TV appears unlevel after installation, slightly loosen the screws connecting the VESA panel to the mount, adjust the TV to be level, and then re-tighten the screws.
- Mount Feels Loose: Check all wall mounting screws and TV attachment screws. Ensure they are securely tightened. If the issue persists, re-evaluate your wall type and installation method.
- Difficulty Adjusting Tilt/Swivel: Ensure no cables are obstructing movement. For tilt, loosen the adjustment screws before attempting to change the angle, then re-tighten.
9. Specifications
| Feature | Specification |
|---|---|
| Model Number | M4-WHT |
| Screen Size Compatibility | 32 - 65 inches |
| Maximum Load Capacity | 77 lbs (35 kg) |
| VESA Compatibility | 100x100mm to 400x400mm |
| Tilt Angle | -5° to +8° |
| Swivel Angle | Up to 180° (screen size dependent) |
| Extension from Wall | 2.1" (55mm) to 19.7" (500mm) |
| Material | Alloy Steel |
| Color | White |
| Product Dimensions | 16 x 13 x 3 inches (folded) |
| Item Weight | 8.1 pounds |
10. Warranty and Support
ONKRON products undergo multi-stage quality control. For any questions, technical assistance, or warranty claims, please contact ONKRON customer support. Refer to your product packaging or the official ONKRON website for the most current contact information.
All necessary fasteners and a clear manual are included in the TV mounting kit. ONKRON full motion TV wall mounts undergo multi-stage quality control and feature sturdy packaging, with expert support ready to assist when needed.


