
Junkers WR11/WRD11 Water Body (Replaces 87082062860)
Junkers Water Body for WR11/WRD11 Instruction Manual
Model: WR11/WRD11 Water Body (Replaces Part 87082062860)
1. Introduction
This manual provides detailed instructions for the installation, operation, maintenance, and troubleshooting of the Junkers Water Body, a critical replacement component for Junkers WR11 and WRD11 water heaters. This part is designed to replace the original part number 87082062860, ensuring proper water flow and activation of the gas valve in your appliance. Please read this manual thoroughly before attempting any installation or maintenance.
2. Safety Information
WARNING: Improper installation, adjustment, alteration, service, or maintenance can cause property damage, injury, or death. Read the installation, operating, and maintenance instructions thoroughly before installing or servicing this equipment.
- Always disconnect the electrical power supply to the water heater before beginning any work.
- Turn off the main water supply to the water heater.
- Drain the water heater if necessary, following the manufacturer's instructions.
- Wear appropriate personal protective equipment, including gloves and eye protection.
- If you are unsure about any step, consult a qualified technician.
- Ensure proper ventilation when working with gas appliances.
3. Product Overview
The Junkers Water Body is a precision-engineered component responsible for regulating water flow and, in turn, activating the gas valve in your Junkers WR11 or WRD11 water heater. It includes a 3/4 cardboard gasket for proper sealing during installation.

Figure 3.1: Top-side view of the Junkers Water Body, showing the main housing and connection points.

Figure 3.2: View of the Junkers Water Body, highlighting the part number label and included 3/4 cardboard gasket.
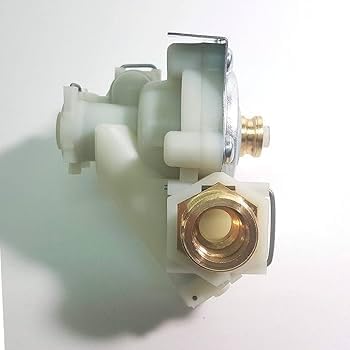
Figure 3.3: Side view of the Junkers Water Body, showing the brass threaded connection for water inlet.
4. Setup and Installation
Replacing the water body requires careful attention to detail. Follow these steps for a successful installation:
4.1. Tools Required
- 30mm fixed wrench or pipe wrench (for water inlet nut)
- Phillips head screwdriver (for mounting screws)
- Bucket or towels (for residual water)
- Replacement O-ring for the water outlet tube (not included with this part, may need to be purchased separately)
4.2. Pre-Installation Steps
- Shut off Water Supply: Locate and close the main water shut-off valve to the water heater.
- Disconnect Power: Disconnect the electrical power supply to the water heater at the circuit breaker or by unplugging it.
- Drain Water: Place a bucket or towels underneath the water body area to catch any residual water.
4.3. Disassembly of Old Water Body
- Disconnect Electrical Wires: Carefully disconnect the electrical connector that links the wires controlling the water heater. These wires are often secured with a clip near the water outlet tube. Press the connector tab and gently pull apart.
- Unscrew Water Inlet Nut: Use the 30mm wrench to loosen and remove the nut connecting the water inlet tube to the old water body.
- Remove Mounting Screws: Use the Phillips head screwdriver to remove the two screws securing the water body to the rest of the water heater.
- Remove Old Water Body: Carefully detach and remove the old water body. Inspect the area for any debris or corrosion.
4.4. Installation of New Water Body
- Prepare Gaskets: Ensure the new 3/4 cardboard gasket is correctly positioned on the water inlet connection of the new water body. If replacing the water outlet O-ring, install the new O-ring on the water outlet tube.
- Position New Water Body: Place the new water body into position, aligning the mounting holes.
- Insert Mounting Screws (Do Not Fully Tighten): Insert the two Phillips head screws into their respective holes. Do not tighten them completely at this stage.
- Connect Water Inlet Nut: Hand-tighten the 30mm nut connecting the water inlet tube to the new water body. Once hand-tight, use the wrench to tighten it securely.
- Fully Tighten Mounting Screws: After the water inlet nut is securely tightened, fully tighten the two Phillips head screws. Ensure the water body is flush and securely attached to the water heater.
- Reconnect Electrical Wires: Reconnect the electrical connector until it clicks into place.
4.5. Post-Installation Checks
- Restore Water Supply: Slowly open the main water shut-off valve to the water heater.
- Check for Leaks: Carefully inspect all connections for any signs of water leaks. Tighten connections if necessary.
- Restore Power: Reconnect the electrical power supply to the water heater.
- Test Operation: Turn on a hot water tap to test the water heater's operation. Ensure hot water flows and the gas ignites correctly.
5. Operating Principle
The Junkers Water Body operates by sensing water flow through the water heater. When a hot water tap is opened, water flows through the water body, causing an internal diaphragm or piston to move. This movement, in turn, activates a microswitch or lever that signals the gas valve to open, allowing gas to flow to the burner and ignite, thus heating the water. When the tap is closed, water flow stops, the diaphragm/piston returns to its resting position, and the gas valve closes, shutting off the burner.
6. Maintenance
The Junkers Water Body is designed for durability, but regular inspection of your water heater system is recommended.
- Leak Inspection: Periodically check all water connections around the water body for any signs of leaks or drips. Address any leaks promptly to prevent further damage.
- Gasket and O-ring Condition: Over time, gaskets and O-rings can degrade. If you notice persistent leaks, these seals may need replacement.
- Professional Servicing: For comprehensive maintenance of your water heater, it is advisable to schedule periodic inspections by a qualified technician.
7. Troubleshooting
If you encounter issues after installing the water body, consider the following common problems and solutions:
| Problem | Possible Cause | Solution |
|---|---|---|
| Water leak from the water body connections. | Loose connections, damaged or improperly seated gaskets/O-rings. | Ensure all nuts and screws are tightened securely. Check the condition and proper seating of the 3/4 cardboard gasket and the water outlet O-ring (if applicable). Replace seals if damaged. |
| Water heater does not ignite when hot water tap is opened. | Insufficient water flow through the water body, faulty water body, or issue with electrical connection. | Ensure adequate water pressure. Verify the electrical connection to the water body is secure. If the water body is new and correctly installed, and other components are functioning, the issue might be elsewhere in the water heater system. |
| Water heater ignites but water does not get hot enough. | Potential issue with the water body's internal mechanism not fully activating the gas valve, or other water heater components. | Ensure the water flow regulator on the water body (if present) is set correctly. If the issue persists, consult a qualified technician as it may indicate a problem with the gas valve or burner. |
8. Specifications
| Attribute | Detail |
|---|---|
| Manufacturer | JUNKERS |
| Compatible Models | Junkers WR11, Junkers WRD11 |
| Replaces Part Number | 87082062860 |
| Package Dimensions | 14.9 x 11.9 x 11.7 cm |
| Product Weight | 370 g |
| Batteries Required | No |
| Included Accessories | 3/4 cardboard gasket |
9. Warranty and Support
For specific warranty information regarding your Junkers Water Body, please refer to the documentation provided at the time of purchase or contact the seller directly. For technical support or professional assistance with your Junkers water heater, please contact an authorized Junkers service center or a qualified plumbing and heating technician.
You can visit the official Junkers store for more information: Junkers Store
Ask a question about this manual
Ask about setup, troubleshooting, compatibility, parts, safety, or missing instructions. Manuals+ will review the question and use this page’s manual context to help answer it.