
1. Introduction
This manual provides detailed instructions for the Karcher DAB 3000 DAB+ Digital Radio. It covers setup, operation, and maintenance to ensure optimal performance and longevity of your device. Please read this manual thoroughly before using the radio.
2. Product Overview
The Karcher DAB 3000 is a versatile digital radio designed for high-quality audio reception. It features DAB+ for digital radio, FM for traditional broadcasts, an AUX-IN port for external devices, and an integrated alarm clock with dual alarm functionality.
Key Features:
- DAB+ and FM Tuner for digital and analog radio reception.
- 2.4-inch color display for clear information.
- 3W RMS output for clear sound.
- 40 station presets per reception type (DAB+/FM).
- Dual alarm clock with radio or buzzer options, adjustable volume, snooze, and sleep timer.
- AUX-IN for connecting external audio devices (e.g., MP3 players).
- Line-out for connecting additional external speakers.

Figure 2.1: Front view of the Karcher DAB 3000 Digital Radio, showing the display and control buttons.
3. Setup
3.1 Unpacking and Placement
- Carefully remove the radio from its packaging.
- Place the radio on a stable, flat surface. Ensure adequate ventilation around the unit.
- Extend the telescopic antenna fully for optimal reception.
3.2 Power Connection
- Connect the provided power adapter to the DC IN port on the back of the radio.
- Plug the power adapter into a standard wall outlet.
- The radio will power on or enter standby mode.
3.3 Initial Scan (DAB+)
- Upon first power-on, the radio may automatically initiate a DAB+ scan.
- If not, press the MODE button to select DAB+ mode.
- Press the SCAN button to start a full scan for available DAB+ stations. The display will show the scanning progress.
- Once the scan is complete, the radio will store all found stations and tune to the first available station.
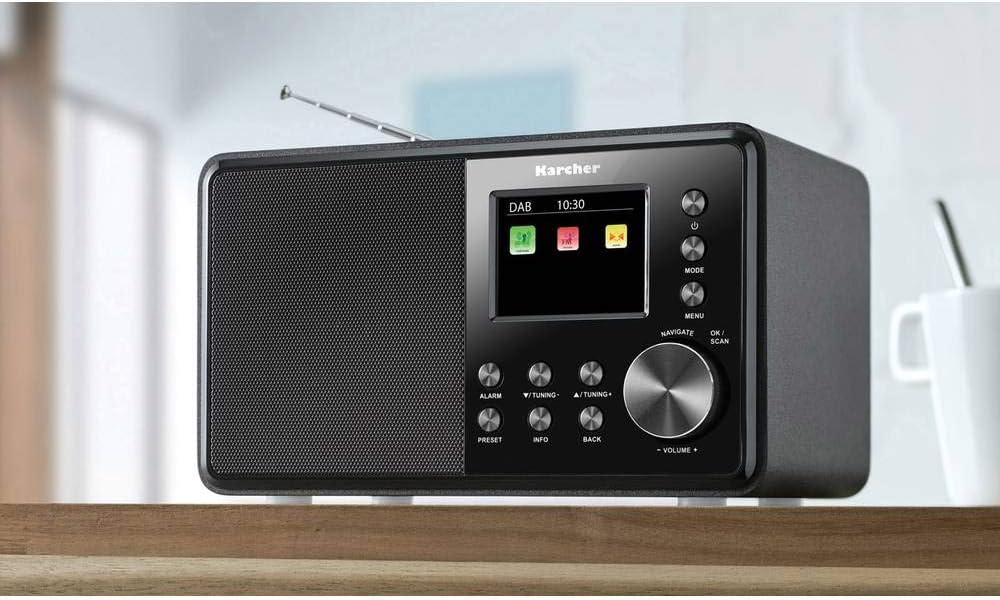
Figure 3.1: The Karcher DAB 3000 radio positioned on a countertop, illustrating typical placement.
4. Operating Instructions
4.1 Power On/Off
- Press the ⏻ (Power) button to turn the radio on or off (standby mode).
4.2 Mode Selection
- Press the MODE button repeatedly to switch between DAB+, FM, and AUX-IN modes.
4.3 DAB+ Radio Operation
- Select DAB+ mode using the MODE button.
- Use the NAVIGATE dial or ▼TUNING- / ▲TUNING+ buttons to browse through available stations.
- Press OK to select a station.
- To perform a full scan, press the SCAN button.
- To save a station as a preset: Press and hold the PRESET button. Use the NAVIGATE dial to select a preset number (1-40), then press OK to confirm.
- To recall a preset station: Briefly press the PRESET button. Use the NAVIGATE dial to select the desired preset, then press OK.
4.4 FM Radio Operation
- Select FM mode using the MODE button.
- To auto-scan for stations: Press and hold the SCAN button. The radio will scan and save stations automatically.
- To manually tune: Use the ▼TUNING- / ▲TUNING+ buttons to adjust the frequency.
- To save an FM station as a preset: Press and hold the PRESET button. Use the NAVIGATE dial to select a preset number (1-40), then press OK to confirm.
- To recall a preset station: Briefly press the PRESET button. Use the NAVIGATE dial to select the desired preset, then press OK.
4.5 AUX-IN Operation
- Select AUX-IN mode using the MODE button.
- Connect your external audio device (e.g., MP3 player) to the AUX-IN port on the radio using a 3.5mm audio cable.
- Control playback from your external device. The radio's volume control will adjust the output level.
4.6 Alarm Clock Function
- Press the ALARM button to access alarm settings.
- Use the NAVIGATE dial and OK button to set Alarm 1 and Alarm 2 times, alarm source (Buzzer or Radio), and alarm volume.
- To activate/deactivate an alarm, navigate to the desired alarm and toggle its status.
- When an alarm sounds, press the SNOOZE button (often the OK button or a dedicated button) to temporarily silence it.
- To stop an alarm, press the ⏻ (Power) button.
4.7 Sleep Timer
- Access the sleep timer function via the MENU button.
- Use the NAVIGATE dial to select the desired sleep duration (e.g., 15, 30, 60 minutes). The radio will automatically turn off after the set time.

Figure 4.1: Close-up of the Karcher DAB 3000 radio's control panel, highlighting buttons and the display.
5. Maintenance
5.1 Cleaning
- Before cleaning, disconnect the radio from the power outlet.
- Use a soft, dry cloth to wipe the exterior of the radio.
- For stubborn marks, slightly dampen the cloth with water. Avoid using abrasive cleaners, solvents, or chemical sprays.
- Do not allow water to enter any openings of the radio.
5.2 Storage
- If storing the radio for an extended period, disconnect it from power.
- Store in a cool, dry place away from direct sunlight and extreme temperatures.
6. Troubleshooting
| Problem | Possible Cause | Solution |
|---|---|---|
| No power | Power adapter not connected or faulty outlet. | Ensure power adapter is securely connected and the outlet is functional. |
| Poor DAB+ / FM reception | Antenna not extended, weak signal, or interference. | Fully extend the telescopic antenna. Reposition the radio. Perform a new scan. |
| No sound from AUX-IN | Cable not connected correctly, incorrect mode, or external device volume too low. | Ensure AUX-IN cable is fully inserted. Select AUX-IN mode. Increase volume on both the radio and the external device. |
| Alarm does not sound | Alarm not activated, incorrect time set, or volume too low. | Verify alarm settings (time, activation, volume). Ensure the radio is in standby mode for the alarm to function. |
7. Specifications
- Brand: Karcher
- Model Number: DAB 3000
- Color: Black
- Screen Size: 2.4 Inches
- Connectivity Technology: Auxiliary
- Special Feature: Integrated Clock
- Compatible Devices: MP3 Player
- Product Dimensions: 20.1L x 11.8W x 11.8H centimeters
- Tuner Technology: DAB+
- Power Source: Corded Electric
- Supported Radio Bands: FM, DAB+
- Included Components: User Manual, Audio Cable (3.5mm), Power Adapter

Figure 7.1: Side view of the Karcher DAB 3000 radio, illustrating its compact form factor.
8. Warranty and Support
For warranty information and customer support, please refer to the documentation provided with your purchase or contact Karcher customer service directly. Keep your proof of purchase for any warranty claims.
The included components list mentions a user manual. This document serves as a comprehensive guide for your product.


