
Fluke 451P-RYR
User Manual for Fluke Pressurized Ion Chamber Radiation Survey Meter
Model: 451P-RYR
Brand: Fluke
1. Introduction
This manual provides essential information for the safe and effective operation, maintenance, and troubleshooting of the Fluke Pressurized Ion Chamber Radiation Survey Meter, Model 451P-RYR. This device is designed for accurate measurement of gamma, X-ray, and beta radiation levels across various operating ranges.
The meter features an LCD display with both a digital readout and an analog bar graph for comprehensive radiation level indication. It is a robust tool for professionals requiring precise radiation monitoring.
2. Safety Information
Always adhere to the following safety guidelines to prevent injury or damage to the device:
- Do not attempt to open or modify the device. Refer all servicing to qualified personnel.
- Ensure the device is used within its specified environmental conditions.
- Use only the specified battery type (two 9V batteries) and ensure correct polarity during installation.
- Remove batteries if the device will not be used for an extended period to prevent leakage.
- Avoid exposing the device to extreme temperatures, moisture, or direct sunlight.
- Handle the device with care to prevent drops or impacts that could affect its calibration or functionality.
3. Setup
3.1. Overview of Components
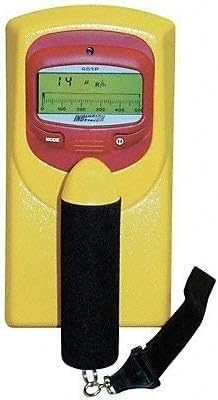
This image displays the Fluke Pressurized Ion Chamber Radiation Survey Meter. The device is yellow with a red control panel. The LCD screen shows a digital reading of '14 uR/h' and an analog bar graph. Below the screen are 'MODE' and 'SET' buttons. A black, cylindrical handle extends from the bottom, connected to a black wrist strap.
3.2. Battery Installation
- Locate the battery compartment cover on the rear of the device.
- Carefully open the battery compartment.
- Insert two (2) 9V batteries, ensuring correct polarity as indicated inside the compartment.
- Close the battery compartment cover securely.
3.3. Initial Power-On
After installing batteries, press the power button (if available, otherwise the MODE button might initiate power-on). The LCD display should illuminate, and the device will perform a self-test. Once the self-test is complete, the display will show the current radiation reading.
4. Operating Instructions
4.1. Powering On/Off
- To power on: Press the 'MODE' button briefly.
- To power off: Press and hold the 'MODE' button until the display turns off.
4.2. Display Interpretation
The LCD features a 2-1/2 digit digital display for precise readings and an analog bar graph for quick visual indication of radiation levels. The units (e.g., uR/h, uSv/h) will be shown next to the digital reading.
4.3. Measurement Ranges
The meter operates across several ranges, automatically adjusting to the detected radiation level:
- 0 to 500 uR/h or 0 to 5 uSv/h
- 0 to 5 mR/h or 0 to 50 uSv/h
- 0 to 50 mR/h or 0 to 500 uSv/h
- 0 to 500 mR/h or 0 to 5 mSv/h
- 0 to 5 R/h or 0 to 50 mSv/h
4.4. Energy Sensitivity
The device is sensitive to:
- Gamma and X-ray Energy Sensitivity: Above 25 keV
- Beta Energy Sensitivity: Above 1 MeV
5. Maintenance
5.1. Cleaning
Wipe the exterior of the device with a soft, damp cloth. Do not use abrasive cleaners or solvents. Ensure no liquid enters the device.
5.2. Storage
Store the meter in a cool, dry place away from direct sunlight and extreme temperatures. If storing for an extended period, remove the batteries to prevent leakage.
5.3. Battery Replacement
Replace batteries when the low battery indicator appears on the display or if the device fails to power on. Follow the battery installation steps outlined in Section 3.2.
6. Troubleshooting
| Problem | Possible Cause | Solution |
|---|---|---|
| Device does not power on | Dead or incorrectly installed batteries | Check battery polarity; replace with new 9V batteries. |
| Inaccurate readings | Device needs calibration; environmental interference | Ensure device is calibrated (NIST certified); move away from potential interference sources. |
| Display is blank or dim | Low battery; display malfunction | Replace batteries. If problem persists, contact support. |
7. Specifications
| Feature | Detail |
|---|---|
| Brand | Fluke |
| Model Number | 451P-RYR |
| Power Source | Battery Powered (2 x 9V Batteries) |
| Battery Life | 200 Hours Continuous Operation |
| Display | LCD (2-1/2 Digit Digital Display, Analog Bar Graph) |
| Operating Range | 0 to 500 uR/h or 0 to 5 uSv/h, 0 to 5 mR/h or 0 to 50 uSv/h, 0 to 50 mR/h or 0 to 500 uSv/h, 0 to 500 mR/h or 0 to 5 mSv/h, 0 to 5 R/h or 0 to 50 mSv/h |
| Gamma & X-ray Energy Sensitivity | Above 25 keV |
| Beta Energy Sensitivity | Above 1 MeV |
| Accuracy | +/- 10% of Reading Between 10% and 100% of Full-scale Indication on Any Range (Calibration Source is 137Cs) |
| Calibration Certificate | NIST |
8. Warranty and Support
8.1. Warranty Information
This Fluke product comes with a 1-Year Manufacturer's Warranty from the date of purchase. This warranty covers defects in materials and workmanship under normal use. It does not cover damage resulting from misuse, accident, modification, or unauthorized repair.
8.2. Customer Support
For technical assistance, calibration services, or warranty claims, please contact Fluke customer support. Refer to the official Fluke website or product packaging for the most current contact information.
Related documents451P-RYR


Ask a question about this manual
Ask about setup, troubleshooting, compatibility, parts, safety, or missing instructions. Manuals+ will review the question and use this page’s manual context to help answer it.