
1. Introduction
This manual provides essential information for the safe and efficient operation of your Casio XJ-F10X LED XGA Projector. Please read this manual thoroughly before using the projector and retain it for future reference. Understanding the instructions will ensure optimal performance and extend the lifespan of your device.
2. Important Safety Instructions
Observe the following safety precautions to prevent damage to the projector and ensure user safety:
- Do not block ventilation openings. Ensure adequate space around the projector for proper airflow.
- Do not expose the projector to rain or moisture to reduce the risk of fire or electric shock.
- Use only the power cord supplied with the projector or an approved replacement.
- Avoid looking directly into the projector lens when the light source is active, as it can cause eye damage.
- Do not attempt to service this product yourself. Refer all servicing to qualified service personnel.
- Place the projector on a stable, level surface to prevent it from falling.
3. Package Contents
Verify that all items are present in the package:
- Casio XJ-F10X Projector
- Power Cord
- Remote Control (with batteries)
- VGA Cable
- User Manual (this document)
4. Product Overview
Familiarize yourself with the various parts and controls of your Casio XJ-F10X projector.
4.1 Front Panel

The front panel features the projection lens, which emits the image. Ventilation grilles are located on the side to ensure proper cooling during operation. A small infrared receiver for the remote control may also be present.
4.2 Rear Panel and Connections

The rear panel houses all the necessary input and output ports for connecting external devices. These include:
- HDMI Type A x 2: For digital video and audio input (HDCP support).
- VGA (D-Sub 15-pin): For analog computer input.
- S-Video: For analog video input.
- Composite Video (RCA): For standard definition video input.
- Audio In (RCA L/R, 3.5mm mini jack): For analog audio input.
- Audio Out (3.5mm mini jack): For connecting external audio systems.
- RS-232: For projector control via a computer or control system.
- USB (Type A, Type B): For service or firmware updates.
- Power Inlet: For connecting the AC power cord.
4.3 Top Panel Controls
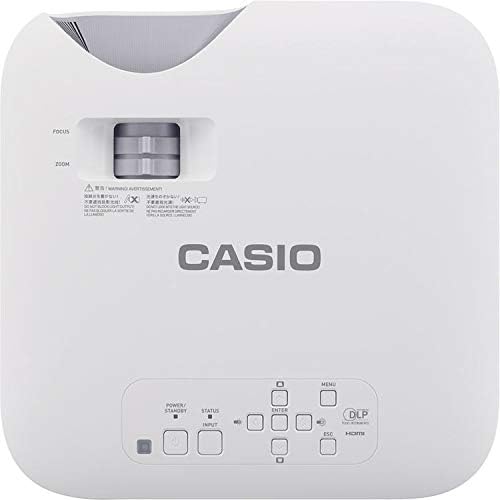
The top panel provides direct access to essential projector functions:
- Power Button: Turns the projector on or off.
- Input Button: Selects the input source (HDMI, VGA, etc.).
- Menu Button: Opens the on-screen display (OSD) menu.
- Navigation Buttons (Up/Down/Left/Right): Used to navigate through menu options.
- Enter Button: Confirms selections in the menu.
- ESC Button: Exits the current menu or returns to the previous screen.
- Zoom Lever: Adjusts the image size.
- Focus Ring: Sharpens the projected image.
5. Setup Guide
5.1 Projector Placement
Proper placement is crucial for optimal image quality.
- Distance: Position the projector at an appropriate distance from the screen to achieve the desired image size. Refer to the specifications for throw ratio details.
- Angle: Ensure the projector is perpendicular to the screen for a rectangular image. Use the keystone correction function if the image appears trapezoidal.
- Ventilation: Maintain clear space around the projector's ventilation openings to prevent overheating.
5.2 Connecting Devices
Follow these steps to connect your source devices:
- Ensure the projector and all source devices are powered off before making connections.
- Connect the appropriate video cable (HDMI, VGA, S-Video, or Composite) from your source device to the corresponding input port on the projector's rear panel.
- If using an analog video input (VGA, S-Video, Composite), connect an audio cable from your source device's audio output to the projector's Audio In port. HDMI carries both video and audio.
- Connect the power cord to the projector's power inlet and then to a grounded electrical outlet.
6. Operating Instructions
6.1 Powering On and Off
- Power On: Press the Power button on the projector's top panel or the remote control. The projector will reach full brightness in approximately 5 seconds due to its Direct On/Off function.
- Power Off: Press the Power button again. The projector will shut down immediately without a cool-down period.
6.2 Basic Projection
- Turn on the projector and your source device.
- Press the Input button on the projector or remote control repeatedly to select the correct input source (e.g., HDMI 1, VGA).
- Adjust the Zoom lever to achieve the desired image size on the screen.
- Adjust the Focus ring until the image appears sharp and clear.
- If the image is distorted (trapezoidal), use the keystone correction feature in the OSD menu to correct it.
7. Maintenance
7.1 Cleaning the Projector
- Lens: Gently wipe the lens with a soft, lint-free cloth specifically designed for optical surfaces. Do not use abrasive cleaners.
- Casing: Wipe the projector casing with a soft, dry cloth. For stubborn dirt, slightly dampen the cloth with water and a mild detergent, then wipe dry.
- Ventilation: Periodically check and clean the ventilation grilles to ensure they are free from dust and debris. Use a soft brush or compressed air.
7.2 Light Source Longevity
The Casio XJ-F10X utilizes a mercury-free LED hybrid light source, offering exceptional durability and a long operational life of up to 20,000 hours without requiring lamp replacement. This significantly reduces maintenance needs and costs.
8. Troubleshooting
If you encounter issues with your projector, refer to the following common problems and solutions:
- No Image:
- Ensure the projector is powered on and the power cord is securely connected.
- Verify that the correct input source is selected.
- Check the connection cable between the projector and the source device.
- Ensure the source device is powered on and outputting a signal.
- Dim Image:
- Check the projector's brightness settings in the OSD menu.
- Ensure the room is sufficiently dark for projection.
- No Sound:
- If using an analog video input, ensure the audio cable is connected.
- Check the volume settings on both the projector and the source device.
- Ensure the correct audio input is selected if applicable.
- Image is Blurry:
- Adjust the focus ring on the projector lens.
- Ensure the projector is placed at an appropriate distance from the screen.
- Image is Trapezoidal:
- Use the keystone correction function in the OSD menu to adjust the image shape.
- Try to position the projector as perpendicular to the screen as possible.
9. Technical Specifications
| Feature | Specification |
|---|---|
| Model Number | XJ-F10X |
| Native Resolution | XGA (1024 x 768) |
| Brightness | 3,300 Lumens |
| Contrast Ratio | 20,000:1 |
| Display Chip | 0.65" DLP Chip |
| Light Source | Hybrid LED |
| Light Source Life | Up to 20,000 hours |
| Lens Type | 1.5x Manual Zoom & Focus |
| Aspect Ratio | 4:3 Native |
| Inputs | HDMI Type A x 2, S-Video, VGA, RS-232, Composite Video, RCA Audio In |
| Product Dimensions | 11.8 x 11.8 x 3.8 inches |
| Item Weight | 10.78 pounds |
10. Warranty and Customer Support
The Casio XJ-F10X Projector is covered by a 3-year parts and labor warranty. The LED hybrid light source is covered by a 5-year or 10,000-hour warranty, whichever comes first. For technical support, service, or warranty claims, please contact Casio customer support through their official website or the contact information provided with your purchase documentation.
Please have your model number (XJ-F10X) and purchase date available when contacting support.


