
Edifier DA5100
Edifier DA5100 5.1 Speakers User Manual
Your comprehensive guide to setup, operation, and maintenance.
Introduction
Thank you for purchasing the Edifier DA5100 5.1 multimedia speaker system. This manual provides detailed instructions to help you set up, operate, and maintain your speakers for optimal performance and longevity. Please read this manual thoroughly before using the product.
Package Contents
Before proceeding, please verify that all components are present in your package:
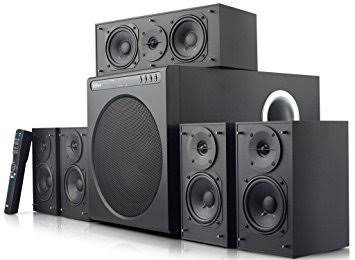
- Subwoofer unit
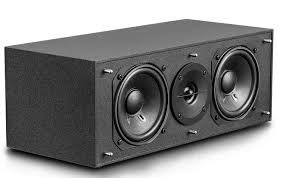
- Center speaker
- Front satellite speakers (2)
- Rear satellite speakers (2)
- Remote control
- Audio input cables (RCA to RCA, 3.5mm to RCA)
- Speaker connection cables
- User manual (this document)
Important Safety Precautions
To ensure safe operation and prevent damage, please observe the following:
- Do not expose the unit to rain or moisture.
- Do not open the speaker enclosures; there are no user-serviceable parts inside.
- Place the unit on a stable, level surface to prevent tipping.
- Ensure adequate ventilation around the speakers and subwoofer.
- Disconnect from power during lightning storms or when unused for long periods.
- Keep away from heat sources and direct sunlight.
- Use only specified power supply and accessories.
Setup Guide
1. Speaker Placement
Proper speaker placement is crucial for optimal 5.1 surround sound experience.
- Center Speaker: Place directly in front of the listening position, typically above or below your display.
- Front Speakers (Left/Right): Position equidistant from the listening position, forming an equilateral triangle with the listener.
- Rear Speakers (Left/Right): Place behind the listening position, slightly to the sides, at ear level or slightly above.
- Subwoofer: Can be placed anywhere in the room, but corner placement often enhances bass. Experiment for best results.
2. Connecting the Speakers
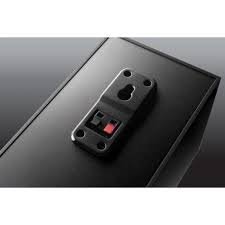
Connect the satellite speakers to the subwoofer unit using the provided speaker cables. Ensure correct polarity (red to red, black to black) for each connection.
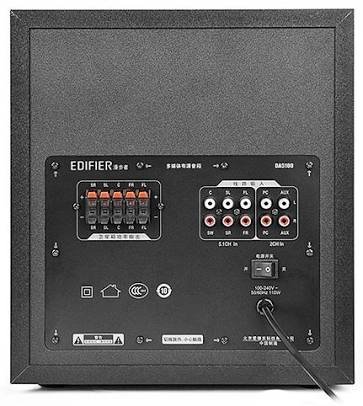
- Identify the speaker output terminals on the rear of the subwoofer. These are typically labeled for Front Left (FL), Front Right (FR), Center (C), Surround Left (SL), and Surround Right (SR).
- Connect each satellite speaker to its corresponding terminal on the subwoofer.
3. Connecting Audio Sources
The DA5100 offers multiple input options. Choose the one that best suits your audio source.
- 5.1 Channel Input: For true 5.1 surround sound, connect your DVD player, Blu-ray player, or sound card's 5.1 analog outputs to the corresponding 5.1 input jacks on the subwoofer (FL, FR, C, SL, SR, SW).
- PC Input: Use the 3.5mm to RCA cable to connect your computer's audio output to the "PC" input jacks.
- AUX Input: Use the RCA to RCA cable to connect other stereo audio devices (e.g., TV, game console) to the "AUX" input jacks.
4. Power Connection
After all audio and speaker connections are made, connect the power cord to the subwoofer and then to a wall outlet. Ensure the power switch on the rear of the subwoofer is in the "OFF" position before plugging in.
Operating Instructions
1. Powering On/Off
Locate the power switch on the rear panel of the subwoofer. Flip it to the "ON" position to power on the system. Flip it to "OFF" to power off.
2. Input Selection
Use the "Input" button on the remote control or the control panel on the subwoofer to cycle through the available audio inputs: 5.1, PC, AUX.
3. Volume Control
Use the "Volume +" and "Volume -" buttons on the remote control or the main volume knob on the subwoofer to adjust the overall system volume.
4. Individual Channel Volume Adjustment
The remote control allows for individual adjustment of the center, surround, and subwoofer volumes to fine-tune your sound experience.
- Press the "Center", "Surround", or "Subwoofer" button on the remote.
- Use the "Volume +" or "Volume -" buttons to adjust the level for that specific channel.
5. Mute Function
Press the "Mute" button on the remote control to temporarily silence the audio. Press it again to restore the sound.
Maintenance and Care
To keep your Edifier DA5100 speakers in optimal condition:
- Cleaning: Use a soft, dry cloth to wipe down the speaker surfaces. Do not use liquid cleaners or abrasive materials.
- Ventilation: Ensure that the subwoofer's heat sink and ventilation ports are not obstructed.
- Storage: If storing the speakers for an extended period, disconnect them from power and store them in a cool, dry place.
- Cable Management: Keep cables tidy and avoid sharp bends or kinks to prevent damage.
Troubleshooting
If you encounter issues with your Edifier DA5100 system, refer to the table below for common problems and solutions.
| Problem | Possible Cause | Solution |
|---|---|---|
| No sound | Power off; incorrect input selected; loose cables; muted. | Check power switch; select correct input; re-connect all cables securely; un-mute. |
| Distorted sound | Volume too high; poor audio source quality; incorrect cable connection. | Reduce volume; try a different audio source; check cable connections and polarity. |
| Remote control not working | Dead batteries; obstruction between remote and sensor. | Replace batteries; ensure clear line of sight to the subwoofer's IR sensor. |
| Only some speakers producing sound | Incorrect 5.1 setup; loose speaker cables; audio source not 5.1. | Verify 5.1 input connections; check individual speaker cables; ensure audio source is outputting 5.1. |
If the problem persists, please contact Edifier customer support.
Specifications
The following are the general specifications for the Edifier DA5100 5.1 speaker system. Specifications are subject to change without notice.
- Power Output: RMS 8W x 5 + 38W (THD+N=10%)
- Frequency Response: R/L/C/SL/SR: 150Hz-20KHz | SW: 20Hz-130Hz
- Input Sensitivity: 5.1CH: L/R: 450mV+/-50mV; SW: 150mV+/-50mV | PC: 700mV+/-50mV | AUX: 350mV+/-50mV
- Input Type: 5.1 Channel, PC, AUX
- Bass Unit: 8 inch (210mm)
- Mid-range Unit: 3 inch (78mm)
- Treble Unit: 1 inch (25mm)
- Dimensions (Subwoofer): 270mm x 300mm x 435mm (W x H x D)
- Dimensions (Satellite): 130mm x 160mm x 100mm (W x H x D)
Warranty Information
Edifier products come with a limited warranty. Please refer to the warranty card included with your product or visit the official Edifier website for detailed warranty terms and conditions specific to your region. Keep your purchase receipt as proof of purchase for warranty claims.
Customer Support
For further assistance, technical support, or service inquiries, please contact Edifier customer support through their official website or the contact information provided in your product packaging.
Edifier Official Website: www.edifier.com
Related documentsDA5100


Ask a question about this manual
Ask about setup, troubleshooting, compatibility, parts, safety, or missing instructions. Manuals+ will review the question and use this page’s manual context to help answer it.