
Introduction
Thank you for choosing the Goetland 18-inch Oversized Digital LED Wall Clock. This multi-functional clock is designed for clear visibility and versatile use in various environments such as kitchens, offices, living rooms, and classrooms. It features a large LED display, remote control operation, and multiple functions including time, temperature, countdown, and alarms. Please read this manual carefully to ensure proper setup and operation.
Package Contents
- 1 x Goetland 18-inch Digital LED Wall Clock
- 1 x Remote Control
- 1 x USB Power Cable (9.8 ft / 3 m)
- 1 x USB Power Adapter
- 1 x Instruction Manual
Product Overview
Familiarize yourself with the components of your Goetland Digital LED Wall Clock.
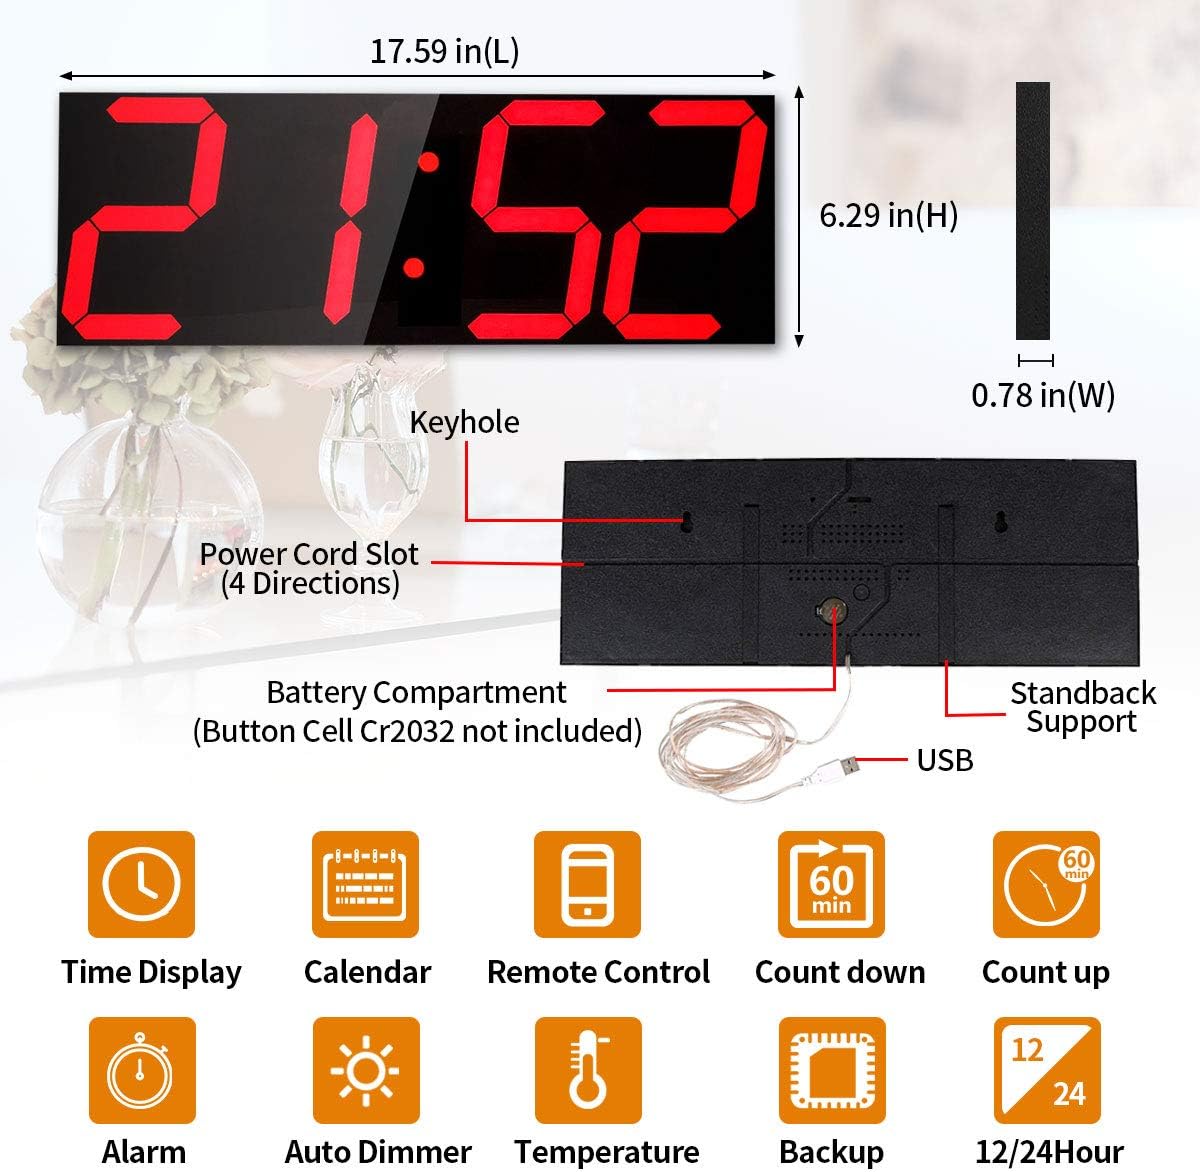
Figure 1: Clock Dimensions and Rear Features

Figure 2: Remote Control Layout
Setup
1. Power Connection
- Connect the USB power cable to the clock's USB port.
- Plug the USB power adapter into a standard wall outlet.
- The clock will power on automatically.

Figure 3: Power Adapter Connection
2. Battery Installation (for backup)
A CR2032 battery (not included) is required for memory backup during power outages. This battery does not power the display.
- Locate the battery compartment on the back of the clock.
- Insert one CR2032 battery, ensuring correct polarity.
3. Mounting Options
The clock can be wall-mounted or placed on a flat surface using its integrated standback support.
- Wall Mounting: Use the two hanging holes on the back of the clock. Ensure the mounting screws are level and securely fastened to the wall.
- Tabletop Placement: Extend the standback support on the rear of the clock to place it on a desk or shelf.

Figure 4: Rear View with Standback Support
Operating Instructions
All functions are controlled using the provided remote control.
1. Power On/Off
Press the Power button (
2. Time Setting
To set the time (e.g., 12:08:25):
- Press the T SET button. The hour digits will flash.
- Use the UP or DOWN buttons, or directly enter the hour using the number buttons (0-9).
- Press the MODE button to move to minute setting. The minute digits will flash.
- Use the UP or DOWN buttons, or directly enter the minute using the number buttons (0-9).
- Press the MODE button again to move to second setting. The second digits will flash.
- Use the UP or DOWN buttons, or directly enter the second using the number buttons (0-9).
- Press the RET button to save and exit time setting.
3. 12/24-Hour Mode
To switch between 12-hour and 24-hour display:
- Press the 0 button on the remote.
- One beep indicates 12-hour mode. Three beeps indicate 24-hour mode.
4. Temperature Mode
To toggle between Celsius and Fahrenheit temperature display:
- Press the °C/°F button on the remote.
- Press the RET button to exit after setting.
5. Brightness Adjustment
The clock offers 8 levels of brightness, with both manual and automatic sensing modes.
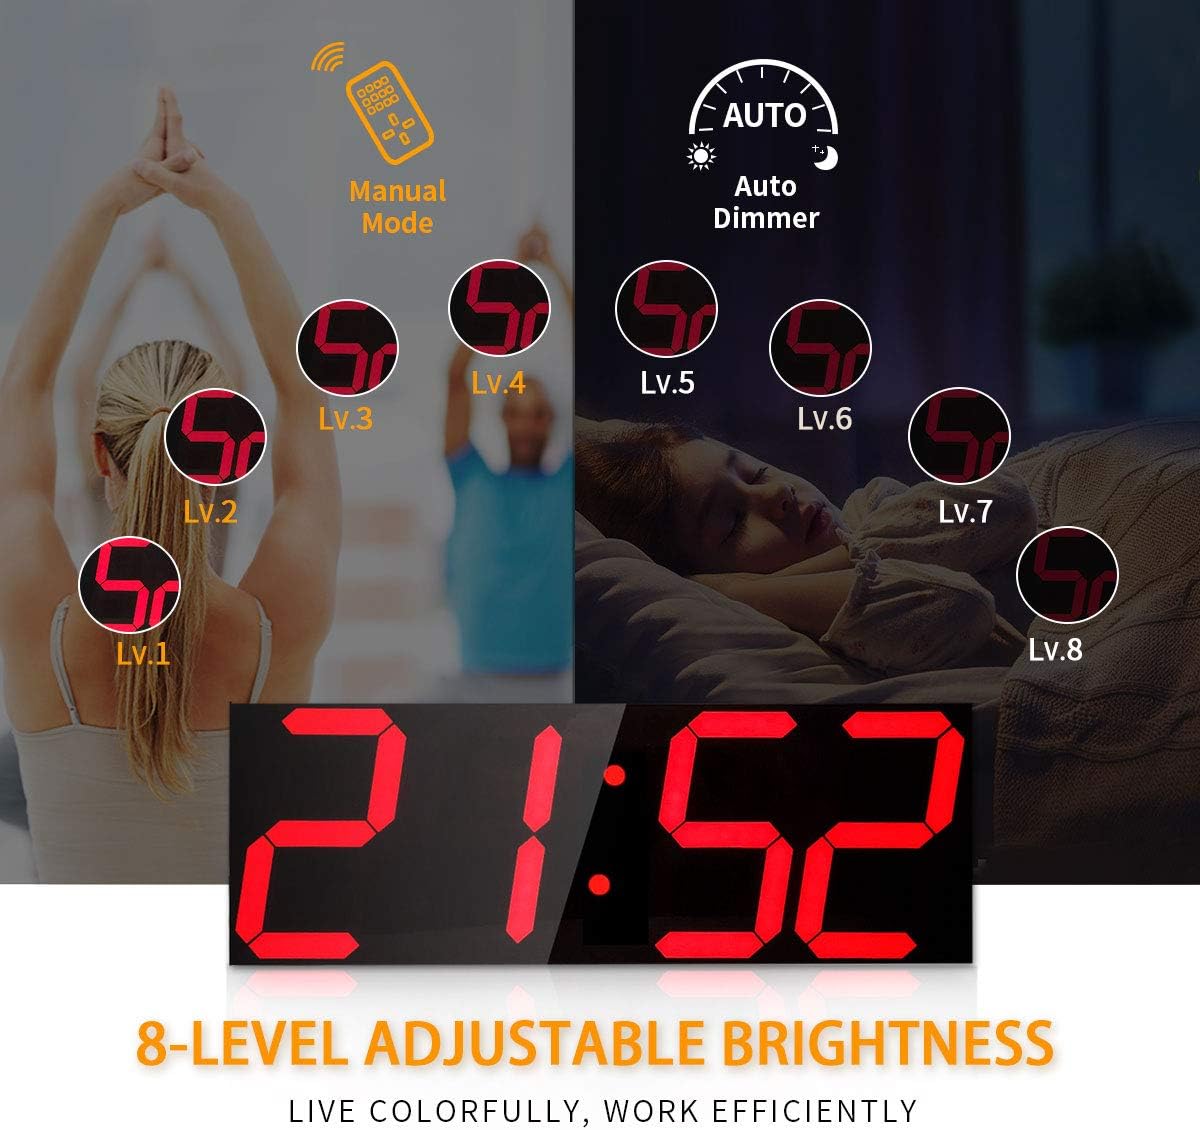
Figure 5: 8 Adjustable Brightness Levels
- Press the DIM button to switch between manual brightness and auto-sensing mode.
- One beep indicates manual mode. Two beeps indicate auto-sensing mode.
- In manual mode, use the + or - buttons to adjust the brightness level (8 levels).
6. Display Settings (Fixed or Loop)
The clock can display information in a fixed mode or loop through different information.
- Press the DISP button to cycle through display modes:
- Fixed Calendar (Year-Month-Day)
- Fixed Time
- Fixed Temperature
- Loop Time-Year-Month
- Loop Time-Year-Month-Day-Temperature

Figure 6: Time and Temperature Display

Figure 7: Time and Date Display
7. Calendar Setting
To set the calendar (e.g., December 15, 2023):
- Press the C SET button. The year digits will flash.
- Use the number buttons (0-9) to enter the year (e.g., 2023).
- Press the MODE button to move to month setting. The month digits will flash.
- Use the number buttons (0-9) to enter the month (e.g., 12 for December).
- Press the MODE button again to move to day setting. The day digits will flash.
- Use the number buttons (0-9) to enter the day (e.g., 15).
- Press the RET button to save and exit calendar setting.
8. Timer Function
To use the timer function:
- Press the ST button to enter timer mode. The display will show 00:00.
- Press the Start/Pause button (green play/pause icon) to start or pause the timer.
- Press the RET button to exit timer mode.
9. Countdown Function
To set a countdown (e.g., 10 seconds):
- Press the CD SET button to enter countdown setting. The display will show 00:00.
- Press CD SET again to set the number of days (up to 999 days). Use MODE to switch between digits and number buttons to enter values.
- Press MODE to set hours, then minutes, then seconds. Use number buttons to enter values.
- To set a reminder before the end, press MODE again. The reminder can be set from 01 to 99 seconds.
- Press the Start/Pause button (green play/pause icon) to start or pause the countdown.
- Press the RET button to exit countdown mode.
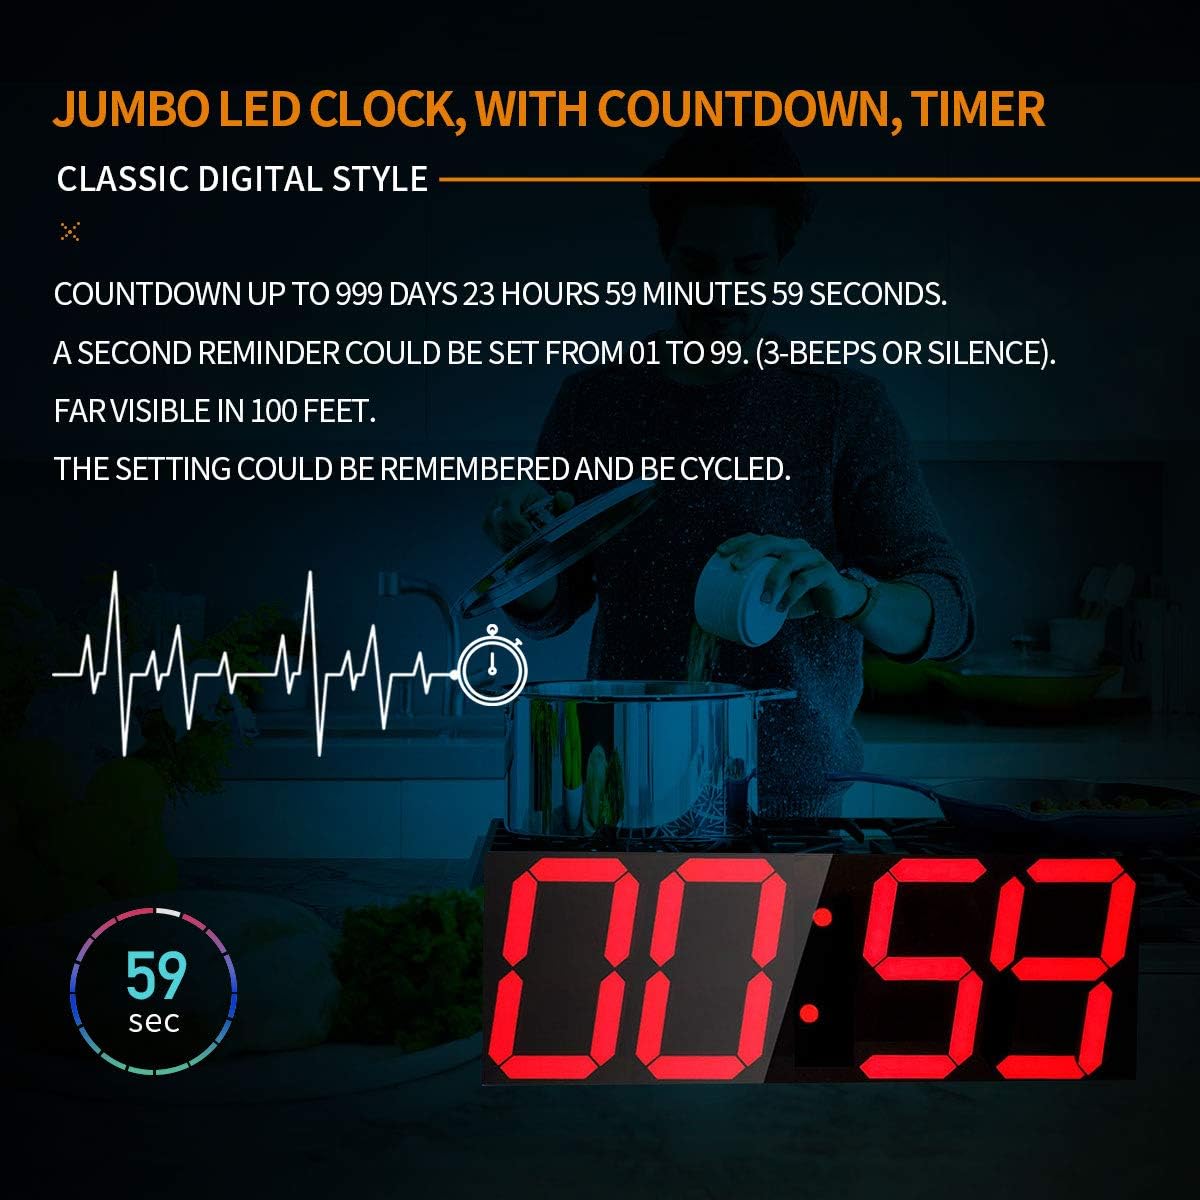
Figure 8: Countdown Timer in Use
10. Alarm Setting
The clock supports up to 16 alarms (A1-A16).
- Press the AL SET button to turn the alarm on/off.
- Press the MODE button to enter AL01 setting.
- Press UP to enable snooze mode.
- Press MODE to set the alarm hour. Use number buttons (0-9) to enter the hour.
- Press MODE again to set the alarm minute. Use number buttons (0-9) to enter the minute.
- Press the RET button to save and exit alarm setting.
- To check alarms A1-A3, press the corresponding A1, A2, or A3 button, then press MODE.
- To check alarms A1-A16, press the A++ button, then press MODE.
11. Mute/Sound Mode
To toggle between mute and sound mode:
- Press the Mute/Sound button (speaker icon) on the remote.
12. Screen and Sound Test
To perform a screen and sound test:
- Press the FULL button. The display will show all segments and emit a sound.
- If there are no problems, press the RET button to exit.
Video: How to use Goetland Jumbo LED clock. This video demonstrates the unboxing, setup, and various functions of the Goetland Digital LED Wall Clock, including time setting, temperature mode, brightness adjustment, timer, countdown, and alarm settings.
Maintenance
1. Cleaning
To clean the clock, gently wipe the display and frame with a soft, dry cloth. Avoid using abrasive cleaners or solvents that may damage the surface.
2. Battery Replacement
If the clock loses time during a power outage, the CR2032 backup battery may need replacement. Follow the battery installation steps in the Setup section.
Troubleshooting
- Clock not turning on: Ensure the USB power cable is securely connected to both the clock and the power adapter, and that the adapter is plugged into a working electrical outlet.
- Remote control not working: Check if the remote control battery is correctly installed and has sufficient power. Ensure there are no obstructions between the remote and the clock.
- Display is too dim or too bright: Adjust the brightness using the DIM button and +/- buttons on the remote control. Ensure the clock is not in auto-sensing mode if you prefer manual control.
- Time/Date is incorrect: Follow the Time Setting and Calendar Setting instructions to correct the time and date.
- Alarm not sounding: Verify that the alarm is set correctly and is enabled. Check the mute/sound mode.
Specifications
| Feature | Description |
|---|---|
| Brand | Goetland |
| Model Number | LDC0001-04 |
| Display Type | LED |
| Product Dimensions | 17.52"W x 6.3"H |
| Power Source | Corded Electric (5V2A USB) |
| Power Cord Length | 9.8 ft / 3 m |
| Backup Battery | 1 x CR2032 (Not included) |
| Brightness Levels | 8 (Manual/Automatic) |
| Functions | 12/24-Hour, Temperature (F/C), Countdown (max 365 days), Timer (max 1 day), 16 Alarms, Mute/Beep |
| Remote Control Range | Up to 50 ft / 15.3 m |
| Mounting Type | Wall Mount, Tabletop Stand |
| Material | LED, Acrylic, Aluminum |
Warranty and Support
Warranty Information
This Goetland Digital LED Wall Clock comes with a 2-year replacement warranty. If the remote control is broken, a new clock will be provided as a replacement.
Customer Support
For any questions, troubleshooting assistance, or warranty claims, please contact Goetland customer service. Refer to the product packaging or the official Goetland website for the most current contact information.
