1. Introduction
The BOYA BY-VM600 is a high-quality condenser shotgun microphone designed to significantly improve the audio quality of your video recordings. It is compatible with digital SLR cameras and camcorders, offering clear and precise sound capture for various applications such as video conferences, video recording, and voice recording. This manual provides detailed instructions for the proper setup, operation, and maintenance of your BY-VM600 microphone.
2. Product Components
Before using your BOYA BY-VM600 microphone, please ensure all components are present and familiarize yourself with each part.
- BY-VM600 Condenser Microphone
- Foam Windscreen
- 3.5mm Audio Cable
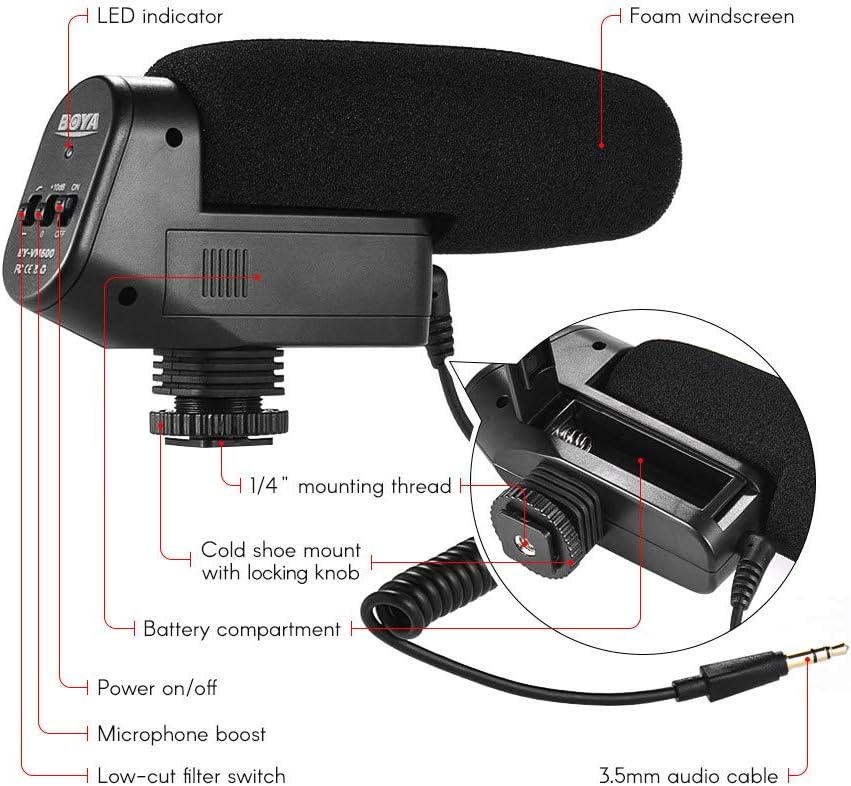
Figure 1: Diagram illustrating the various components of the BOYA BY-VM600 microphone, including the LED indicator, foam windscreen, 1/4" mounting thread, cold shoe mount with locking knob, battery compartment, power on/off switch, microphone boost switch, low-cut filter switch, and 3.5mm audio cable.
Key Components:
- LED Indicator: Shows power status.
- Foam Windscreen: Reduces wind noise during outdoor recordings.
- 1/4" Mounting Thread: For attaching to tripods or other accessories.
- Cold Shoe Mount with Locking Knob: For secure attachment to a camera's hot/cold shoe.
- Battery Compartment: Holds the AA battery.
- Power On/Off Switch: Controls microphone power.
- Microphone Boost Switch (+10dB): Increases audio gain.
- Low-Cut Filter Switch: Reduces low-frequency noise.
- 3.5mm Audio Cable: Connects the microphone to your camera or recording device.
3. Setup Instructions
Follow these steps to properly set up your BOYA BY-VM600 microphone with your camera or camcorder.
3.1 Installing the Battery
- Locate the battery compartment on the underside of the microphone unit (refer to Figure 1).
- Open the battery compartment cover.
- Insert one AA battery, ensuring correct polarity (+/-).
- Close the battery compartment cover securely.
3.2 Mounting the Microphone
- Slide the cold shoe mount of the microphone onto your camera's hot/cold shoe.
- Tighten the locking knob on the cold shoe mount to secure the microphone in place.
- Alternatively, if your camera does not have a hot/cold shoe or you prefer external mounting, use the 1/4" mounting thread to attach the microphone to a tripod or other compatible accessory.

Figure 2: The BOYA BY-VM600 microphone securely mounted on top of a DSLR camera, ready for use.
3.3 Connecting to Your Device
- Connect one end of the supplied 3.5mm audio cable to the 3.5mm output jack on the microphone.
- Connect the other end of the 3.5mm audio cable to the microphone input jack on your digital SLR camera or camcorder.

Figure 3: The BOYA BY-VM600 microphone connected to a DSLR camera, with its control panel visible for adjustment.
4. Operating Instructions
Once the microphone is set up, follow these steps for optimal audio recording.
4.1 Powering On/Off
- Locate the Power On/Off switch on the microphone (refer to Figure 1).
- Slide the switch to the 'ON' position to power on the microphone. The LED indicator should illuminate.
- Slide the switch to the 'OFF' position when not in use to conserve battery life.
4.2 Using the Microphone Boost (+10dB)
- The +10dB switch increases the microphone's sensitivity, which can be useful when recording quieter sounds or when your camera's preamps are noisy.
- Slide the switch to '+10dB' to activate the boost.
- Use this setting cautiously, as it can also amplify background noise if not used appropriately. Monitor your camera's audio levels to prevent clipping.
4.3 Activating the Low-Cut Filter
- The low-cut filter (often labeled 'LOW CUT' or with a frequency symbol) reduces low-frequency sounds such as rumble, wind noise, or air conditioning hum.
- Slide the switch to activate the low-cut filter when such noises are present in your recording environment.
- This helps to achieve clearer dialogue and reduce unwanted background noise.
4.4 Using the Foam Windscreen
- Attach the foam windscreen over the microphone head when recording outdoors or in windy conditions.
- The windscreen effectively minimizes wind noise, ensuring clearer audio capture.
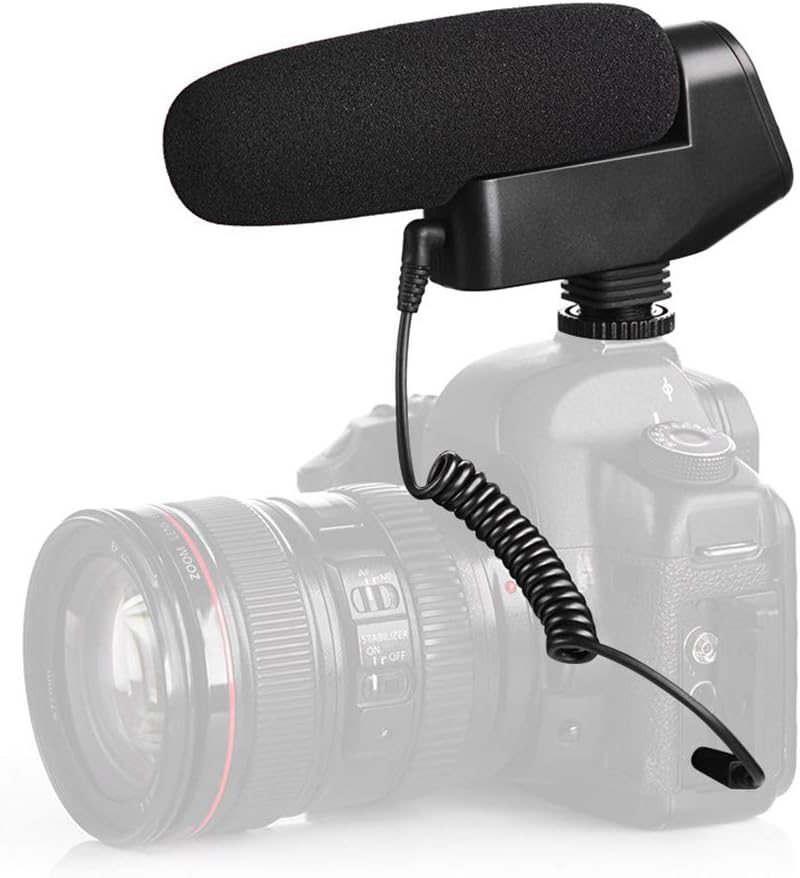
Figure 4: A close-up view of the BOYA BY-VM600 microphone's grille, demonstrating the texture and design for sound capture.
5. Maintenance
Proper care and maintenance will extend the life and performance of your BOYA BY-VM600 microphone.
- Cleaning: Use a soft, dry cloth to clean the microphone body. Do not use harsh chemicals or abrasive cleaners.
- Storage: Store the microphone in a dry, dust-free environment when not in use. Remove the AA battery if storing for extended periods to prevent leakage.
- Handling: Avoid dropping or subjecting the microphone to strong impacts, as this can damage internal components.
- Windscreen: The foam windscreen can be gently cleaned with mild soap and water if it becomes dirty. Ensure it is completely dry before reattaching.
6. Troubleshooting
If you encounter issues with your BOYA BY-VM600 microphone, refer to the following common problems and solutions.
- No Sound or Low Volume:
- Ensure the microphone is powered 'ON' and the LED indicator is lit.
- Check if the AA battery is correctly installed and has sufficient charge. Replace if necessary.
- Verify that the 3.5mm audio cable is securely connected to both the microphone and your camera's microphone input.
- Check your camera's audio input settings to ensure the external microphone is selected and input levels are appropriate.
- Try activating the '+10dB' boost switch if the sound is too low.
- Excessive Background Noise/Hum:
- Activate the low-cut filter switch to reduce low-frequency rumble.
- Ensure the microphone is not too close to sources of electromagnetic interference (e.g., power cables, Wi-Fi routers).
- If using the '+10dB' boost, try turning it off if the ambient noise is already high.
- Check your camera's audio gain settings; high internal gain can introduce noise.
- Wind Noise:
- Ensure the foam windscreen is properly installed over the microphone head when recording in windy conditions.
7. Technical Specifications
| Feature | Specification |
|---|---|
| Model Name | BY-VM600 |
| Microphone Form Factor | Shotgun |
| Polar Pattern | Unidirectional |
| Impedance | 25 Ohms |
| Signal-to-Noise Ratio | 78 dB |
| Power Source | Battery Powered (1 AA battery required) |
| Connectivity Technology | Auxiliary |
| Connector Type | 3.5 mm Jack |
| Compatible Devices | Digital SLR Camera, Camcorder |
| Item Dimensions (L x W x H) | 6.69 x 3.54 x 1.77 inches |
| Item Weight | 7.1 ounces (200 Grams) |
| Material | Rubber |
| Color | Black |
| Recommended Uses | Video Conference, Video Recording, Voice Recording |
8. Warranty and Support
The BOYA BY-VM600 microphone comes with a standard manufacturer's warranty. For specific warranty terms and conditions, please refer to the documentation provided with your purchase or visit the official BOYA website. For technical support or service inquiries, please contact BOYA customer service through their official channels.


