1. Introduction
This manual provides essential information for the safe and efficient operation of the Keyence BL-601 Fixed Mount Barcode Scanner. Please read this manual thoroughly before using the product and keep it for future reference.
The BL-601 is an ultra-compact barcode scanner designed for high-speed and accurate data capture in various industrial applications. Its small footprint allows for integration into space-constrained environments.
2. Safety Precautions
Observe the following safety precautions to prevent injury to personnel and damage to the product.
- Do not attempt to disassemble, repair, or modify the scanner. This may cause electric shock or damage.
- Ensure the power supply voltage is within the specified range. Incorrect voltage can cause damage.
- Avoid exposing the scanner to direct sunlight, high temperatures, excessive humidity, or corrosive gases.
- Do not look directly into the scanning window while the device is operating, as it emits a laser light.
- Mount the device securely to prevent it from falling.
3. Package Contents
Verify that all items are present and undamaged upon unpacking.
- Keyence BL-601 Barcode Scanner Unit
- Connection Cable (specific type may vary)
- Mounting Bracket (optional, may be sold separately)
- Quick Start Guide
4. Product Overview
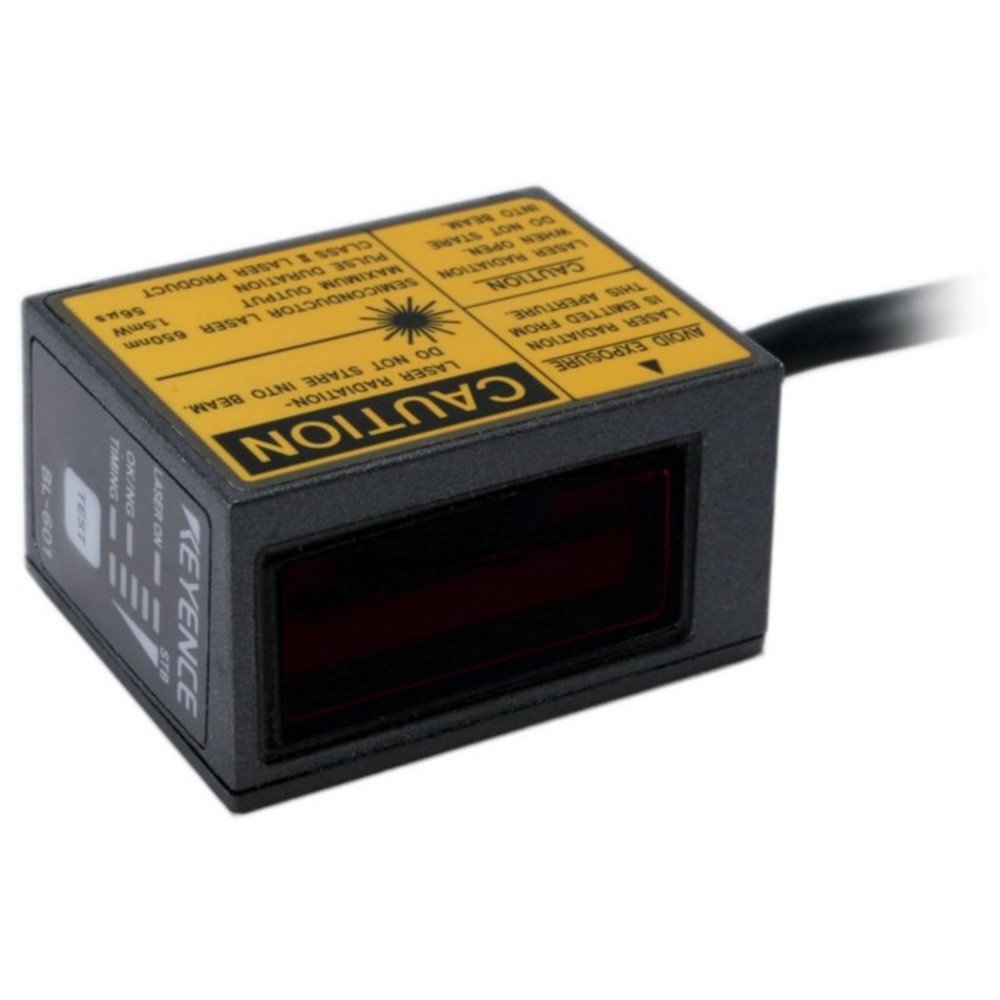
Figure 4.1: Front view of the Keyence BL-601 Barcode Scanner. This image shows the compact design and the scanning window.
The BL-601 features a robust housing, a high-performance scanning engine, and various interface options for seamless integration into existing systems. Key components include the scanning window, status indicators, and a connector port.
- Scanning Window: Area where barcodes are read.
- Status Indicators: LEDs indicating power, scan status, and error conditions.
- Connector Port: For power and data communication.
5. Setup
5.1 Mounting the Scanner
The BL-601 can be mounted using standard M3 screws or an optional mounting bracket. Ensure the scanner is positioned to provide a clear line of sight to the barcodes.
- Select a stable, vibration-free surface for mounting.
- Secure the scanner using appropriate screws, ensuring it is firmly attached.
- Adjust the angle to optimize reading performance.
5.2 Connecting the Cables
Connect the provided cable to the scanner's connector port and to the host device (e.g., PC, PLC).
- Ensure the host device is powered off before connecting.
- Connect the scanner cable to the designated port on the scanner.
- Connect the other end of the cable to the appropriate interface port (e.g., USB, RS-232) on your host system.
- Power on the host device and then the scanner. Observe the status indicators.
6. Operating Instructions
6.1 Basic Scanning Operation
Once powered on and connected, the BL-601 is ready to scan. The scanner operates automatically or can be triggered externally depending on its configuration.
- Ensure the barcode is within the scanner's field of view and focal range.
- The scanner will emit a laser beam to read the barcode.
- A successful read is typically indicated by a green LED and/or an audible beep (if configured).
- The decoded data is then transmitted to the host system via the connected interface.
6.2 Configuration
The BL-601 can be configured using dedicated software provided by Keyence or via configuration barcodes. Refer to the detailed programming manual for advanced settings such as symbology enabling/disabling, data formatting, and trigger modes.
7. Maintenance
7.1 Cleaning the Scanner
Regular cleaning ensures optimal performance and longevity of the scanner.
- Scanning Window: Gently wipe the scanning window with a soft, lint-free cloth dampened with a mild, non-abrasive cleaner or isopropyl alcohol. Do not use harsh chemicals or abrasive materials.
- Housing: Wipe the exterior housing with a soft, dry cloth.
- Ensure no liquid enters the scanner's interior.
7.2 Storage
Store the scanner in a clean, dry environment within the specified temperature and humidity ranges when not in use for extended periods.
8. Troubleshooting
| Problem | Possible Cause | Solution |
|---|---|---|
| Scanner not powering on | No power supply; loose cable connection | Check power source; ensure cable is securely connected. |
| Cannot read barcodes | Barcode damaged; incorrect focal distance; dirty scanning window; symbology disabled | Check barcode quality; adjust scanner position; clean scanning window; enable required symbology in settings. |
| Data not transmitting to host | Incorrect interface settings; faulty cable; host software issue | Verify communication settings; try a different cable; check host application. |
9. Specifications
| Feature | Detail |
|---|---|
| Model | BL-601 |
| Manufacturer | KEYENCE |
| Dimensions (W x D x H) | 31 x 40 x 21 mm (approx.) |
| Scanning Method | Fixed Mount Laser Scanner |
| Interface | RS-232C, USB (depending on model/cable) |
| Power Supply | 5 VDC to 24 VDC (typical) |
| Operating Temperature | 0 to 50°C (32 to 122°F) |
| Storage Temperature | -20 to 70°C (-4 to 158°F) |
| Humidity | 35 to 85% RH (no condensation) |
10. Warranty and Support
For information regarding product warranty, technical support, or service, please contact your local Keyence representative or visit the official Keyence website. Keep your purchase receipt and product serial number handy when contacting support.
Keyence Official Website: www.keyence.com


