
Tascam US-1x2
Tascam US-1x2 USB Audio/MIDI Interface User Manual
Model: US-1x2
1. Introduction
The Tascam US-1x2 is a compact 1-in/2-out USB Audio/MIDI Interface designed for high-quality audio recording and playback. It features a high-quality Ultra-HDDA microphone preamp, a 1/4" line input switchable to instrument level, and stereo line outputs. This manual provides essential information for setting up, operating, and maintaining your US-1x2 interface.
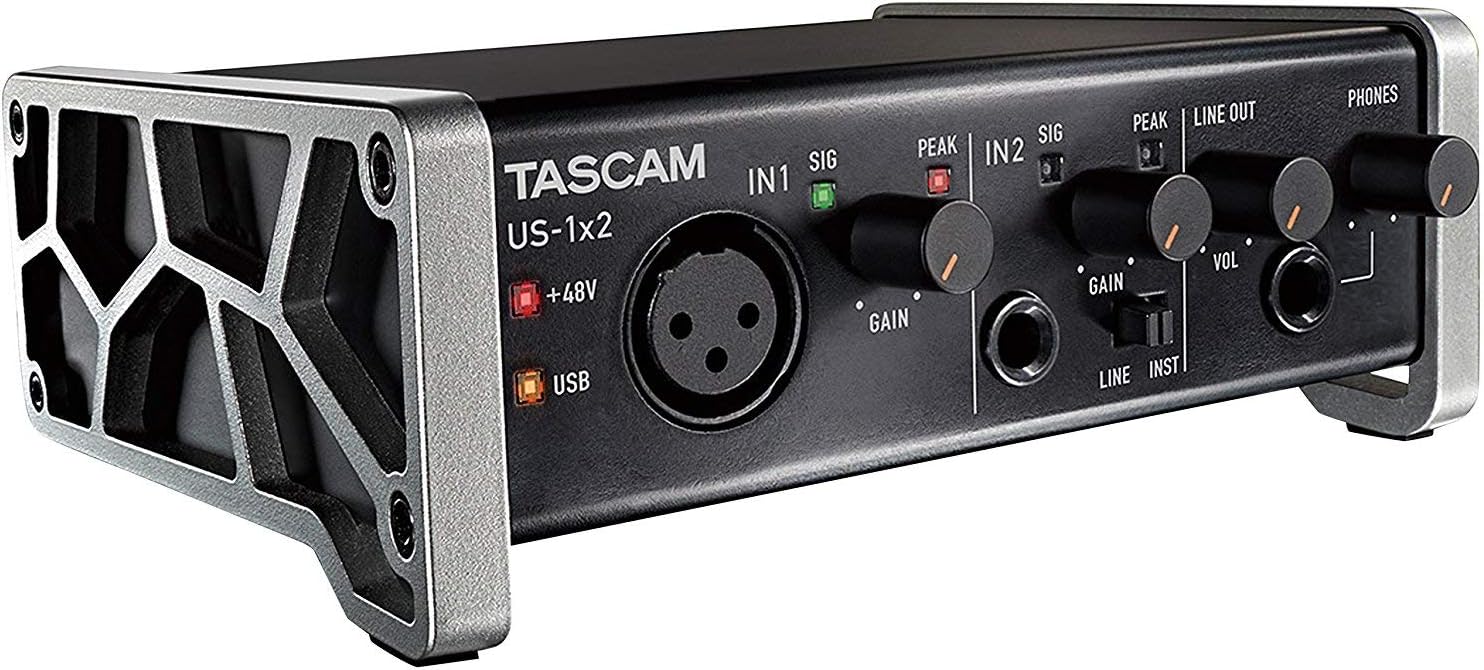
Figure 1: Tascam US-1x2 USB Audio/MIDI Interface, showing its compact design with input and output controls.
2. Important Safety Information
Please read and understand all safety instructions before using this product. Keep this manual for future reference.
- Do not expose this unit to rain or moisture.
- Do not block any ventilation openings.
- Use only attachments/accessories specified by the manufacturer.
- Refer all servicing to qualified service personnel.
- Ensure proper power supply as specified for the device.
3. Package Contents
Verify that all items listed below are included in your package:
- Tascam US-1x2 USB Audio/MIDI Interface
- USB Cable
- Software License Information (for Steinberg Cubase LE and Cubasis LE)
- User Manual (this document)
4. Product Overview
4.1 Front Panel

Figure 2: Front view of the Tascam US-1x2, highlighting input controls and headphone jack.
- IN 1 (XLR/TRS Combo Jack): For connecting microphones (XLR) or line-level/instrument-level devices (TRS). Supports +48V phantom power.
- GAIN 1 Knob: Adjusts the input level for IN 1.
- PEAK/SIG 1 Indicator: Lights green for signal presence, red for clipping.
- IN 2 (TRS Jack): For connecting line-level or instrument-level devices.
- GAIN 2 Knob: Adjusts the input level for IN 2.
- PEAK/SIG 2 Indicator: Lights green for signal presence, red for clipping.
- LINE/INST Switch: Toggles IN 2 between line level and instrument level.
- LINE OUT Knob (VOL): Adjusts the overall output volume for the main line outputs.
- PHONES Jack: Stereo headphone output.
- PHONES Knob: Adjusts the headphone output volume.
- +48V Indicator: Lights when phantom power is active for IN 1.
- USB Indicator: Lights when the unit is connected via USB.
4.2 Rear Panel

Figure 3: Rear view of the Tascam US-1x2, showing USB, line inputs/outputs, and control switches.
- USB Port: Connects to your computer for power and data transfer.
- DC IN 5V Port: For external power supply when using with tablets (e.g., iOS devices).
- DIRECT MONITOR Switch: Enables direct monitoring of input signals to reduce latency.
- INPUT SELECT Switch: Selects between front panel inputs (IN 1/IN 2) or rear panel LINE IN.
- LINE IN (L/R) Jacks: Stereo RCA inputs for line-level devices.
- LINE OUT (L/R) Jacks: Stereo RCA outputs for connecting to monitors or amplifiers.
- +48V (IN1) Switch: Activates phantom power for the XLR input on IN 1.
5. Setup
5.1 Driver Installation
For optimal performance, it is recommended to install the dedicated drivers for your operating system (Windows or macOS). The US-1x2 also supports class-compliant operation for basic functionality without drivers on compatible systems, including iOS.
- Visit the official Tascam website and navigate to the support page for the US-1x2.
- Download the latest drivers compatible with your operating system.
- Follow the on-screen instructions to complete the driver installation. Restart your computer if prompted.
5.2 Connecting to Your Computer
Use the supplied USB cable to connect the US-1x2 to an available USB port on your computer. The USB indicator on the front panel will illuminate when a connection is established.

Figure 4: The Tascam US-1x2 connected to a laptop, ready for recording.
5.3 Software Installation
The US-1x2 includes licenses for Steinberg Cubase LE (for desktop) and Cubasis LE (for iOS). These digital audio workstations (DAWs) allow you to record, edit, and mix your audio.
- Locate the software license information included with your US-1x2.
- Follow the instructions to download and activate Cubase LE or Cubasis LE.
- Configure your chosen DAW to use the Tascam US-1x2 as its audio input and output device.
6. Operating the US-1x2
6.1 Connecting Microphones
Connect a microphone to the XLR input of IN 1. If using a condenser microphone that requires phantom power, ensure the +48V switch on the rear panel is set to ON. The +48V indicator on the front panel will light up.

Figure 5: An XLR cable connected to the IN 1 input of the Tascam US-1x2.
6.2 Connecting Instruments and Line-Level Devices
For guitars, basses, or other instruments, connect them to the 1/4" TRS input of IN 2. Set the LINE/INST switch to INST. For line-level devices like keyboards or drum machines, connect to IN 2 with the LINE/INST switch set to LINE, or use the stereo RCA LINE IN jacks on the rear panel.

Figure 6: The Tascam US-1x2 being used to record a guitar.
6.3 Adjusting Input Levels (GAIN)
Turn the GAIN knob for the respective input (IN 1 or IN 2) clockwise until the SIG indicator lights green consistently during the loudest parts of your performance. If the PEAK indicator lights red, the signal is clipping; reduce the GAIN until it no longer lights red.
6.4 Direct Monitoring
To hear your input signal directly through the headphones or line outputs without latency from your computer, set the DIRECT MONITOR switch on the rear panel to ON. This is useful for real-time performance monitoring.
6.5 Output Volume Control
Use the LINE OUT (VOL) knob to adjust the volume of the main line outputs connected to your studio monitors or speakers. Use the PHONES knob to adjust the volume of your headphones.
7. Maintenance
To ensure the longevity and optimal performance of your Tascam US-1x2, follow these maintenance guidelines:
- Cleaning: Use a soft, dry cloth to wipe the exterior of the unit. Do not use liquid cleaners or abrasive chemicals.
- Storage: Store the unit in a cool, dry place away from direct sunlight and extreme temperatures.
- Handling: Avoid dropping or subjecting the unit to strong impacts.
- Ventilation: Ensure that the ventilation openings are not blocked to prevent overheating.
8. Troubleshooting
| Problem | Possible Cause | Solution |
|---|---|---|
| No sound from outputs/headphones. | Output volume too low; incorrect output device selected in software; cables not connected properly. | Increase LINE OUT (VOL) and PHONES knobs. Check audio settings in your computer/DAW. Verify all cables are securely connected. |
| No input signal (SIG/PEAK indicators off). | GAIN knob too low; incorrect input selected; phantom power not enabled for condenser mic; faulty cable/microphone. | Increase GAIN knob. Ensure INPUT SELECT switch is correct. Activate +48V for condenser mics. Test with a different cable/mic. |
| Distorted sound (PEAK indicator lights red). | Input signal too hot. | Reduce the GAIN knob for the affected input until the PEAK indicator no longer lights red. |
| Interface not recognized by computer. | Drivers not installed or corrupted; faulty USB cable/port. | Reinstall drivers. Try a different USB port or cable. Restart computer. |
| Static or noise in audio. | Ground loop; interference; faulty cable. | Ensure all equipment is on the same power circuit. Use balanced cables where possible. Try different cables. |
9. Specifications
- Model: US-1x2
- Item Weight: 2 pounds
- Product Dimensions: 8 x 3 x 7 inches
- Hardware Interface: USB
- Number of Channels: 1-In/2-Out (Audio), 1-In/1-Out (MIDI)
- Max Resolution: 96kHz/24-bit
- Microphone Preamp: Ultra-HDDA
- Phantom Power: +48V (switchable for IN 1)
- Compatible Devices: Personal Computer
- Operating System Compatibility: Windows, macOS, iOS, Linux, Android
- Supported Software: Steinberg Cubase LE, Cubasis LE
- Connectivity Technology: USB, XLR
- Voltage: 240 Volts (Note: USB bus powered for most uses, DC 5V for tablet use)
- First Available Date: August 11, 2017
10. Warranty and Support
For warranty information, technical support, or service inquiries, please visit the official Tascam website or contact their customer support directly. Keep your proof of purchase for warranty claims.
Official Tascam Website: www.tascam.com
User Manual (PDF): Download PDF
Related documentsUS-1x2


Ask a question about this manual
Ask about setup, troubleshooting, compatibility, parts, safety, or missing instructions. Manuals+ will review the question and use this page’s manual context to help answer it.