
1. Introduction
This manual provides essential information for the safe and effective use of your Pink Power Cordless Electric Scissors, Model HG2043. Please read these instructions thoroughly before operating the device and retain this manual for future reference. These electric scissors are designed for various cutting tasks in crafts, sewing, and general household use, offering convenience and efficiency.

Image 1.1: Pink Power Cordless Electric Scissors (Model HG2043) with its retail packaging.
2. What's in the Box
Your Pink Power Cordless Electric Scissors package includes the following components:
- 1 x Pink Power Cordless Electric Scissor Unit (Model HG2043)
- 1 x O-Blade (for flexible, softer materials)
- 1 x D-Blade (for rigid, tougher materials)
- 1 x Battery Charger
- 1 x Lithium-Ion Battery

Image 2.1: The electric scissors unit, two types of blades, battery, and charger.
3. Product Features
The Pink Power Cordless Electric Scissors offer several features designed for user convenience and cutting efficiency:
- Cordless Operation: Provides freedom of movement without being tethered to an outlet.
- Rechargeable Lithium-Ion Battery: Delivers 1-2 hours of continuous cutting on a full charge.
- Dual Blade System: Includes an O-Blade for flexible materials and a D-Blade for rigid materials.
- Ergonomic Design: Lightweight (under 1 pound) and compact for comfortable handling.
- Ambidextrous Use: Symmetrical design accommodates both left-handed and right-handed users.
- Versatile Cutting: Capable of cutting fabric, leather, carpet, metal, paper, cardboard, and plastic.
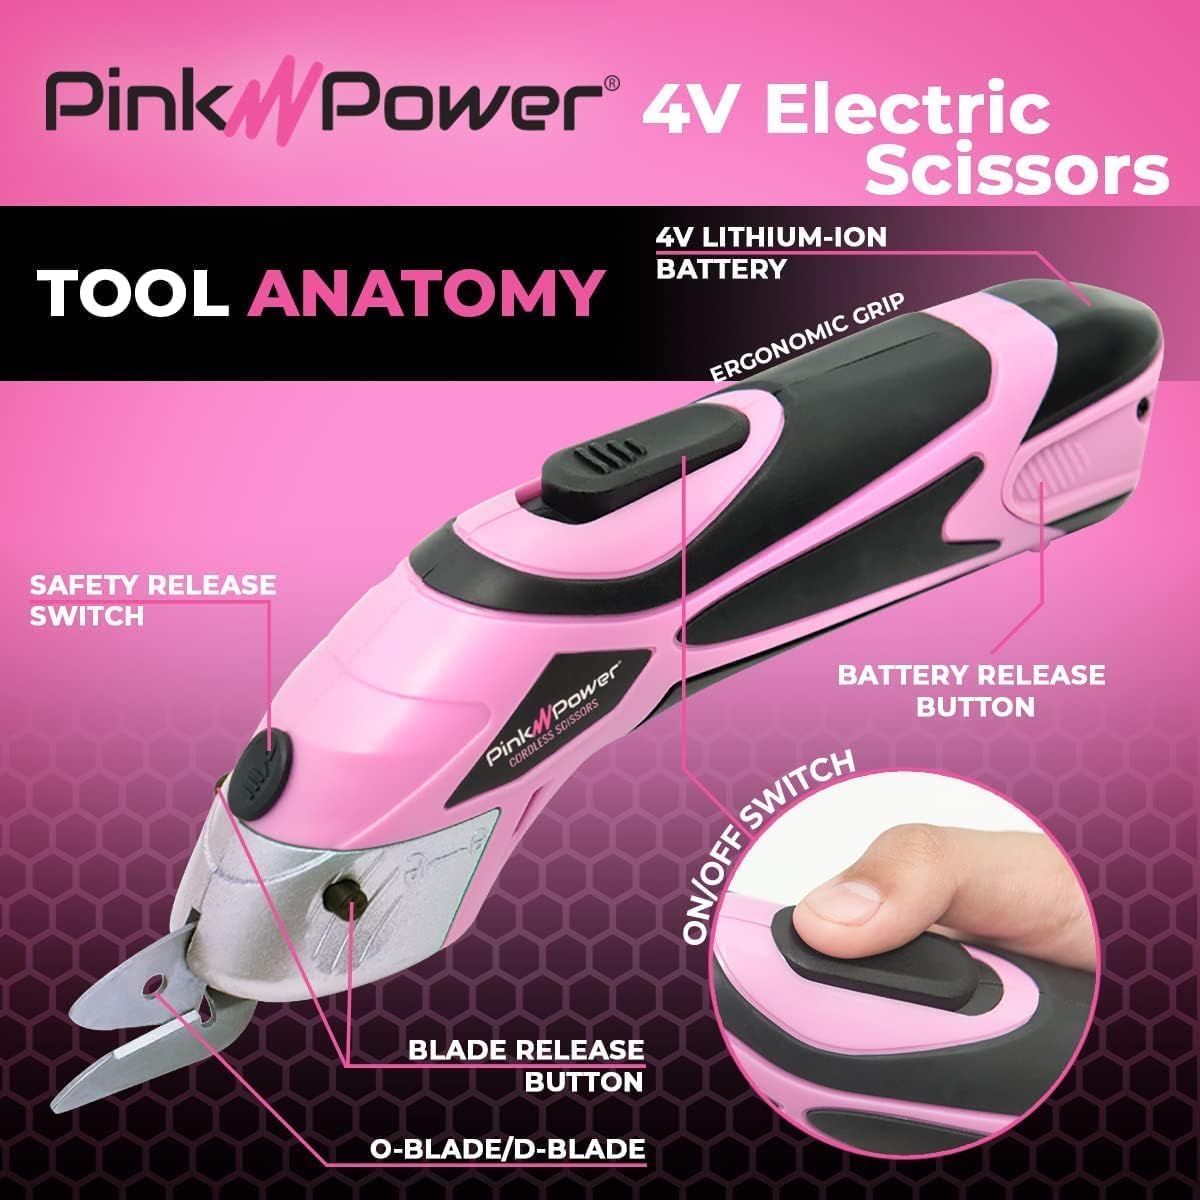
Image 3.1: Detailed diagram of the electric scissors' components and controls.

Image 3.2: The compact size and extended cutting time of the device.
4. Setup
4.1 Charging the Battery
- Ensure the battery is securely inserted into the charging port on the charger.
- Plug the charger into a standard electrical outlet.
- Allow the battery to charge fully before first use. The charging indicator light will typically change color or turn off when charging is complete.
4.2 Installing/Changing Blades
The electric scissors come with two interchangeable blades: an O-Blade and a D-Blade. Select the appropriate blade for your material.
- O-Blade: Designed for flexible and softer materials such as cotton fabric, corrugated cardboard, felt fabric, carpet backing, and rose stems.
- D-Blade: Designed for rigid and tougher materials like solid cardboard, plastic sheets, and tin sheets.
- Ensure the electric scissors are turned off and the battery is removed for safety.
- Locate the blade release button on the side of the scissor head.
- Press and hold the blade release button while gently pulling the current blade assembly off the unit.
- Align the desired blade (O-Blade or D-Blade) with the slot on the scissor unit.
- Push the blade assembly firmly onto the unit until it clicks into place. Ensure it is securely fastened.

Image 4.1: The O-Blade is suitable for flexible materials.

Image 4.2: The D-Blade is suitable for rigid materials.
5. Operating Instructions
5.1 General Operation
- Ensure the correct blade is installed and the battery is charged.
- Hold the scissors firmly with one hand.
- To activate, slide the safety release switch forward with your thumb, then press the on/off switch. The blades will begin to rotate.
- Guide the material into the blades, maintaining a steady pace.
- Release the on/off switch to stop the blades.
5.2 Cutting Tips
- For best results, ensure the material is flat and free of obstructions.
- Maintain a consistent speed while cutting to achieve clean edges.
- When cutting curves, apply gentle pressure and guide the scissors smoothly.
- Avoid forcing the scissors through overly thick or hard materials not specified for the blades.

Image 5.1: The electric scissors in use for a sewing project, cutting fabric.

Image 5.2: The electric scissors being used for crafting.
6. Maintenance
6.1 Cleaning
- Always ensure the scissors are turned off and the battery is removed before cleaning.
- Use a soft, dry cloth to wipe down the body of the scissors.
- Carefully remove any material debris from the blades using a small brush or cloth. Do not use water or harsh chemicals.
6.2 Blade Care
Blades may dull over time with regular use. Replacement blades are available from Pink Power. Refer to section 4.2 for instructions on changing blades.
6.3 Battery Storage
Store the lithium-ion battery in a cool, dry place away from direct sunlight and extreme temperatures. For long-term storage, it is recommended to charge the battery to approximately 50% capacity.
7. Troubleshooting
- Scissors not turning on:
- Ensure the battery is fully charged and properly inserted.
- Check that the safety release switch is engaged before pressing the on/off switch.
- Blades not cutting effectively:
- Verify that the correct blade (O-Blade or D-Blade) is installed for the material being cut.
- Clean any debris from the blades.
- If blades are dull, consider replacing them.
- Battery not charging:
- Ensure the charger is properly plugged into a working outlet.
- Check for any damage to the charger or battery.
If you encounter issues not covered here, please contact Pink Power customer support.
8. Specifications
| Specification | Detail |
|---|---|
| Brand | Pink Power |
| Model Number | HG2043 |
| Color | Pink |
| Material | Plastic (body), Stainless Steel (blades) |
| Product Dimensions | 10.24"L x 1.77"W |
| Item Weight | 16 ounces (1 pound) |
| Blade Length | 23 Centimeters |
| Blade Edge | Straight |
| Handle Orientation | Ambidextrous |
| Battery Type | 1 Lithium Ion battery required |
| UPC | 703610714977 |

Image 8.1: Dimensions and symmetrical design for ambidextrous use.
9. Safety Information
- Always keep hands and fingers away from the blades during operation.
- Do not operate the scissors near water or in damp conditions.
- Keep the tool out of reach of children.
- Use appropriate personal protective equipment, such as safety glasses, when operating.
- Never attempt to cut materials that exceed the tool's capacity or are not recommended for the installed blade type.
- Turn off the tool and remove the battery before performing any maintenance, cleaning, or blade changes.
10. Warranty and Support
Pink Power offers a Full 3-Year Warranty on this product, ensuring quality and reliability. For warranty claims or technical assistance, please refer to the contact information provided with your purchase or visit the official Pink Power brand store.
Additionally, the product is eligible for a 30-day return policy from the date of purchase, subject to the retailer's terms and conditions.

Image 10.1: Pink Power products and warranty information.
For more information and support, visit the Pink Power Brand Store.


