
1. Introduction
Thank you for choosing the Multibrackets 4627 Mobile Display Floor Stand. This versatile and robust stand is designed to securely support LCD, LED, or interactive displays up to 80 inches in size and weighing up to 90 kg. Ideal for educational, commercial, and presentation environments, its mobile design allows for easy relocation between rooms. This manual provides essential information for safe assembly, operation, and maintenance of your new display stand.
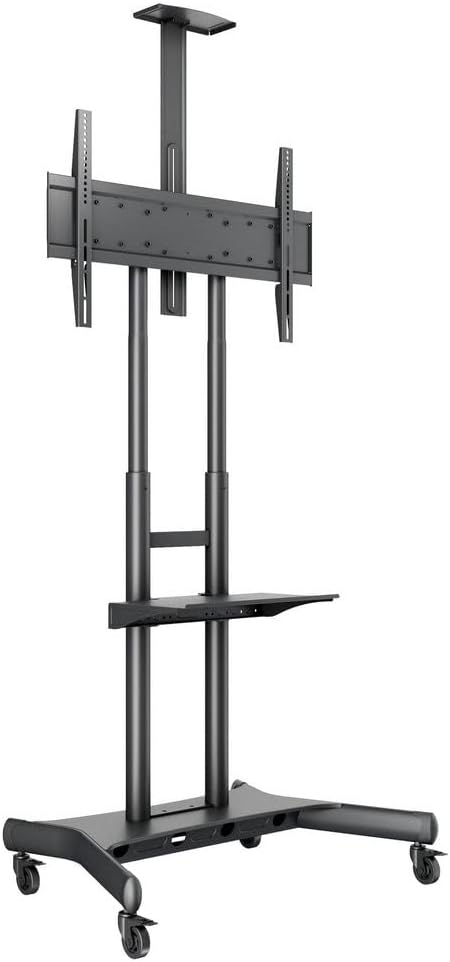
Figure 1: The Multibrackets 4627 Mobile Display Floor Stand, showcasing its sturdy base, dual support columns, and display mounting bracket.
2. Safety Information
Please read all safety instructions carefully before assembly and use. Failure to follow these instructions may result in property damage, serious injury, or death.
- Weight Capacity: Do not exceed the maximum weight capacity of 90 kg (198 lbs).
- Display Size: Ensure your display's size is within the recommended range (up to 80 inches).
- VESA Compatibility: Verify your display's VESA mounting pattern is compatible (up to 800 x 500mm).
- Assembly: Assemble the stand according to the instructions. Use all provided hardware.
- Stability: Always ensure the stand is on a stable, level surface. Engage wheel brakes when the stand is stationary.
- Movement: When moving the stand with a display, do so slowly and carefully, especially over thresholds or uneven surfaces. Ensure all cables are clear to prevent tripping hazards.
- Children: Keep children away from the stand during assembly and operation. Do not allow children to climb on or play with the stand.
- Maintenance: Regularly check all bolts and connections to ensure they are secure.
3. Setup and Assembly
Follow these steps to assemble your Multibrackets 4627 Mobile Display Floor Stand. It is recommended to have two people for assembly, especially when mounting the display.
- Unpack Components: Carefully remove all parts from the packaging. Verify all components are present against the parts list (not provided in this manual, refer to your product packaging for a complete list).
- Assemble Base: Attach the support columns to the base unit. Ensure all bolts are tightened securely.
- Install Wheels: Securely attach the four heavy-duty wheels to the base. Ensure the locking brakes are functional.
- Attach Display Mounting Bracket: Secure the VESA compatible mounting bracket to the top of the support columns. Adjust the height as desired before mounting the display.
- Mount Display: Carefully lift your display and attach it to the mounting bracket using the appropriate VESA screws. Ensure the display is centered and securely fastened.
- Install Accessory Shelf (Optional): If using the accessory shelf, attach it to the support columns at your desired height.
- Cable Management: Utilize the integrated cable management system to route and conceal display and power cables for a tidy and professional appearance.

Figure 2: Side view illustrating the adjustable height of the display bracket and the optional accessory shelf.
4. Operating Instructions
The Multibrackets 4627 stand is designed for ease of use and flexibility.
- Adjusting Display Height: The display mounting bracket can be adjusted along the support columns to achieve an optimal viewing height. Loosen the securing mechanisms, adjust the height, and then re-tighten firmly.
- Mobility: To move the stand, ensure the display is securely mounted and all cables are managed. Release the brakes on the wheels and carefully push the stand to its new location. Re-engage the brakes once in position.
- Tilting Display: The mounting bracket allows for tilting the display to reduce glare or optimize viewing angles. Loosen the tilt adjustment knobs, set the desired angle, and re-tighten.
- Accessory Shelf Use: The included AV shelf can hold devices such as laptops, DVD players, or video conferencing equipment. Ensure items placed on the shelf do not exceed its weight capacity.
5. Maintenance
Regular maintenance ensures the longevity and safe operation of your stand.
- Cleaning: Wipe the stand with a soft, damp cloth. Avoid abrasive cleaners or solvents that could damage the finish.
- Hardware Check: Periodically inspect all bolts, screws, and connections to ensure they remain tight and secure. Re-tighten if necessary.
- Wheel Inspection: Check the wheels for any debris or damage that might impede smooth movement or brake functionality. Clean as needed.
6. Troubleshooting
If you encounter issues with your Multibrackets 4627 stand, refer to the following common problems and solutions:
| Problem | Possible Cause | Solution |
|---|---|---|
| Stand is unstable or wobbly. | Loose connections; uneven surface; overloaded. | Ensure all bolts are tightened. Move stand to a level surface. Verify display weight is within limits. |
| Wheels do not roll smoothly or brakes don't engage. | Debris in wheels; damaged wheels; brakes not properly adjusted. | Clean wheels. Inspect for damage and replace if necessary. Adjust brake mechanism. |
| Display cannot be mounted. | Incorrect VESA pattern; missing or incorrect screws. | Verify display's VESA pattern matches stand (up to 800x500mm). Use correct screws for your display. |
7. Specifications
| Feature | Detail |
|---|---|
| Brand | Multibrackets |
| Model Number | 7350073734627 |
| Color | Black |
| Installation Type | Floor Mount |
| Compatible Devices | Monitor |
| Max Screen Size Supported | 80 Inches (203 cm) |
| Min Screen Size Supported | 55 Inches (140 cm) |
| Weight Capacity | 90 kg (198 lbs) |
| VESA Compatibility | Up to 800 x 500mm |
| Product Dimensions (L x W x H) | 77 x 108 x 18 cm (30.3 x 42.5 x 7.1 inches) |
| Product Weight | 16.5 kg (36.4 lbs) |
| Movement Type | Tiltable |
8. Warranty and Support
Manufacturer Warranty: This Multibrackets product comes with a 5-year manufacturer's warranty, covering defects in materials and workmanship under normal use.
Customer Support: For technical assistance, missing parts, or warranty claims, please contact Multibrackets customer support directly. Refer to the official Multibrackets website or your purchase documentation for contact details.
Please retain your proof of purchase for warranty purposes.


