
Qiilu Qiilugxyg7ao3fm
Qiilu LED Digital Battery Indicator Gauge with Hour Meter User Manual
Brand: Qiilu | Model: Qiilugxyg7ao3fm
1. Introduction
This manual provides comprehensive instructions for the installation, operation, and maintenance of your Qiilu LED Digital Battery Indicator Gauge with Hour Meter. This versatile device is designed to accurately display the charge status of your battery and track the total operating hours of your equipment. It is compatible with a wide range of battery voltages, including 12V, 24V, 36V, 48V, and 72V systems, making it ideal for various applications such as golf carts, RVs, and other battery-powered vehicles.

Figure 1.1: Qiilu Digital Battery Indicator Gauge with Hour Meter Overview
Key Features:
- Extensive Application: Works with 12V, 24V, 36V, 48V, and 72V battery systems.
- LED Battery Indicator: Features a 10-segment LED display with red, yellow, and green lights for clear battery status indication. Flashes for low and high warnings.
- LCD Hour Meter: Tracks up to 99999.9 hours with 0.1 hours resolution, displayed on a 6-digit, 7-segment LCD.
- Memory Function: Retains the last recorded quantity of electricity.
- Easy Installation: Designed for straightforward setup with complete accessories.
- Durable Design: IP65 dustproof and waterproof rating with surface isolation.
2. Specifications
| Feature | Specification |
|---|---|
| Brand | Qiilu |
| Model Number | Qiilugxyg7ao3fm |
| Item Weight | 0.704 ounces (approx. 20g) |
| Country of Origin | China |
| Voltage Compatibility | 12V / 24V / 36V / 48V / 72V |
| Hour Meter Range | 0 - 99999.9 hours |
| Hour Meter Resolution | 0.1 hours |
| Display Type | LED (Battery), LCD (Hour Meter) |
| Waterproof Rating | IP65 |
Dimensions:
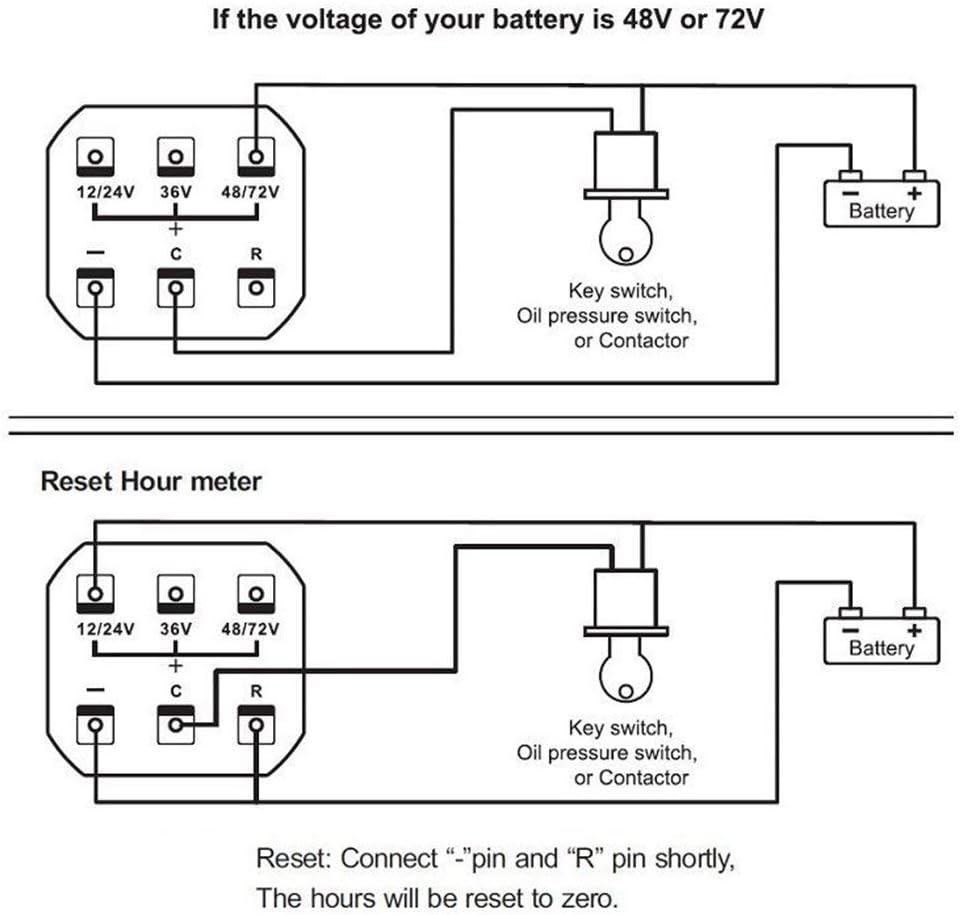
Figure 2.1: Product Dimensions and Panel Cut-out
The diagram above illustrates the physical dimensions of the gauge and the recommended panel cut-out size for proper installation. Ensure your mounting location accommodates these measurements.
LED Working Voltage Table:

Figure 2.2: LED Working Voltage and Display Colors
This table provides detailed information on the voltage thresholds for each LED segment and their corresponding colors, indicating the battery's charge status. Note that for accurate readings, the battery charging voltage needs to be higher than the specified minimums (e.g., 12V gauge needs >13.6V).
3. Setup
Installation:
- Prepare the installation hole according to the dimensions provided in Figure 2.1. The recommended panel cut-out is approximately Ø50mm.
- Carefully insert the battery meter into the prepared installation slot.
- Secure the meter in place using the provided bracket. Ensure it is firmly seated to prevent movement.

Figure 3.1: Installation Steps
Wiring Diagram:
Correct wiring is crucial for the proper functioning of the battery indicator and hour meter. Refer to the diagrams below and ensure connections match your battery's voltage system. Incorrect wiring may lead to inaccurate readings or device malfunction.

Figure 3.2: Comprehensive Wiring Diagrams for Various Voltages and Hour Meter Reset
The wiring diagrams illustrate connections for 12V/24V, 36V, and 48V/72V battery systems. The 'R' pin is used for resetting the hour meter. Connect the '-' pin and 'R' pin momentarily to reset the accumulated hours to zero.

Figure 3.3: Rear Terminal Configuration
This image provides a close-up of the rear terminals, clearly showing the voltage selection pins (12/24V, 36V, 48/72V), positive (+), negative (-), common (C), and reset (R) connections. Ensure your wiring corresponds to the correct voltage setting for your battery.
4. Operating Instructions
Battery Indicator:
The battery indicator features a 10-segment LED bar that visually represents the battery's charge level. The segments illuminate in different colors to provide a quick assessment of the battery status:
- Red Segment(s): Indicate a low battery charge, requiring immediate attention or charging.
- Yellow Segment(s): Indicate a medium charge level.
- Green Segment(s): Indicate a good to full charge level.
The LED will flash for both low and high warning conditions. The battery level display is designed to show discharge, meaning it will decrease from high to low and cannot rise unless the battery is charged.

Figure 4.1: Battery Indicator Display Details

Figure 4.2: Battery Level Display Behavior
Hour Meter:
The hour meter displays accumulated operating time on a 6-digit LCD. It tracks hours up to 99999.9 with a resolution of 0.1 hours. The hour meter updates approximately every 155 seconds (2 minutes and 35 seconds) when the device is powered on and operating.

Figure 4.3: Hour Meter Update Cycle
For example, if the meter reads 69806.6 hours, after 6 minutes, it will update to 69806.7 hours, reflecting the 0.1-hour resolution.

Figure 4.4: Hour Meter Reading Update Example
The total accumulated working time can be reset. If the engine or primary power source is changed, the meter can be reset to start timing from 0.0 hours. To reset the hour meter, briefly connect the '-' (negative) pin and the 'R' (reset) pin as shown in Figure 3.2.

Figure 4.5: Timing System Overview
5. Maintenance
The Qiilu LED Digital Battery Indicator Gauge with Hour Meter is designed for durability and minimal maintenance. It features an IP65 dustproof and waterproof rating, along with a surface isolation design, protecting it from common environmental elements.

Figure 5.1: Dustproof & Waterproof Features
To ensure continued optimal performance, periodically inspect the wiring connections for any signs of wear or corrosion. Keep the display surface clean using a soft, damp cloth. Avoid using abrasive cleaners or solvents that could damage the display or casing.
6. Troubleshooting
If you encounter issues with your Qiilu Battery Indicator Gauge, consider the following common troubleshooting steps:
- Gauge Not Powering On / No Display:
- Check all wiring connections to ensure they are secure and correctly matched to the battery's positive and negative terminals.
- Verify that the battery voltage is within the compatible range (12V/24V/36V/48V/72V) and that the correct voltage selection pin is used if applicable.
- Ensure there is power supplied to the circuit where the gauge is installed.
- Inaccurate Battery Reading:
- Confirm that the gauge is set to the correct voltage for your battery system. Refer to the wiring diagrams in Section 3.
- Ensure the battery is fully charged before assessing accuracy. The gauge displays discharge and will not show an increase in charge unless the battery is actively charging.
- Check for any loose or corroded connections that might impede accurate voltage sensing.
- Hour Meter Not Functioning / Not Updating:
- Verify that the gauge is receiving continuous power when the equipment is operating.
- Note that the hour meter updates every 0.1 hours (approximately every 6 minutes) or every 155 seconds, so small changes may not be immediately visible.
- If the hour meter is stuck, try performing a reset by briefly connecting the '-' and 'R' pins (refer to Figure 3.2).
- LEDs Flashing Continuously:
- This indicates a low or high voltage warning. Check your battery's actual voltage with a multimeter to confirm its state.
- If the battery is healthy, re-check wiring for any intermittent connections.
If problems persist after following these steps, please contact Qiilu customer support for further assistance.
7. Warranty and Support
Qiilu is committed to providing high-quality products and excellent customer service. For specific warranty information regarding your LED Digital Battery Indicator Gauge with Hour Meter, please refer to the product packaging or the official Qiilu website. Typically, warranty coverage addresses manufacturing defects and ensures the product functions as described under normal use.
For technical support, troubleshooting assistance beyond what is covered in this manual, or inquiries about replacement parts, please contact Qiilu customer support. You can usually find contact information on the product's retail page, the manufacturer's website, or within the product packaging.
When contacting support, please have your product model number (Qiilugxyg7ao3fm) and purchase details readily available to facilitate a quicker resolution.
Ask a question about this manual
Ask about setup, troubleshooting, compatibility, parts, safety, or missing instructions. Manuals+ will review the question and use this page’s manual context to help answer it.