1. Introduction
The AODELAN FT-8 Wireless Flash Trigger system allows for remote triggering of off-camera flash units and studio lights. Operating on a 2.4 GHz frequency, it provides a communication range of up to 200 meters (656 feet) without requiring line-of-sight. This system features 8 channels, enabling control of individual or multiple flash units simultaneously. It is compatible with most cameras equipped with a standard hot shoe mount and flashes with a 3.5mm port, including Canon, Nikon, Sony (metal hot shoe), Olympus, Panasonic, Pentax, Fuji, and Samsung cameras. The transmitter offers a 90-degree rotating adjustment for flexible positioning.
Video: Overview of the AODELAN Flash Trigger Transmitter and Receiver, demonstrating its features and applications in a studio setting.
2. Package Contents
Verify that all items listed below are included in your package:
- 1 x Transmitter
- 1 x Receiver
- 1 x 3.5mm to 3.5mm Sync Cable
- 1 x 3.5mm to PC Plug Cable
- 1 x 1/4" Mono Plug Socket Adapter
- 2 x Lanyards
- 1 x Carrying Pouch
- 1 x User Manual (this document)

Image: Contents of the AODELAN FT-8 Wireless Flash Trigger Set, including the transmitter, receiver, various cables, lanyards, and carrying pouch.
3. Component Overview
3.1 Transmitter
The transmitter unit mounts onto your camera's hot shoe. It sends the trigger signal to the receiver.
- Status LED: Indicates power and signal status.
- Channel Numbers (1-8): Displays the selected channel.
- Channel Adjustment Buttons: Used to change the operating channel.
- Test Button: Manually triggers the flash for testing.
- Swivel Rotator: Allows 90-degree rotation of the unit.
- Locking Ring: Secures the transmitter to the camera hot shoe.
- Camera Hot Shoe Connection: Connects to the camera.
- Power Switch: Turns the unit on/off.
- Battery Compartment/Cover: Houses the AA batteries.

Image: Detailed diagram illustrating the various parts and controls of the AODELAN FT-8 Transmitter.
3.2 Receiver
The receiver unit attaches to your flash or studio light and receives the trigger signal from the transmitter.
- Status LED: Indicates power and signal status.
- Hot Shoe Connection: For mounting a flash unit.
- DC Power Port: For external power (if applicable, not typically used for AA battery models).
- Power Switch: Turns the unit on/off.
- Locking Ring: Secures the receiver to a light stand or flash.
- Cold Shoe & 1/4"-20 Tripod Lug: Provides mounting options.
- Channel Numbers (1-8): Displays the selected channel.
- 3.5mm Output Port: For connecting to studio lights via sync cable.
- Channel Adjustment Buttons: Used to change the operating channel.
- Battery Compartment/Cover: Houses the AA batteries.

Image: Detailed diagram illustrating the various parts and connections of the AODELAN FT-8 Receiver.
4. Setup
4.1 Battery Installation
Both the transmitter and receiver require 2 AA batteries each. Open the battery compartment cover, insert the batteries according to the polarity markings, and close the cover securely.
4.2 Connecting the Transmitter to your Camera
- Slide the transmitter onto your camera's hot shoe.
- Tighten the locking ring on the transmitter to secure it in place.
- Turn on the transmitter using the power switch. The Status LED will illuminate.

Image: The AODELAN FT-8 Transmitter mounted on a camera's hot shoe, illustrating its connection and a flash firing in the background, highlighting the effective transmission distance.
4.3 Connecting the Receiver to your Flash/Studio Light
The receiver can be connected to a flash unit in two ways:
- Via Hot Shoe: Slide your hot shoe compatible flash unit onto the receiver's hot shoe. Ensure it is securely mounted.
- Via Sync Cable: For studio lights or flashes with a 3.5mm sync port, connect one end of the provided 3.5mm to 3.5mm sync cable to the receiver's 3.5mm output port and the other end to the flash/studio light's sync input. If your studio light has a 1/4" mono plug socket, use the included 3.5mm to PC plug cable and the 1/4" mono plug socket adapter.
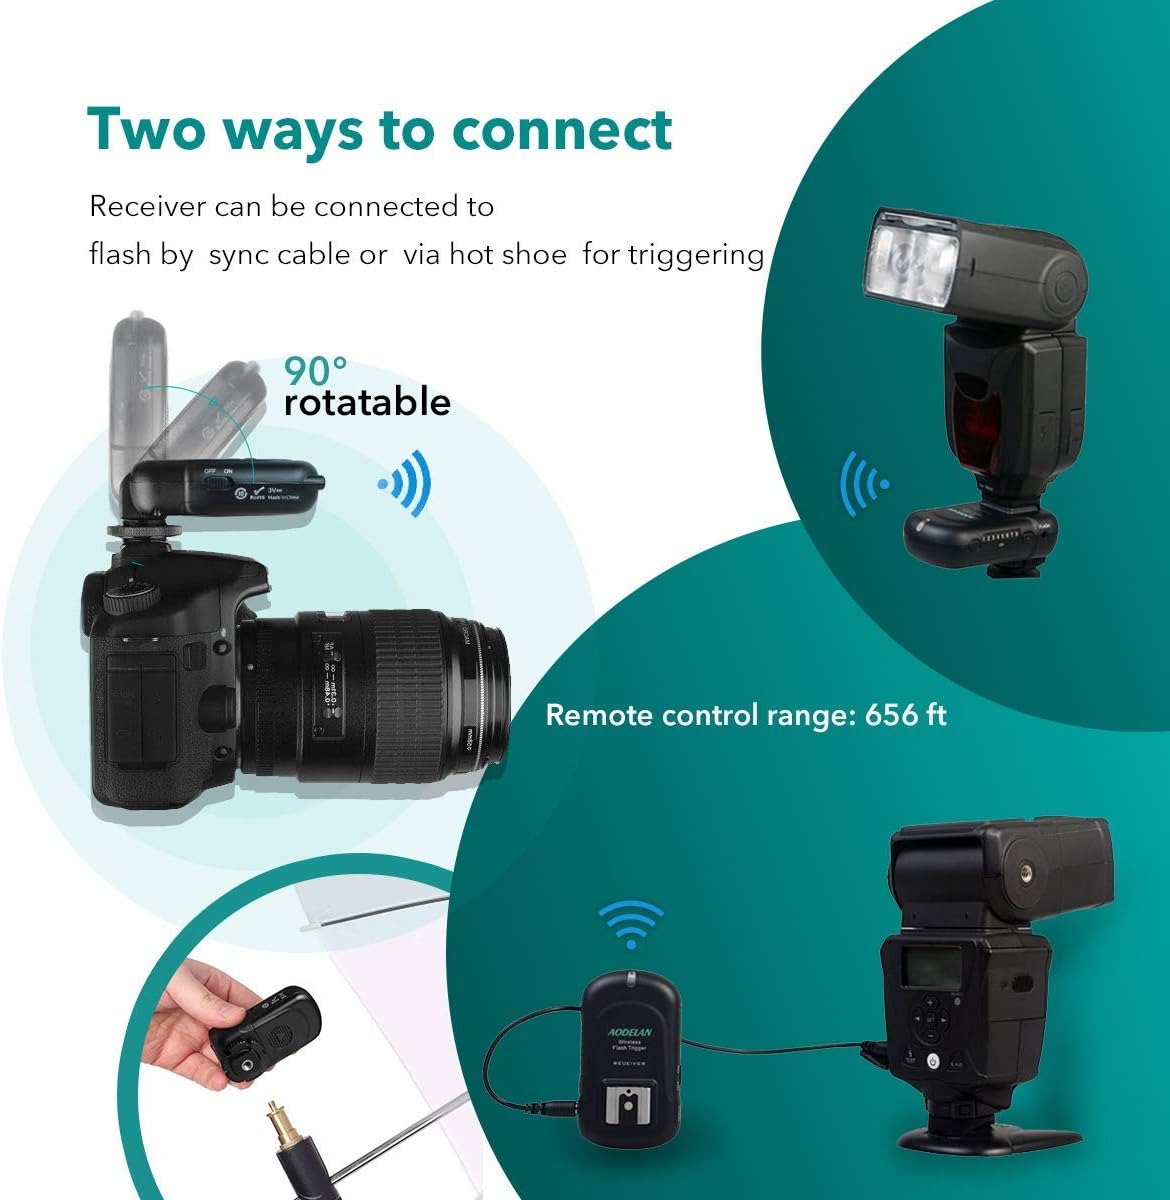
Image: Illustration showing two ways to connect the AODELAN FT-8 Receiver: directly to a flash on a camera's hot shoe (with the receiver acting as a pass-through or on-camera trigger) and via a sync cable to a studio light.

Image: Diagram showing the AODELAN FT-8 receiver connected to a studio light via a sync cable and a 3.5mm to 6.3mm adapter, illustrating the wired connection method for studio lights.
Turn on the receiver using its power switch. The Status LED will illuminate.
5. Operating Instructions
5.1 Channel Selection
Both the transmitter and receiver must be set to the same channel for proper communication. Use the Channel Adjustment Buttons on both units to select a channel from 1 to 8. The selected channel number will be displayed on the unit.
5.2 Testing the Connection
After setting the channels, press the Test Button on the transmitter. The connected flash unit(s) should fire. If they do not, recheck battery installation, power switches, and channel settings.
5.3 Flash Synchronization
The AODELAN FT-8 supports a maximum flash sync speed of 1/250s. Ensure your camera's shutter speed is set to 1/250s or slower for proper synchronization with the flash.
6. Maintenance
- Cleaning: Use a soft, dry cloth to clean the units. Do not use liquid cleaners or solvents.
- Battery Replacement: Replace batteries when the Status LED indicates low power or when the units fail to operate reliably. Remove batteries if the units will not be used for an extended period.
- Storage: Store the units in a cool, dry place, away from direct sunlight and extreme temperatures.
7. Troubleshooting
| Problem | Possible Cause | Solution |
|---|---|---|
| Flash not firing |
|
|
| Intermittent firing |
|
|
| Flash not syncing properly |
|
|
8. Specifications
- Model: FT-8
- Frequency: 2.4 GHz
- Channels: 8
- Communication Range: Up to 200m (656ft)
- Max Sync Speed: 1/250s
- Power Source: 2 x AA batteries (for each unit)
- Product Dimensions: 1.61 x 3.5 x 1.61 inches (approximate, for one unit)
- Item Weight: 9.9 ounces (total for set, approximate)
- Compatible Mountings: Universal Hot Shoe (for transmitter), Hot Shoe & 3.5mm Sync Port (for receiver)
- Compatible Cameras: Canon, Nikon, Sony (Metal Hot shoe), Olympus, Panasonic, Pentax, Fuji, Samsung
9. Warranty and Support
AODELAN products are designed for reliability and performance. For warranty information, technical support, or service inquiries, please refer to the contact details provided on the product packaging or the official AODELAN website. Please retain your proof of purchase for warranty claims.
For further assistance, you may visit the AODELAN store on Amazon: AODELAN Store


