
ARB ARB601
ARB ARB601 Digital Tire Pressure Gauge User Manual
1. Introduction
This manual provides instructions for the proper use and maintenance of the ARB ARB601 Digital Tire Pressure Gauge. This device is designed to accurately measure, inflate, and deflate vehicle tire pressures, particularly beneficial for 4WD applications and off-roading where precise tire pressure adjustments are critical.
The ARB601 features a large digital display with a blue backlight, a thumb-operated inflator button, and an accessible deflator bleed button for efficient tire pressure management.

Image 1.1: The ARB ARB601 Digital Tire Pressure Gauge, showing the main unit, braided hose, and chuck.
2. Safety Information
Please read and understand all safety warnings and instructions before using this product. Failure to follow these instructions may result in property damage or personal injury.
- Always wear appropriate eye protection when working with compressed air and tires.
- Ensure the tire valve stem is clean and free of debris before attaching the chuck.
- Do not exceed the maximum pressure rating of the tire or the gauge. The ARB601 is rated for 0-200 PSI.
- Keep hands and fingers clear of moving parts during inflation/deflation.
- Store the gauge in a clean, dry place away from extreme temperatures.
- Keep out of reach of children.
3. Product Overview
The ARB601 Digital Tire Pressure Gauge is constructed with a durable metal body and features a rubber bump guard for protection against impacts. It includes a 600mm (approximately 23.6 inches) PVC coated braided hose and a 1/4" NPT fitting.
Components:
- Digital Display: Large, blue backlit screen for clear readings.
- ON Button: Powers the device on and off.
- FUNC Button: Cycles through measurement units (PSI, Bar, Kpa, KgF).
- Inflator Button: Thumb-operated button to initiate inflation when connected to an air source.
- Deflator Bleed Button: Releases air from the tire to reduce pressure.
- Braided Hose: 600mm dual swivel PVC coated hose for flexibility and durability.
- Air Chuck: Connects to the tire valve stem.
- Air Inlet: Connects to an air compressor hose (1/4" NPT fitting).
- Rubber Bump Guard: Provides protection against drops and impacts.

Image 3.1: Side view of the ARB601, highlighting the main unit and hose connection.

Image 3.2: Angled view of the ARB601, showing the robust construction.
4. Setup
4.1. Battery Installation
The ARB601 requires 2 AAA batteries for operation. To install or replace batteries:
- Locate the battery compartment cover on the back of the digital gauge unit.
- Remove the cover.
- Insert 2 AAA batteries, ensuring correct polarity (+/-).
- Replace the battery compartment cover securely.
The device is designed for up to 200 hours of runtime on a set of batteries.

Image 4.1: Close-up of the digital display and 'ON' and 'FUNC' buttons.
5. Operating Instructions
5.1. Power On/Off
- To power on the gauge, press the ON button. The display will illuminate.
- To power off, press and hold the ON button for a few seconds until the display turns off. The device also features an auto-off function to conserve battery life.
5.2. Selecting Measurement Units
- With the gauge powered on, press the FUNC button to cycle through the available measurement units: PSI, Bar, Kpa, and KgF.
- Select the desired unit before taking a measurement or adjusting pressure.
5.3. Measuring Tire Pressure
- Ensure the gauge is powered on and the correct measurement unit is selected.
- Firmly attach the air chuck to the tire valve stem. Ensure a secure connection to prevent air leakage.
- The current tire pressure will be displayed on the digital screen.
- Remove the chuck from the valve stem to stop measuring.

Image 5.1: User holding the ARB601, showing the digital display with a pressure reading.
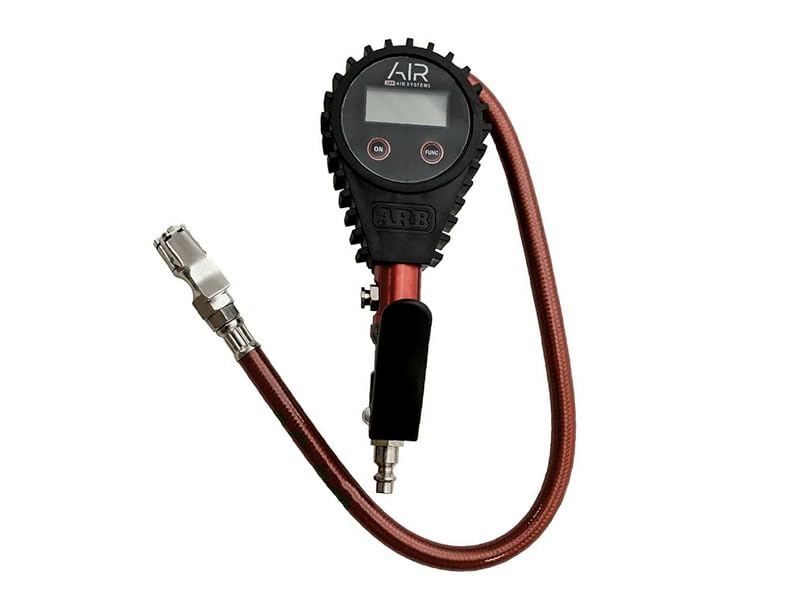
Image 5.2: The ARB601 gauge positioned on the ground near a vehicle tire.
5.4. Inflating Tires
- Connect the 1/4" NPT fitting of the gauge to a suitable air compressor hose.
- Attach the air chuck securely to the tire valve stem.
- Press and hold the Inflator Button to begin inflating the tire. The digital display will show the increasing pressure in real-time.
- Release the button when the desired pressure is reached.
- Disconnect the chuck from the tire valve.

Image 5.3: A user actively inflating a vehicle tire with the ARB601 gauge.
5.5. Deflating Tires
- Attach the air chuck securely to the tire valve stem. The current pressure will be displayed.
- Press the Deflator Bleed Button to release air from the tire. The digital display will show the decreasing pressure in real-time.
- Release the button when the desired pressure is reached.
- Disconnect the chuck from the tire valve.

Image 5.4: A user deflating a vehicle tire using the ARB601 gauge.
6. Maintenance
6.1. Cleaning
- Wipe the gauge with a soft, damp cloth. Do not use harsh chemicals or abrasive cleaners.
- Ensure the display and buttons are free from dirt and debris.
6.2. Storage
- Store the gauge in its protective pouch (if included) or a clean, dry environment.
- Avoid storing in direct sunlight or areas with extreme temperatures.
- The rubber bump guard provides protection during storage and transport.
6.3. Battery Care
- Remove batteries if the device will not be used for an extended period to prevent leakage.
- Replace batteries when the low battery indicator appears on the display.
7. Troubleshooting
| Problem | Possible Cause | Solution |
|---|---|---|
| Gauge does not power on | Dead or incorrectly installed batteries | Check battery polarity; replace batteries. |
| Inaccurate readings | Loose connection to valve stem; gauge malfunction | Ensure chuck is securely attached. If problem persists, contact support. |
| Air leaks during inflation/deflation | Improper chuck attachment; damaged chuck/hose | Re-attach chuck firmly. Inspect hose and chuck for damage. |
| Display flickering or not functioning | Low batteries; internal fault | Replace batteries. If issue continues, contact support. |
8. Specifications
- Brand: ARB
- Model: ARB601
- Material: Metal (with rubber bump guard)
- Measurement Range: 0-14 Bar, 0-200 PSI, 0-1400 Kpa, 0-14 KgF
- Accuracy: +/-1 PSI @ 25-75 PSI
- Hose Length: 600mm (PVC coated braided hose)
- Air Inlet Fitting: 1/4" NPT
- Power Source: 2 AAA batteries (required)
- Battery Runtime: Up to 200 hours
- Item Weight: Approximately 1 pound
- Product Dimensions: 10.4 x 5.2 x 3.8 inches
9. Warranty and Support
For warranty information and technical support, please refer to the documentation provided with your purchase or visit the official ARB website. Keep your proof of purchase for any warranty claims.
If you encounter issues not covered in this manual, please contact ARB customer service for assistance.
10. Official Product Videos
No official product videos with 'Seller' creator type and relevant filenames were provided in the product data to embed in this manual.
Ask a question about this manual
Ask about setup, troubleshooting, compatibility, parts, safety, or missing instructions. Manuals+ will review the question and use this page’s manual context to help answer it.