Introduction
The petwant PF-105 Automatic Pet Feeder is designed to provide scheduled meals for your pets, supporting up to 5 meals per day. It features five individual compartments, a voice recording function, and a dual power supply system to ensure consistent feeding. This manual provides detailed instructions for setup, operation, maintenance, and troubleshooting.
Package Contents
- 1x petwant PF-105 Automatic Pet Feeder
- 1x Power Adapter
Setup
1. Unpacking and Placement
Carefully remove all components from the packaging. Place the feeder on a flat, stable surface in an area accessible to your pet but away from excessive moisture or direct sunlight.

Image: Top view of the petwant PF-105 5-Meal Automatic Pet Feeder.
2. Power Supply
The feeder supports dual power supply options: an AC power adapter or 4x Size C batteries (not included). It is recommended to use both for uninterrupted operation in case of a power outage.
- AC Adapter: Connect the provided power adapter to the DC 5V port on the feeder and plug it into a standard wall outlet.
- Batteries: Open the battery compartment on the bottom of the feeder and insert 4x Size C batteries, ensuring correct polarity.

Image: Illustration of the dual power supply options, showing the battery compartment and power adapter connection.
3. Filling Food Trays
Open the top lid of the feeder. The feeder has five individual compartments, each with a capacity of 240ml. Fill each compartment with your pet's dry or semi-wet food. Ensure food does not overflow or spill into the rotation mechanism. For semi-wet food, it is recommended not to leave it in the feeder for more than 24 hours.

Image: Close-up view of the feeder showing the open lid, five food trays, and the control panel with LCD display.
Operating Instructions
The feeder features capacitive touch keys for programming. Each key press will be accompanied by an audible beep.
1. Setting the Current Time
- Press the 'SET' button to enter time setting mode.
- Use the 'UP' and 'DOWN' arrows to adjust the hour.
- Press 'SET' again to move to minute adjustment, then use 'UP' and 'DOWN' arrows.
- Press 'SET' to confirm and exit time setting.
2. Programming Meal Times
The feeder allows programming up to 5 distinct meal times per day. The settings will be retained daily without the need for reprogramming.
- Press the 'FEED' button to cycle through the meal settings (P1, P2, P3, P4, P5).
- When the desired meal program (e.g., P1) is displayed, press 'SET'.
- Use the 'UP' and 'DOWN' arrows to set the hour for this meal. Press 'SET'.
- Use the 'UP' and 'DOWN' arrows to set the minute for this meal. Press 'SET'.
- Repeat for all desired meal programs. To disable a meal, set its time to 'OFF'.
3. Voice Recording Function
The feeder includes a 10-second voice recorder to call your pet at meal times. The recorded message will play three times before each scheduled feeding.
- Press and hold the 'REC' button.
- Speak your message clearly into the microphone for up to 10 seconds.
- Release the 'REC' button to save the recording.
- To play back the recording, press the 'PLAY' button.
4. Manual Feeding
To dispense a meal manually, press the 'MANUAL' button. The feeder will rotate to the next available food compartment.
Maintenance
Cleaning the Feeder
Regular cleaning ensures hygiene and proper operation. The food tray is removable for easy cleaning.
- Turn off the feeder and disconnect the power adapter.
- Remove the top lid and lift out the food tray.
- Wash the food tray and lid with warm, soapy water. The manufacturer recommends hand washing only.
- Wipe the main unit with a damp cloth. Do not immerse the main unit in water.
- Ensure all parts are completely dry before reassembling and refilling.
Note: If using semi-wet food, clean the trays daily to prevent spoilage and bacterial growth.
Troubleshooting
- Feeder not dispensing food: Check if the power adapter is securely connected or if batteries are properly installed and have sufficient charge. Ensure no food particles are obstructing the rotation mechanism.
- Feeder dispensing at incorrect times: Verify that the current time is set correctly and that all programmed meal times are accurate. If the internal clock becomes inaccurate, reset the time settings.
- Pet accessing food prematurely: Ensure the top lid is securely fastened. If your pet is particularly persistent, consider additional securing methods to prevent unauthorized access.
- Loud beeping from buttons: The control buttons emit an audible beep upon press. This is a normal function and cannot be adjusted.
- No cooling mechanism: This feeder does not include a cooling mechanism. It is primarily designed for dry food. If using semi-wet food, ensure it is consumed within 24 hours to prevent spoilage.
Specifications
| Model Name | PF-105 |
| Dimensions (L x W x H) | 12" x 13.2" x 3.2" (30.5cm x 33.5cm x 8cm) |
| Material | Acrylonitrile Butadiene Styrene (ABS) |
| Tray Capacity | 5 x 240mL (Total 1.2L) |
| Power Supply | AC Adapter (DC 5V) and 4x Size C Batteries |
| Voice Recording | 10 seconds |
| Item Weight | 4.89 pounds |
| Certifications | CE, ROHS, FCC, REACH |
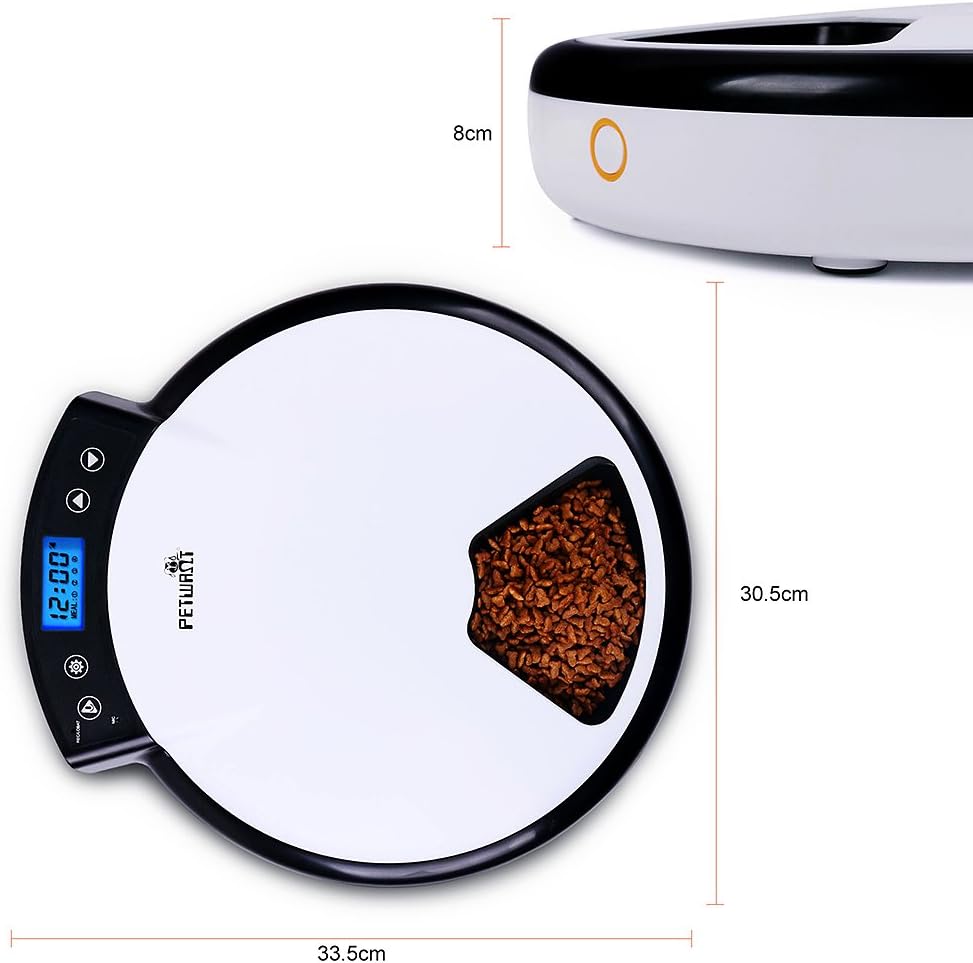
Image: Diagram illustrating the dimensions of the petwant PF-105 Automatic Pet Feeder.

Image: Certificates of Conformity for CE, RoHS, FCC, and REACH standards.
Safety Information
The petwant PF-105 feeder has passed CE, ROHS, FCC, and REACH tests, meeting quality and safety standards. Always ensure the feeder is used as directed and kept clean to maintain a safe environment for your pets.

Image: Bottom view of the feeder showing audio output, power switch, anti-slip pads, and certification labels.
Warranty and Support
Information regarding product warranty and customer support was not available in the provided product data. Please refer to the product packaging or the manufacturer's official website for details on warranty coverage and how to contact customer support.


