
ECCPP 8x6.5 to 8x6.5 spacers
ECCPP Wheel Spacers Instruction Manual
Model: 8x6.5 to 8x6.5 spacers
Introduction
This manual provides comprehensive instructions for the safe and proper installation, operation, and maintenance of your ECCPP Wheel Spacers. These spacers are designed to enhance vehicle stability and appearance by widening the wheel base. Please read this manual thoroughly before installation to ensure correct procedure and safety.

Figure 1: ECCPP 8-Lug Wheel Spacers
This image shows two ECCPP 8-lug wheel spacers, highlighting their robust construction and pre-installed studs. These spacers are designed to fit vehicles with an 8x6.5 bolt pattern.
Safety Information
WARNING: Improper installation, incompatibility, or failure to re-torque hardware can cause loss of wheel and result in serious accident, injury, or death. Always follow manufacturer specifications and consult a professional if unsure.
- Ensure the vehicle is parked on a flat, stable surface and the parking brake is engaged.
- Use appropriate safety equipment, including jack stands, wheel chocks, and personal protective equipment (gloves, eye protection).
- Never work under a vehicle supported only by a jack. Always use jack stands.
- Do not use an impact wrench for final tightening of lug nuts on the wheel spacers or the wheel itself. Use a torque wrench.
- Verify proper fitment and clearance before driving.
- Re-torque all lug nuts after the first 50-100 miles of driving, and again every 2000-3000 miles.
Product Overview and Components
ECCPP Wheel Spacers are precision-engineered from T6 billet aluminum for durability and lightweight performance. Each spacer comes with heat-treated and hardened 10.9 grade bolts pre-installed.

Figure 2: Front view of a single wheel spacer
This image displays the front face of a single wheel spacer, showing the bolt holes and the central hub bore.

Figure 3: Angled view of a single wheel spacer
This image provides an angled perspective of a single wheel spacer, highlighting its thickness and the pre-installed studs.
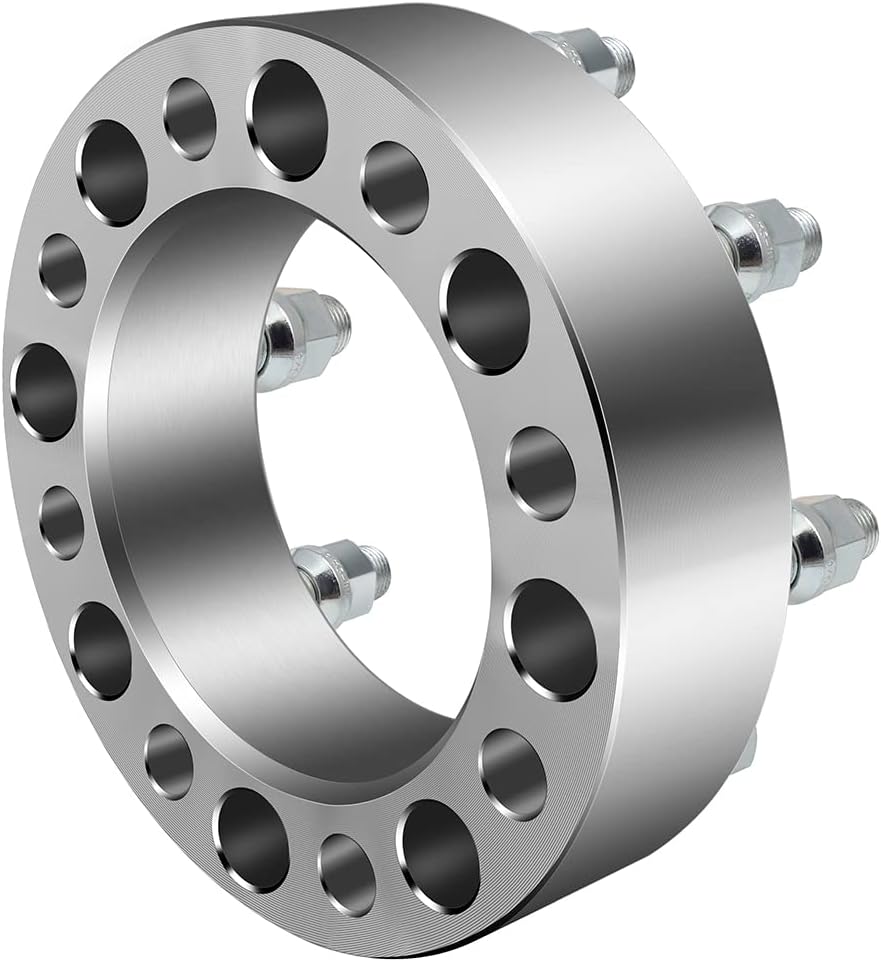
Figure 4: Close-up of a stud and nut
A detailed view of one of the pre-installed studs and a lug nut, emphasizing the 10.9 grade hardened bolts.
Compatibility
These 2-inch 8-lug wheel spacers (8x6.5 to 8x6.5) are designed to fit specific vehicle models. Please verify your vehicle's bolt pattern, thread size, and inner diameter before installation.
- Bolt Pattern: 8x6.5"
- Wheel Pattern: 8x6.5" (126.15mm)
- Thickness: 2"
- Thread Size: 9/16"
- Inner Diameter: 126.15mm
Known Fitment:
- 94-2010 for Ram 2500
- 94-2010 for Ram 3500
- 2011 for Ram 2500
- 2011 for Ram 3500
- 88-1998 for F250

Figure 5: How to Check Compatibility
This diagram illustrates the five key steps to verify compatibility: checking thickness, vehicle bolt pattern, wheel bolt pattern, inner diameter, and thread pitch.

Figure 6: Compatibility for Dodge Ram
This image visually confirms compatibility for specific Dodge Ram models, listing the years for Ram 2500 and Ram 3500.
Installation Guide
A basic understanding of automotive mechanics is recommended for installation. If you are unsure, please seek professional assistance.
Video Tutorial: Wheel Spacers Installation
Video 1: Wheel Spacers Installation Guide
This video provides a step-by-step visual guide on how to install ECCPP wheel spacers, including preparation, mounting, and tightening procedures.
Step-by-Step Installation
- Prepare the Vehicle:
Park the vehicle on a level, firm surface. Engage the parking brake. Loosen the lug nuts on the wheel you intend to work on using a lug wrench. Do not remove them completely yet.

Figure 7: Overview of Installation Steps and Required Tools
This image provides a summary of the installation process and illustrates the basic tools required, such as a wrench, jack, and brush.
- Lift the Vehicle:
Place a jack under the vehicle's frame near the wheel. Lift the vehicle until the wheel is off the ground. Secure the vehicle with jack stands for safety.
- Remove the Wheel:
Completely remove the loosened lug nuts and carefully take off the wheel. Set it aside in a safe location.
- Clean the Hub Surface:
Thoroughly clean the vehicle's hub surface to remove any rust, dirt, or debris. This ensures a flush fit for the wheel spacer. Use a wire brush and rust neutralizer if necessary.

Figure 8: Cleaning the Hub Surface
This image shows a person cleaning the vehicle's hub and brake rotor, emphasizing the importance of removing rust for proper spacer fitment.
- Mount the Wheel Spacer:
Place the wheel spacer onto the vehicle's hub, aligning the holes with the vehicle's studs. Use the provided lug nuts to hand-tighten the spacer to the vehicle's hub. Ensure the spacer sits flush against the hub.
- Torque the Spacer Lug Nuts:
Using a torque wrench, tighten the spacer lug nuts to the manufacturer's specified torque. Refer to the torque specifications table below. Tighten in a star pattern to ensure even pressure.

Figure 9: Universal Torque Specifications
This table provides universal torque specifications in FT/LBS and recommended safety thread turns for various stud sizes, including 9/16 inch relevant to these spacers.
- Reinstall the Wheel:
Place the wheel back onto the newly installed wheel spacer, aligning the wheel's bolt holes with the spacer's studs. Hand-tighten your vehicle's original lug nuts onto the spacer's studs.
- Final Torque of Wheel Lug Nuts:
Lower the vehicle slightly so the tire makes contact with the ground but the full weight is not on it. Using a torque wrench, tighten the wheel lug nuts to your vehicle manufacturer's specifications. Tighten in a star pattern. Fully lower the vehicle and remove the jack and jack stands.
- Check Clearance:
Ensure there is adequate clearance between the tire and fender, and any other suspension components. A minimum of 12mm (1/2 inch) clearance is recommended to prevent rubbing.

Figure 10: Before and After Wheel Clearance
This image visually demonstrates the increased wheel clearance and wider stance achieved after installing wheel spacers.
Operating Benefits
Installing ECCPP wheel spacers offers several operational benefits:
- Aggressive Stance: Moves wheels further out from the hub for a more assertive vehicle appearance.
- Improved Handling: Widens the vehicle's wheel base, increasing the extra gap between the tire and vehicle hub assembly, which can lead to better handling characteristics.
- Increased Stability: Lowers the center of gravity, benefiting stability at high speeds and increasing resistance to side roll-over.
- Enhanced Flexibility: Improves flexibility when turning.
- Tire Clearance: Increases tire clearance, fixes brake caliper clearance issues, and allows for the installation of lift/lowering kits and wider, larger, or high-traction tires.

Figure 11: Widened Wheel Base
This image illustrates how wheel spacers widen the vehicle's wheel base, increasing the distance between the tires and the hub assembly.

Figure 12: Lowering the Center of Gravity
This image depicts how wheel spacers contribute to lowering the vehicle's center of gravity, which can improve high-speed stability.

Figure 13: Increased Stability and Flexibility
This image shows how wheel spacers can increase vehicle stability and resistance to roll-over, while also improving turning flexibility.
Maintenance
Regular maintenance is crucial for the longevity and safety of your wheel spacers.
- Re-torque: Re-torque all lug nuts (both spacer-to-hub and wheel-to-spacer) after the first 50-100 miles of driving. This is critical as components settle.
- Periodic Checks: Re-check torque every 2000-3000 miles or during routine tire rotations.
- Inspection: Periodically inspect the spacers for any signs of wear, damage, or corrosion. Ensure all bolts are secure and there is no visible movement.
- Cleaning: Keep the spacers and hub surfaces clean to prevent rust buildup, which can affect fitment.
Troubleshooting
Common issues and their potential solutions:
| Issue | Possible Cause | Solution |
|---|---|---|
| Vibrations after installation | Improper torque, uneven seating, hub corrosion, incorrect hub-centric fitment. | Re-torque all lug nuts. Clean hub and spacer mating surfaces thoroughly. Ensure spacer is hub-centric if applicable. |
| Wheel rubbing fender/suspension | Insufficient clearance, incorrect spacer thickness. | Verify fender clearance (minimum 12mm). Consider thinner spacers or fender rolling if necessary. |
| Lug nuts loosening | Improper torque, lack of re-torquing. | Ensure correct torque specifications are met. Perform initial re-torque after 50-100 miles and regular checks. |
| Studs not long enough for wheel | Original vehicle studs too long for spacer, or wheel requires extended studs. | Buyers need to purchase extended wheel studs if the original studs protrude beyond the spacer face and interfere with the wheel. Confirm proper stud length before installation. |
Specifications
- Brand: ECCPP
- Model Number: 8x6.5 to 8x6.5 spacers (Manufacturer Part Number: 070693-8x6.5)
- Item Weight: 12.18 pounds (per pair)
- Material: T6 Billet Aluminum
- Stud Grade: 10.9 Hardened Bolts
- Bolt Pattern: 8x6.5 inches
- Thickness: 2 inches
- Thread Size: 9/16 inches
- Inner Diameter: 126.15mm
Warranty and Support
ECCPP is committed to providing quality automotive accessories. For any questions, concerns, or support regarding your wheel spacers, please contact our customer service representatives. Refer to your purchase documentation for specific warranty details.
Contact: Please refer to the contact information provided with your product packaging or on the official ECCPP website.
Ask a question about this manual
Ask about setup, troubleshooting, compatibility, parts, safety, or missing instructions. Manuals+ will review the question and use this page’s manual context to help answer it.