
Introduction
The Retro-Bit RES Plus is an 8-bit console designed to play your favorite Nintendo Entertainment System (NES) games. It offers both HDMI and AV compatibility, allowing for crisp 720p resolution on modern displays or connection to traditional televisions. This manual provides essential information for setting up, operating, and maintaining your RES Plus console.
Package Contents
- Retro-Bit RES Plus Console
- Two (2) Wired Classic Pro Controllers (6 ft. cable each)
- HDMI Cable
- AV Cable (Composite)
- Power Adapter (Micro USB cable and plug)

Image: The Retro-Bit RES Plus console, black with red accents, shown with two matching wired classic pro controllers.
Setup
1. Connecting the Console to Your Television
The RES Plus console supports both HDMI and composite AV connections.
- For HDMI (Recommended for 720p output): Connect one end of the included HDMI cable to the HDMI port on the back of the RES Plus console and the other end to an available HDMI input on your television.
- For Composite AV (Traditional TV connection): Connect the yellow, red, and white RCA plugs of the included AV cable to the corresponding input jacks on your television. Connect the other end to the AV output port on the back of the RES Plus console.

Image: A detailed view of the rear of the RES Plus console, highlighting the HDMI, composite AV (yellow, red, white), and Micro USB power ports.
2. Connecting Controllers
The RES Plus console features two NES-compatible controller ports on the front.
- Plug the included wired classic pro controllers into the controller ports on the front of the console.
- Original NES controllers and other compatible third-party NES controllers can also be used.

Image: Two black and red classic pro controllers, similar in design to original NES controllers, with their wired connectors.
3. Power Connection
Connect the Micro USB cable to the power input on the back of the console and plug the power adapter into a wall outlet.
Operating Instructions
1. Inserting Game Cartridges
Gently insert your original NES game cartridge into the top-loading cartridge slot until it is fully seated. The console is designed to allow for easy insertion and removal of cartridges without excessive force.
2. Powering On/Off
- To power on the console, slide the "ON/OFF" switch to the "ON" position. The LED power indicator will illuminate.
- To power off, slide the "ON/OFF" switch to the "OFF" position.
- Press the "RESET" button to restart the console during gameplay.
Image: A top-down view of the RES Plus console, pointing out the 8-bit cartridge slot, power switch, reset button, and LED power indicator.
3. Gameplay and Display
The RES Plus outputs video in 720p resolution via HDMI. Please note the following characteristics:
- Aspect Ratio: The console defaults to a 16:9 widescreen aspect ratio when using HDMI. Original NES games were designed for a 4:3 aspect ratio. To achieve a more authentic 4:3 display, you may need to adjust the aspect ratio settings on your television. The console itself does not have a built-in switch for aspect ratio adjustment.
- Sound Accuracy: The sound output may not be perfectly accurate to the original NES console. While generally acceptable, purists may notice slight differences.
- Zapper Light Gun: Original NES Zapper light guns are generally not compatible with modern HD televisions. They typically require a Cathode Ray Tube (CRT) television to function correctly. Compatibility with the RES Plus on CRT televisions may vary depending on the specific Zapper and TV model.
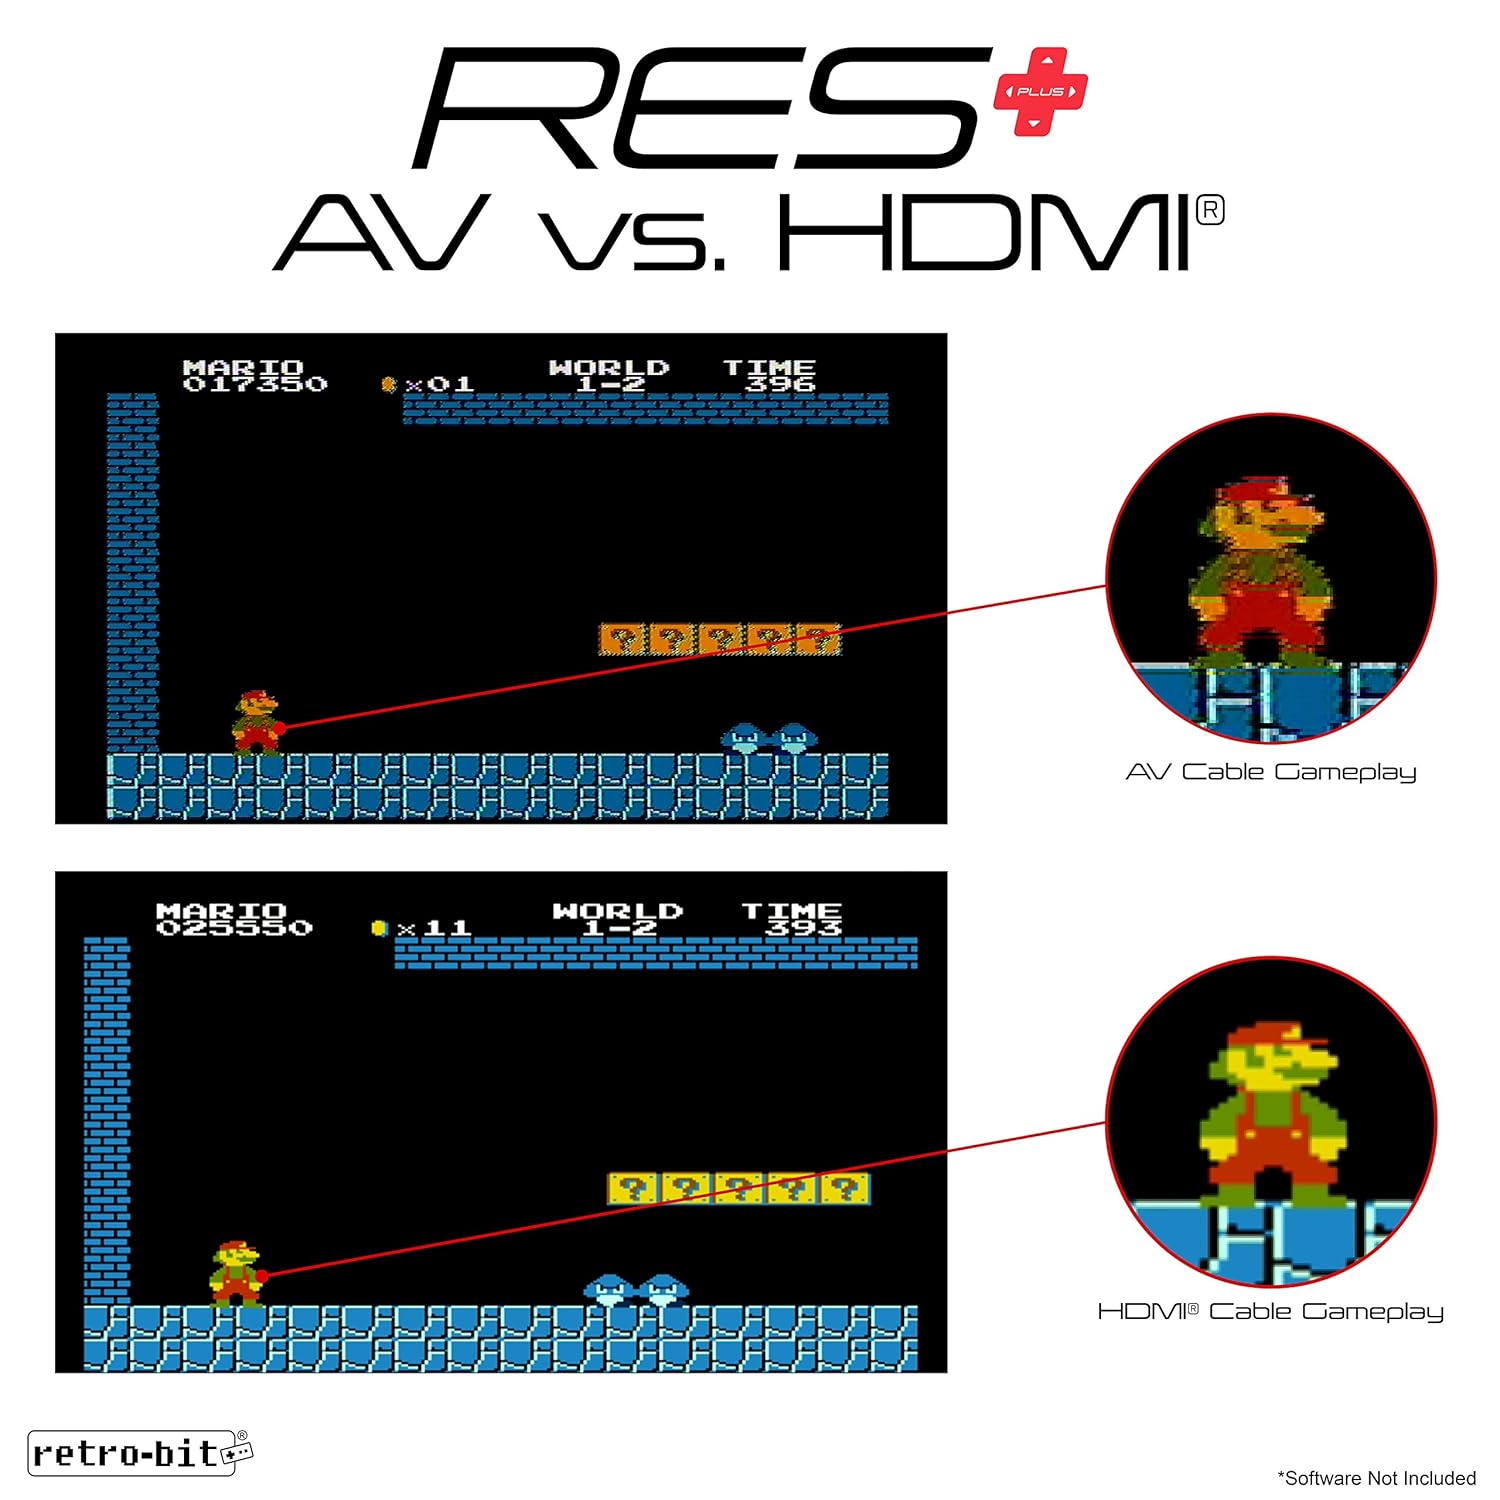
Image: A visual comparison showing the difference between AV cable gameplay (top) and HDMI cable gameplay (bottom) for an NES game, highlighting the improved clarity with HDMI.
Maintenance
- Keep the console and cartridges clean and free from dust. Use a soft, dry cloth for cleaning.
- Avoid exposing the console to extreme temperatures or direct sunlight.
- Do not store or operate the console in areas with high humidity.
- Ensure proper ventilation by not blocking the side air vents.

Image: A side view of the RES Plus console, indicating the location of the side air vents for proper cooling.
Troubleshooting
- No Video/Audio:
- Ensure all cables (HDMI/AV, power) are securely connected.
- Verify your television is set to the correct input source (HDMI 1, AV, etc.).
- Check if the console's power switch is in the "ON" position and the LED indicator is lit.
- Clean game cartridge contacts with a cotton swab and rubbing alcohol if games are not loading.
- Stretched Image (Widescreen):
- Adjust your television's aspect ratio settings to 4:3 or "Normal" mode. The console outputs 16:9 by default via HDMI.
- Controller Not Responding:
- Ensure controllers are firmly plugged into the console's front ports.
- Test with a different controller if available.
- Sound Issues:
- While sound accuracy may vary from the original NES, ensure TV volume is up and not muted.
- Check audio cable connections if using AV.
Specifications
| Model Number: | rb-nes-7390 |
| Product Dimensions: | 9.25 x 8.25 x 2.75 inches |
| Item Weight: | 1 Pound |
| Video Output: | HDMI (720p), Composite AV |
| Controller Ports: | 2 x NES-compatible ports |
| Power Input: | Micro USB |
Warranty and Support
For warranty information and customer support, please refer to the official Retro-Bit website or contact their customer service directly. Keep your purchase receipt for warranty claims.

