
Introduction
This instruction manual provides essential information for the safe and efficient operation, maintenance, and care of your Bartscher PRO II 60T coffee machine. Please read this manual thoroughly before initial use and keep it for future reference. This appliance is designed for brewing large quantities of filter coffee, suitable for commercial and event use.
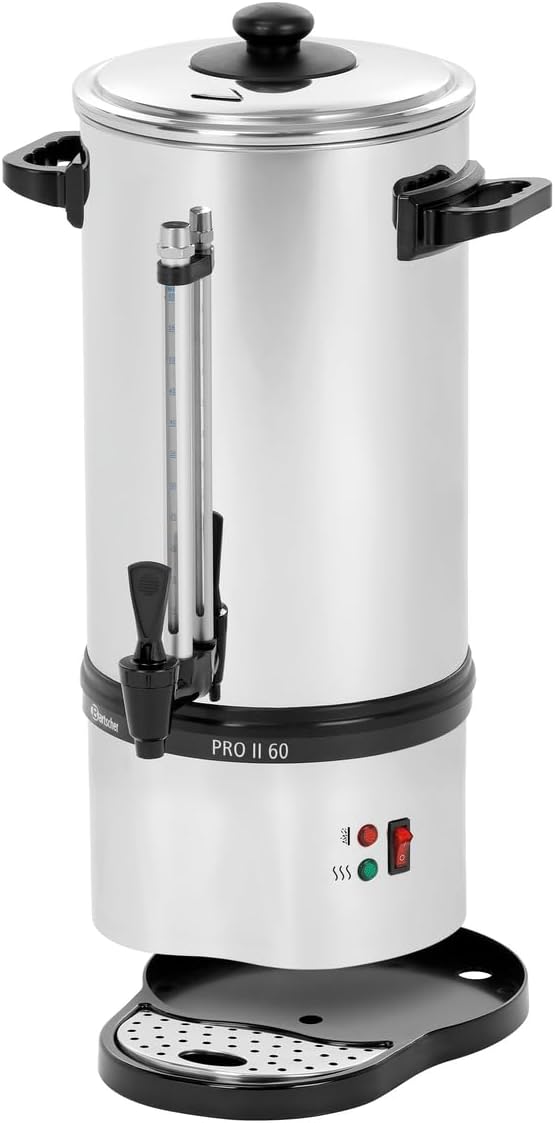
Figure 1: The Bartscher PRO II 60T coffee machine, a stainless steel appliance with a spigot and level indicator on the front, and a control panel at the base.
Safety Instructions
- Always connect the appliance to a grounded power outlet with the correct voltage (230 V, 50 Hz).
- Do not immerse the appliance, cord, or plug in water or other liquids.
- Keep the appliance out of reach of children and unauthorized personnel.
- Exercise caution when handling hot liquids and surfaces. The appliance becomes hot during operation.
- Do not operate the appliance if the power cord or plug is damaged, or if the appliance malfunctions or has been damaged in any way. Contact qualified service personnel.
- Ensure adequate ventilation around the appliance during use.
- Only use the appliance for its intended purpose: brewing coffee.
Product Overview
Main Components
- Lid: Covers the brewing chamber.
- Filter Basket: Holds coffee grounds, can be used with or without filter paper.
- Spigot: For dispensing brewed coffee.
- Level Indicator: Shows the current liquid volume inside the machine.
- Control Panel: Includes power switch, brewing indicator, and keep-warm indicator.
- Base with Drip Tray: Collects any drips from the spigot.

Figure 2: Close-up view of the control panel, showing the power switch (red), brewing indicator (red light), keep-warm indicator (green light), and the coffee spigot with the level indicator tube.
Setup
1. Unpacking and Initial Cleaning
- Remove all packaging materials and inspect the appliance for any damage.
- Wash the filter basket, lid, and interior of the coffee machine with warm soapy water. Rinse thoroughly and dry.
2. Placement
Place the coffee machine on a stable, level, and heat-resistant surface. Ensure there is sufficient space around the appliance for ventilation and safe operation.
3. Power Connection
Plug the power cord into a suitable grounded electrical outlet. Ensure the voltage matches the appliance's requirements (230V).

Figure 3: Interior view of the coffee machine, showing the heating element base and the 'MAX' fill line indicator on the inner wall.
Operation
1. Filling with Water
- Remove the lid and the filter basket.
- Fill the reservoir with cold, fresh water. The minimum capacity is 4.5 liters (30 cups), and the maximum is 9 liters (60-72 cups). Do not exceed the 'MAX' fill line.
2. Adding Coffee Grounds
- Place the filter basket back into the machine.
- Add the desired amount of ground coffee to the filter basket. The optimized stainless steel filter allows use without additional paper filters.

Figure 4: Top-down view of the filter basket containing coffee grounds, ready for brewing.

Figure 5: Top-down view of the empty stainless steel filter basket, demonstrating its design for use without paper filters.

Figure 6: The filter basket lifted out of the coffee machine, revealing the central column and heating element below.
3. Starting the Brewing Process
- Securely place the lid on the machine.
- Turn on the power switch. The red indicator light will illuminate, signaling that the brewing process has started.
- Brewing 9 liters of coffee takes approximately 50 minutes.
4. Keep-Warm Function
Once brewing is complete, the appliance automatically switches to the keep-warm function. The green indicator light will illuminate, maintaining the coffee at an optimal serving temperature.
5. Dispensing Coffee
Place a cup or carafe under the spigot and press the lever to dispense coffee. Release the lever to stop the flow.
Maintenance
1. Daily Cleaning
- After each use, unplug the machine and allow it to cool completely.
- Remove the filter basket and discard used coffee grounds.
- Wash the filter basket, lid, and the interior of the reservoir with warm soapy water. Use a soft brush for stubborn residues.
- Wipe the exterior of the appliance with a damp cloth. Do not use abrasive cleaners or scouring pads.
- Ensure all parts are thoroughly dry before reassembling or storing.
2. Descaling
The appliance features a descaling signal. When this signal activates, it indicates that descaling is required to maintain optimal performance and extend the lifespan of the machine. Use a commercial descaling agent suitable for coffee machines and follow the product's instructions carefully. Rinse the machine thoroughly after descaling.
Troubleshooting
| Problem | Possible Cause | Solution |
|---|---|---|
| Appliance does not turn on | No power supply; faulty power cord/plug | Check power connection; inspect cord/plug for damage. |
| Coffee not brewing | Insufficient water; machine not switched on | Ensure water level is above minimum; check power switch. |
| Descaling signal active | Mineral buildup in heating elements | Perform a descaling cycle as per maintenance instructions. |
| Coffee tastes weak or too strong | Incorrect coffee-to-water ratio; coffee grind size | Adjust coffee amount or water volume; use appropriate grind for filter coffee. |
Technical Specifications
| Feature | Specification |
|---|---|
| Model Name | Rundfilter-Kaffeemaschine PRO II 60T |
| Model Number | A190167 |
| Brand | Bartscher |
| Material | Stainless steel / Plastic |
| Capacity | 9 liters (approx. 60-72 cups) |
| Minimum Brewing Capacity | 4.5 liters (approx. 30 cups) |
| Brewing Time (9 liters) | Approx. 50 minutes |
| Power Connection | 1.2 kW / 230 V / 50 Hz / 1 NAC |
| Dimensions (W x D x H) | 32 cm x 31 cm x 54 cm |
| Weight | 3.8 kg |
| Special Features | Integrated descaling signal, 2 separate heating systems (brewing & keep-warm), reusable stainless steel filter |
Warranty and Support
For warranty information, technical support, or service inquiries, please refer to the warranty card included with your product or contact Bartscher customer service directly. Keep your purchase receipt as proof of purchase.


