
Introduction
This manual provides detailed instructions for the proper setup, operation, and maintenance of your Arcshell AR-5 Two-Way Radios. Please read this manual thoroughly before using your radios to ensure optimal performance and safety. The Arcshell AR-5 is designed for reliable communication across various environments, featuring a compact design, 16 channels, and a long-lasting rechargeable battery.

Image: A set of six Arcshell AR-5 two-way radios, each with an earpiece and placed in its individual charging dock.
What's in the Box
Your Arcshell AR-5 package includes the following items:
- Arcshell AR-5 Two-way Radios (quantity as purchased, e.g., 6)
- 1500mAh High Capacity Li-ion Batteries (one per radio)
- Charging Docks (one per radio)
- AC Wall Adapters (one per charging dock)
- Belt Clips (one per radio)
- Handstraps (one per radio)
- Earphones with Microphones (one per radio)
- User Manual (this document)
Product Features and Components
Familiarize yourself with the various parts and controls of your Arcshell AR-5 radio:

Image: A detailed diagram of the Arcshell AR-5 radio, highlighting key components such as the Antenna, Channel Switch, Power Switch/Volume Control, LED Indicator, Flashlight, PTT Button, SP/MIC Jacks, Moni Button, Function Button, USB Type-C Port, and Microphone.
- Antenna: For transmitting and receiving signals.
- Channel Switch: Rotary knob to select one of 16 available channels.
- Power Switch/Volume Control: Rotary knob to turn the radio on/off and adjust speaker volume.
- LED Indicator: Displays radio status (e.g., transmitting, receiving, charging).
- Flashlight: Built-in LED light for illumination.
- PTT (Push-to-Talk) Button: Press and hold to transmit your voice.
- SP/MIC Jacks: Ports for connecting external earpieces or microphones (K-type 3.5mm and 2.5mm plugs).
- Moni Button (Monitor): Used to temporarily disable squelch and listen for weak signals.
- Function Button: Programmable button for various features (e.g., scan, alarm).
- USB Type-C Port: For direct charging of the radio.
- Microphone: Built-in microphone for voice input.
Setup
1. Battery Installation
- Ensure the radio is powered off.
- Align the Li-ion battery with the battery compartment on the back of the radio.
- Slide the battery into place until it clicks securely.
- To remove, press the release latch (if present) and slide the battery out.
2. Charging the Battery
The Arcshell AR-5 offers two charging methods:
- Using the Charging Dock:
- Connect the AC wall adapter to the charging dock and plug it into a 110V-240V power outlet.
- Place the radio with the battery installed, or the battery alone, into the charging dock.
- The LED indicator on the dock will show charging status (typically red for charging, green for fully charged).
- A full charge takes approximately 2.5 hours.

Image: A single Arcshell AR-5 Li-ion battery placed in its charging dock, connected to a wall adapter.
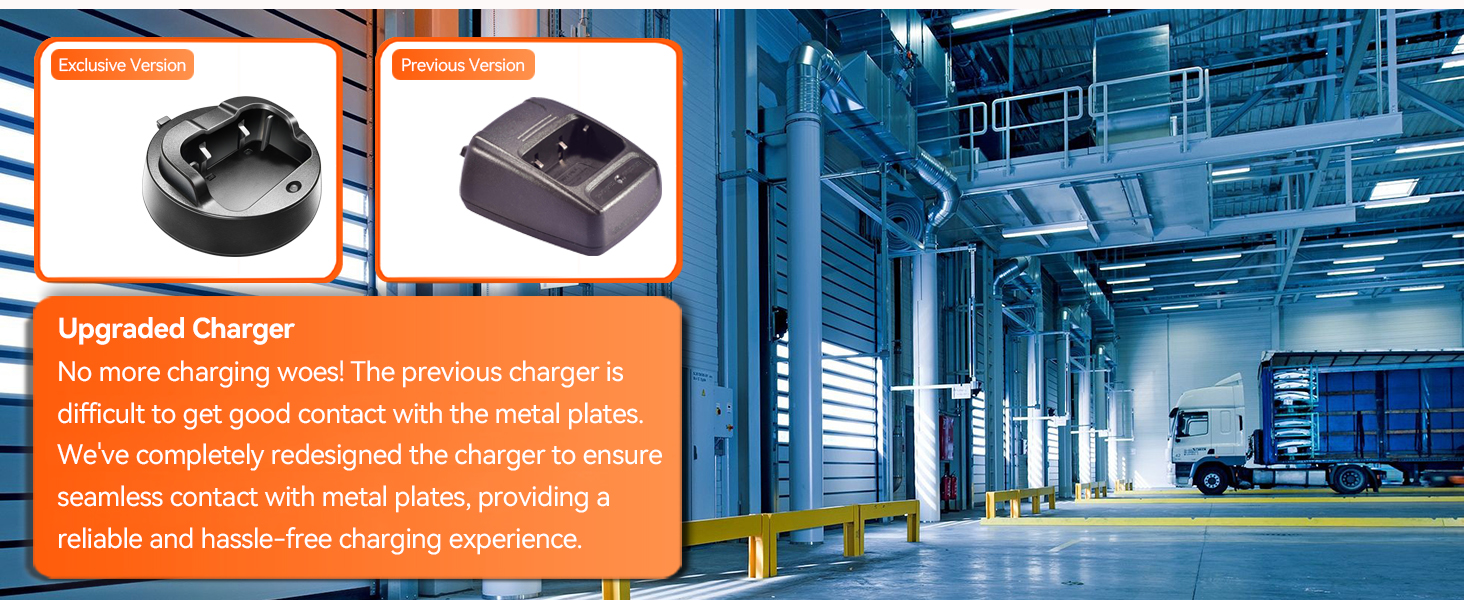
Image: A visual comparison showing the redesigned charging dock for improved contact and reliability.
- Using the USB Type-C Port:
- Connect a USB Type-C cable to the port on the side of the radio.
- Connect the other end of the cable to a compatible USB power source (e.g., power bank, car charger, computer USB port).
- This allows for convenient charging on the go.

Image: An Arcshell AR-5 radio being charged via its USB Type-C port while placed in a car's center console.

Image: A close-up side view of the Arcshell AR-5 radio, clearly showing the USB Type-C charging port.
3. Attaching the Belt Clip
The belt clip requires a small screwdriver for installation. Align the belt clip with the screw holes on the back of the radio and secure it with the provided screws.
4. Attaching the Earpiece
Plug the K-type earpiece connector (3.5mm and 2.5mm plugs) into the SP/MIC jacks on the side of the radio. When an earpiece is connected, all audio will be routed to the earpiece, and the radio's internal speaker will be silent.
Operating Instructions
1. Power On/Off and Volume Control
Rotate the Power Switch/Volume Control knob clockwise to turn the radio on. Continue rotating clockwise to increase the volume. Rotate counter-clockwise to decrease the volume and turn the radio off.
2. Channel Selection
Rotate the Channel Switch knob to select one of the 16 available channels. A synthesized voice will announce the selected channel number.
3. Transmitting and Receiving
- To Transmit: Press and hold the PTT (Push-to-Talk) button on the side of the radio. Speak clearly into the microphone. Release the PTT button when you finish speaking.
- To Receive: Ensure the PTT button is not pressed. The radio will automatically receive transmissions on the selected channel.
4. VOX Function (Voice Operated Transmission)
The radio features a VOX function for hands-free operation. When VOX is enabled, the radio will automatically transmit when it detects your voice, without needing to press the PTT button. The sensitivity of the VOX feature can typically be adjusted using programming software (not included with the radio).
5. Flashlight
The built-in LED flashlight can be activated via the Function Button or a specific key combination, depending on the radio's programming. Refer to the programming software manual for detailed instructions on flashlight activation.

Image: A collage illustrating diverse applications of the Arcshell AR-5 radio, including use around the house, camping, security teams, warehouses, retail stores, road trips, hotels, and cruise ships.
Maintenance
1. Battery Care
- Avoid fully discharging the Li-ion battery frequently to prolong its lifespan.
- Store batteries in a cool, dry place when not in use.
- Do not expose batteries to extreme temperatures or direct sunlight.
- If the radio will not be used for an extended period, charge the battery to about 50% before storing.
2. Cleaning
- Wipe the radio's exterior with a soft, damp cloth.
- Do not use harsh chemicals or abrasive cleaners.
- Ensure the radio is dry before use or charging.
Troubleshooting
| Problem | Possible Cause | Solution |
|---|---|---|
| Radio does not power on | Battery is dead or not installed correctly. | Charge the battery or ensure it is properly seated. |
| No sound from speaker | Volume is too low; earpiece is connected; squelch level too high. | Increase volume; disconnect earpiece; adjust squelch level (via software). |
| Cannot transmit or receive | Wrong channel selected; out of range; battery low. | Verify channel matches other radios; move closer; charge battery. |
| Poor audio quality | Weak signal; interference; microphone too far. | Move to a clearer area; speak closer to the microphone. |
Specifications
| Feature | Detail |
|---|---|
| Model Number | AR-5 |
| Item Weight | 0.01 ounces (approx. 6.3 oz for the radio unit) |
| Product Dimensions | 1.3 x 2.36 x 4.53 inches (D x W x H) |
| Batteries | 1500mAh Lithium Ion (included) |
| Number of Channels | 16 |
| Frequency Range | 406.1-470 MHz |
| Talking Range Maximum | Up to 5 Miles (terrain dependent) |
| Voltage | 3.7 Volts |
| Water Resistance Level | Waterproof (refer to product specifications for exact rating) |
| Special Features | Channel Monitor, Scan, Squelch level, Computer Software Programming, USB Type-C Port for Charging, Voice Operated Transmission (VOX), Voice Prompt, Built-in LED Flash Light, Noise Reduction |
| Manufacturer | Arcshell |
Warranty and Support
For warranty information and customer support, please refer to the documentation included with your product or visit the official Arcshell website. The manufacturer, Arcshell, provides support for their products.
You can visit the Arcshell Store for more information: Arcshell Store on Amazon


