
Kramer FC-7
Kramer VS-62HA 6x2 4K HDMI/Audio Automatic Matrix Switcher User Manual
Model: VS-62HA (FC-7)
1. Introduction
The Kramer VS-62HA is a high-performance 6x2 matrix switcher designed for 4K@60Hz (4:2:0) HDMI and analog audio signals. It incorporates advanced auto-switching capabilities and versatile control options, making it ideal for various professional AV environments. This device re-clocks and equalizes signals, allowing any of its six inputs to be routed to either or both of its two outputs simultaneously.
Key features include support for resolutions up to 4K@60Hz (4:2:0) and WUXGA, HDCP compliance, and comprehensive HDMI support for 3D, Deep Color, x.v.Color, Lip Sync, and various audio formats like Dolby TrueHD, Dolby Digital Plus, DTS-HD, and 7.1 PCM. The VS-62HA also features EDID capture, advanced auto AV switching (last-connected or priority), independent audio routing, and programmable Step-In over HDMI functionality.
2. Safety Information
Always read and follow all instructions carefully before operating this device. Keep this manual for future reference.
- Ensure the device is connected to a grounded power outlet.
- Do not expose the device to water or excessive moisture.
- Avoid placing the device near heat sources or in direct sunlight.
- Do not open the device casing. Refer all servicing to qualified personnel.
- Use only the power adapter supplied with the unit.
- Disconnect power before cleaning or moving the device.
3. Package Contents
Verify that all items are present in your package:
- Kramer VS-62HA 6x2 4K HDMI/Audio Automatic Matrix Switcher
- Power Adapter
- Rack Ears (for rack mounting)
- This User Manual
4. Product Overview
The VS-62HA features a user-friendly front panel for direct control and comprehensive rear panel connectivity.
4.1 Front Panel

Figure 4.1: Front and Rear Panels of the Kramer VS-62HA. The top image shows the front panel with input selection buttons, EDID controls, and analog audio controls. The bottom image shows the rear panel with HDMI inputs/outputs, analog audio inputs/outputs, control ports (RS-232, Ethernet), and power input.
The front panel provides intuitive controls for input selection, EDID management, and analog audio adjustments. It includes LED indicators for power, input status, and output status.
- INPUTS Buttons (1-6): Selects the HDMI input source.
- TO OUT 1 / TO OUT 2 Buttons: Routes the selected input to Output 1 or Output 2.
- OFF Button: Disconnects the current input from the output.
- EDID Controls: Buttons for EDID management (e.g., EDID Copy, EDID Default).
- ANALOG AUDIO Control: Volume up/down, mute, and swap functions for analog audio outputs.
- LOCK Button: Locks the front panel controls to prevent accidental changes.
- PATTERN Button: Activates an internal test pattern generator.
4.2 Rear Panel
The rear panel houses all the necessary ports for connecting your source devices, displays, and control systems.
- HDMI IN (1-6): HDMI input ports for connecting source devices.
- AUDIO IN (1-6): Analog audio input ports (3.5mm jacks) corresponding to HDMI inputs.
- HDMI OUT (1-2): HDMI output ports for connecting displays.
- AUDIO OUT (1-2): Balanced analog audio output ports (terminal blocks).
- REMOTE 1 / REMOTE 2 LEDs: Indicators for remote control status.
- SETUP DIP Switches: For initial configuration settings.
- REMOTE IR: IR receiver port for remote control.
- RS-232: Serial control port for integration with control systems.
- ETHERNET: RJ-45 port for network control and firmware updates.
- PROGRAM Button: For firmware updates.
- RESET Button: Resets the device.
- POWER Input: For connecting the external power adapter.
5. Setup and Installation
Follow these steps to set up your Kramer VS-62HA matrix switcher.
5.1 Connecting the VS-62HA
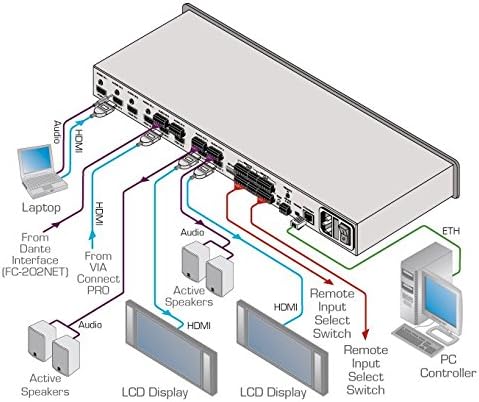
Figure 5.1: Typical Connection Diagram for the Kramer VS-62HA. This diagram illustrates how to connect various HDMI and audio sources (laptops, VIA Connect PRO, Dante Interface) to the inputs, and how to connect displays (LCD Display) and active speakers to the outputs. It also shows connections for remote input select switches and a PC controller via Ethernet.
- Power Off All Devices: Before making any connections, ensure all devices, including the VS-62HA, are powered off.
- Connect HDMI Sources: Connect your HDMI source devices (e.g., Blu-ray players, computers, media streamers) to the HDMI IN 1-6 ports on the rear panel using high-quality HDMI cables.
- Connect Analog Audio Sources (Optional): If using analog audio, connect your analog audio sources to the corresponding AUDIO IN 1-6 ports.
- Connect HDMI Displays: Connect your HDMI displays (e.g., TVs, projectors, monitors) to the HDMI OUT 1-2 ports on the rear panel.
- Connect Analog Audio Outputs: Connect your audio receivers or active speakers to the AUDIO OUT 1-2 terminal block connectors.
- Connect Control Systems (Optional):
- For RS-232 control, connect a serial cable from your control system to the RS-232 port.
- For network control, connect an Ethernet cable from your network switch/router to the ETHERNET port.
- Connect Power: Connect the supplied power adapter to the POWER input on the rear panel, then plug the adapter into a grounded AC outlet.
- Power On: Power on the VS-62HA, then power on your source devices and displays.
5.2 Rack Mounting (Optional)
The VS-62HA can be mounted in a standard 19-inch equipment rack using the supplied rack ears. Attach the rack ears to the sides of the unit using the provided screws, then secure the unit into the rack.
6. Operating the VS-62HA
The VS-62HA can be operated via its front panel, RS-232, Ethernet, or IR remote control.
6.1 Front Panel Operation
- Input Selection: Press one of the INPUTS buttons (1-6) to select the desired source.
- Output Routing: After selecting an input, press TO OUT 1 or TO OUT 2 to route the selected input to the respective output. You can route the same input to both outputs simultaneously.
- Disconnecting an Output: Press the OFF button for the desired output to disconnect the current input.
- Analog Audio Control: Use the VOL+, VOL-, MUTE, and SWAP buttons in the ANALOG AUDIO CONTROL section to adjust the analog audio output.
- EDID Management: Use the EDID buttons to copy EDID from a connected display or load a default EDID. Refer to the full technical manual for advanced EDID settings.
- Locking Controls: Press the LOCK button to disable front panel controls. Press again to unlock.
6.2 Auto Switching
The VS-62HA supports advanced auto-switching schemes. This feature allows the switcher to automatically switch to a newly connected or active input based on predefined rules (e.g., last-connected, priority). This can be configured via the web interface or RS-232 commands.
6.3 Control via RS-232 and Ethernet
For advanced control and integration into larger AV systems, the VS-62HA can be controlled via RS-232 serial commands or over an Ethernet network using its built-in web interface or Kramer's control software. Refer to the Kramer website for detailed command lists and software downloads.
7. Maintenance
Proper maintenance ensures the longevity and optimal performance of your VS-62HA.
- Cleaning: Use a soft, dry cloth to clean the exterior of the unit. Do not use liquid or aerosol cleaners.
- Ventilation: Ensure adequate ventilation around the unit. Do not block any ventilation openings.
- Firmware Updates: Periodically check the Kramer Electronics website for firmware updates to ensure your device has the latest features and bug fixes. Firmware updates can typically be performed via the Ethernet port.
8. Troubleshooting
If you encounter issues with your VS-62HA, refer to the following common problems and solutions:
| Problem | Possible Cause | Solution |
|---|---|---|
| No video output |
|
|
| No audio output |
|
|
| Front panel unresponsive |
|
|
If the problem persists, contact Kramer technical support for further assistance.
9. Specifications
Technical specifications for the Kramer VS-62HA:
| Feature | Detail |
|---|---|
| Model Number | FC-7 (VS-62HA) |
| Max. Data Rate | 8.91Gbps (2.97Gbps per graphics channel) |
| Max. Resolution | 4K@60Hz (4:2:0) and WUXGA |
| HDCP Compliance | Yes |
| HDMI Support | 3D, Deep Color, x.v.Color, Lip Sync, Dolby TrueHD, Dolby Digital Plus, DTS-HD, 7.1 PCM |
| EDID Management | EDID Capture, Non-Volatile EDID Storage |
| Audio Routing | Independent (breakaway) audio routing of embedded HDMI and analog audio |
| Control Options | IR, RS-232, Ethernet, Contact Closure, Advanced Auto Switching |
| Product Dimensions | 48.26 x 10.16 x 18.29 cm |
| Product Weight | 907.18 g |
| Manufacturer | Kramer |
| First Available Date | 22 June 2017 |
10. Warranty and Support
Kramer products are backed by a standard warranty. For specific warranty terms and conditions, please refer to the warranty card included with your product or visit the official Kramer Electronics website.
For technical support, troubleshooting assistance, or service inquiries, please contact Kramer customer support through their official website or the contact information provided in your product documentation. When contacting support, please have your product model number (VS-62HA / FC-7) and serial number ready.
Kramer Electronics Official Website: www.kramerav.com
Related documentsFC-7


Ask a question about this manual
Ask about setup, troubleshooting, compatibility, parts, safety, or missing instructions. Manuals+ will review the question and use this page’s manual context to help answer it.